Icom IC-7700 Instruction Manual - Page 50
Basic transmit operation
 |
View all Icom IC-7700 manuals
Add to My Manuals
Save this manual to your list of manuals |
Page 50 highlights
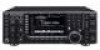
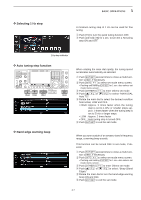
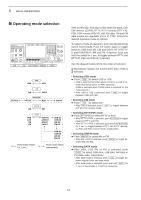
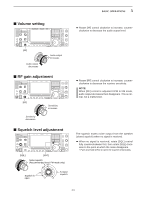
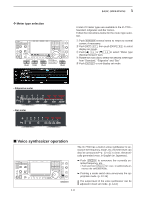
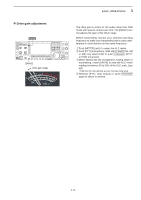
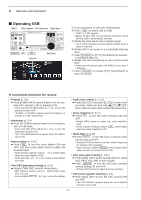
3 BASIC OPERATIONS ■ Basic transmit operation D Transmitting TRANSMIT [TX] indicator [RF PWR] D Microphone gain adjustment [MIC] METER ALC zone 5 9 +20 +40 1 +60dB 5 10 S 0 ID Po 0 10 SWR 10 COMP 50 1.5102 ALC ∞ 100 150 3 20 200 15 250 W A dB 44 52V VD Before transmitting, monitor your selected operating frequency to make sure transmitting won't cause interference to other stations on the same frequency. It's good amateur practice to listen first, and then, even if nothing is heard, ask "is the frequency in use" once or twice, before you begin operating on that frequency. Before transmitting, monitor your selected operating frequency to make sure transmitting won't cause interference to other stations on the same frequency. q Push TRANSMIT or [PTT] (microphone) to transmit. • The [TX] indicator lights red. w Push TRANSMIT again or release [PTT] (microphone) to return to receive. ✔ Adjusting the transmit output power ➥ Rotate [RF PWR]. • Adjustable range : 5 W to 200 W (AM mode: 5 W to 50 W) Decreases min. 5 W Increases max. 200 W (50 W for AM) Before transmitting, monitor your selected operating frequency to make sure transmitting won't cause interference to other stations on the same frequency. q Push [METER] (MF2) to select the ALC meter. w Push [PTT] (microphone) to transmit. • Talk into the microphone at your normal voice level. e While talking into the microphone, rotate [MIC] so that the ALC meter reading doesn't go outside the ALC zone. (see at left) r Release [PTT] (microphone) to return to receive. 3-12
-
 1
1 -
2
-
3
-
4
-
5
-
6
-
7
-
8
-
9
-
10
-
11
-
12
-
13
-
14
-
15
-
16
-
17
-
18
-
19
-
20
-
21
-
22
-
23
-
24
-
25
-
26
-
27
-
28
-
29
-
30
-
31
-
32
-
33
-
34
-
35
-
36
-
37
-
38
-
39
-
40
-
41
-
42
-
43
-
44
-
 45
45 -
 46
46 -
 47
47 -
 48
48 -
 49
49 -
 50
50 -
 51
51 -
 52
52 -
 53
53 -
 54
54 -
 55
55 -
56
-
57
-
58
-
59
-
60
-
61
-
62
-
63
-
64
-
65
-
66
-
67
-
68
-
69
-
70
-
71
-
72
-
73
-
74
-
75
-
76
-
77
-
78
-
79
-
80
-
81
-
82
-
83
-
84
-
85
-
86
-
87
-
88
-
89
-
90
-
91
-
92
-
93
-
94
-
95
-
96
-
97
-
98
-
99
-
100
-
101
-
102
-
103
-
104
-
105
-
106
-
107
-
108
-
109
-
110
-
111
-
112
-
113
-
114
-
115
-
116
-
117
-
118
-
119
-
120
-
121
-
122
-
123
-
124
-
125
-
126
-
127
-
128
-
129
-
130
-
131
-
132
-
133
-
134
-
135
-
136
-
137
-
138
-
139
-
140
-
141
-
142
-
143
-
144
-
145
-
146
-
147
-
148
-
149
-
150
-
151
-
152
-
153
-
154
-
155
-
156
-
157
-
158
-
159
-
160
-
161
-
162
-
163
-
164
-
165
-
166
-
167
-
168
-
169
-
170
-
171
-
172
-
173
-
174
-
175
-
176
-
177
-
178
-
179
-
180
-
181
-
182
-
183
-
184
-
185
-
186
-
187
-
188
-
189
-
190
-
191
-
192
-
193
-
194
-
195
-
196
-
197
-
198
-
199
-
200
-
201
-
202
-
203
-
204
-
205
-
206
-
207
-
208
-
209
-
210
-
211
-
212
-
213
-
214
-
215
-
216
 |
 |