Kenwood TS-990S Operation Manual - Page 167
Applying The Lower Limit Frequency Or Upper Limit Frequency For Center Mode To Fixed Mode
 |
View all Kenwood TS-990S manuals
Add to My Manuals
Save this manual to your list of manuals |
Page 167 highlights
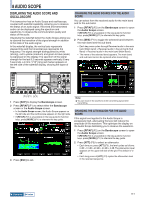
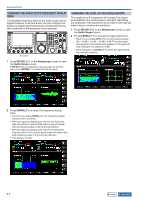
BANDSCOPE 7 APPLYING THE LOWER LIMIT FREQUENCY OR UPPER LIMIT FREQUENCY FOR CENTER MODE TO FIXED MODE The display frequency range (the lower limit frequency and the upper limit frequency) configured for Center mode can be applied to Fixed mode. This is a convenient function to quickly apply the display area for Center mode to Fixed mode. 1 Press and hold [CTR/FIX] (F3). • The lower limit frequency and upper limit frequency selected for use in Center mode replace the lower limit frequency and upper limit frequency for use in Fixed mode, and the Bandscope screen switches to Fixed mode. • If [CTR/FIX] (F5) is unavailable in the key guide, press [MORE] (F1). Note: ◆◆If the lower limit frequency and upper limit frequency are in different band, the lower limit frequency and upper limit frequency will not be refreshed and the display does not change to Fixed mode even with a long press of [CTR/FIX] (F3). ◆◆When the bandscope is switched from Center mode to Fixed mode with a long press of [CTR/FIX] (F3), the lower limit frequency and upper limit frequency will be rounded off so as to fully justify the frequency grids of the bandscope. Therefore, depending on the receive frequency, the marker display position will be shifted for one grid or less from the center. DISPLAYING THE MARKERS Markers indicate the whereabouts of the transmit and receive frequencies in the Bandscope screen. The marker for the receive frequency always appears. In split operation, a transmit frequency can easily be changed by sliding the transmit frequency marker to the desired transmit frequency spot with while viewing the Bandscope screen. ■ If the main band is displayed in the Bandscope screen 1 Press [MARKER] (F7) to alternate the marker display. • Each time you press this key, the displayed marker cycles as follows: Marker for the receive frequency of the main band only > Markers for the receive frequencies of the main band and sub band > Markers for the receive and transmit frequencies of the main band > Markers for the receive frequencies of the main band and sub band and the marker for the transmit frequency > Marker for the receive frequency of the main band only • If [MARKER] (F7) is unavailable in the key guide, press [MORE] (F1). Contents Index ■ With the Sub Band displayed in the Bandscope Screen 1 Press [MARKER] (F7) to alternate the marker display. • Each time you press this key, the displayed marker cycles as follows: Marker for the receive frequency of the sub band only > Markers for the receive frequencies of the main band and sub band > Markers for the receive and transmit frequencies of the sub band > Markers for the receive frequencies of the main band and sub band and the marker for the transmit frequency > Marker for the receive frequency of the sub band only • If [MARKER] (F7) is unavailable in the key guide, press [MORE] (F1). Note: ◆◆Frequency markers are distinguished by color as shown below. White: Receive frequency in the main band Yellow: Receive frequency in the sub band Red: Transmit frequency ◆◆Shifting the marker while the Waterfall is displayed extends the marker line to the Waterfall display area. If the marker becomes static, the marker length reverts to the original length after two seconds. 7-7
-
 1
1 -
2
-
3
-
4
-
5
-
6
-
7
-
8
-
9
-
10
-
11
-
12
-
13
-
14
-
15
-
16
-
17
-
18
-
19
-
20
-
21
-
22
-
23
-
24
-
25
-
26
-
27
-
28
-
29
-
30
-
31
-
32
-
33
-
34
-
35
-
36
-
37
-
38
-
39
-
40
-
41
-
42
-
43
-
44
-
45
-
46
-
47
-
48
-
49
-
50
-
51
-
52
-
53
-
54
-
55
-
56
-
57
-
58
-
59
-
60
-
61
-
62
-
63
-
64
-
65
-
66
-
67
-
68
-
69
-
70
-
71
-
72
-
73
-
74
-
75
-
76
-
77
-
78
-
79
-
80
-
81
-
82
-
83
-
84
-
85
-
86
-
87
-
88
-
89
-
90
-
91
-
92
-
93
-
94
-
95
-
96
-
97
-
98
-
99
-
100
-
101
-
102
-
103
-
104
-
105
-
106
-
107
-
108
-
109
-
110
-
111
-
112
-
113
-
114
-
115
-
116
-
117
-
118
-
119
-
120
-
121
-
122
-
123
-
124
-
125
-
126
-
127
-
128
-
129
-
130
-
131
-
132
-
133
-
134
-
135
-
136
-
137
-
138
-
139
-
140
-
141
-
142
-
143
-
144
-
145
-
146
-
147
-
148
-
149
-
150
-
151
-
152
-
153
-
154
-
155
-
156
-
157
-
158
-
159
-
160
-
161
-
 162
162 -
 163
163 -
 164
164 -
 165
165 -
 166
166 -
 167
167 -
 168
168 -
 169
169 -
 170
170 -
 171
171 -
 172
172 -
173
-
174
-
175
-
176
-
177
-
178
-
179
-
180
-
181
-
182
-
183
-
184
-
185
-
186
-
187
-
188
-
189
-
190
-
191
-
192
-
193
-
194
-
195
-
196
-
197
-
198
-
199
-
200
-
201
-
202
-
203
-
204
-
205
-
206
-
207
-
208
-
209
-
210
-
211
-
212
-
213
-
214
-
215
-
216
-
217
-
218
-
219
-
220
-
221
-
222
-
223
-
224
-
225
-
226
-
227
-
228
-
229
-
230
-
231
-
232
-
233
-
234
-
235
-
236
-
237
-
238
-
239
-
240
-
241
-
242
-
243
-
244
-
245
-
246
-
247
-
248
-
249
-
250
-
251
-
252
-
253
-
254
-
255
-
256
-
257
-
258
-
259
-
260
-
261
-
262
-
263
-
264
-
265
-
266
-
267
-
268
-
269
-
270
-
271
-
272
-
273
-
274
-
275
-
276
-
277
-
278
-
279
-
280
-
281
-
282
-
283
-
284
-
285
-
286
-
287
-
288
-
289
-
290
-
291
-
292
-
293
-
294
-
295
-
296
-
297
-
298
-
299
-
300
 |
 |
