Kenwood TS-990S Operation Manual - Page 170
Displaying The Transmission Signal Waveform, Operation Examples, Select], Menu]
 |
View all Kenwood TS-990S manuals
Add to My Manuals
Save this manual to your list of manuals |
Page 170 highlights
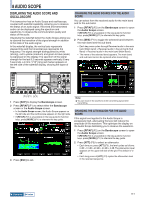
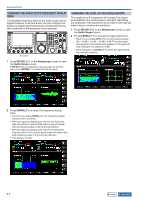
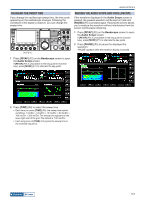
7 BANDSCOPE DISPLAYING THE TRANSMISSION SIGNAL WAVEFORM While transmitting with the bandscope displayed in Center mode, you can select whether or not to display the waveform of the transmit signal. 1 Select Group No. 8, "Bandscope", from the Menu screen. 2 Access Menu 00, "Bandscope Display during TX". 3 Press [SELECT] (F4) to allow editing of the parameter box. 4 Press [-] (F4) or [+] (F5) to select either "On" or "Off" from the parameter box. The default is "Off". 5 Press [ ] (F1). 6 Press [MENU] to exit. Note: ◆◆In Fixed mode, the transmission signal waveform cannot be displayed. OPERATION EXAMPLES The examples of receiving the actual signals are given as follows based on the function explanations described so far. Operation Example: SSB Mode 1 Select "500 [Hz]" (near the peak of the frequency spectra for the typical human vocal) in Menu 8-03, "Marker Offset Frequency (SSB Mode)". 2 Press [SCP] to display the Bandscope and Waterfall. 3 Press [CTR/FIX] (F3) to enter Center mode. 4 Press [SPAN] (F4) to select the displayed frequency span from "20 [kHz]" through "100 [kHz]". 5 Press and hold [CTR/FIX] (F3) to enter Fixed mode with the displayed frequency span retained. 6 Press [REF.LEV] (F5) to adjust the reference level in order to facilitate the signal observation on the Waterfall display. 7 Place a marker for the receive frequency to the position where the signal strength is the strongest so as to zero in. 8 Rotate the Tuning control to change the receive frequency until the receive signal is zeroed in. Operation Example: CW Mode 1 Press [SCP] to display the Bandscope and Waterfall. 2 Press [CTR/FIX] (F3) to enter Center mode. 3 Press [SPAN] (F4) to select the displayed frequency span from "5 [kHz]" through "20 [kHz]". This helps to distinguish the CW signal. 4 If you wish to observe the weak signal that hardly moves the pointer of the S-meter, select "5 [kHz]" or "10 [kHz]" for the displayed frequency span. 5 Press and hold [CTR/FIX] (F3) to enter Fixed mode with the displayed frequency span retained. 6 Place a marker for the receive frequency to the position where the signal strength is the strongest so as to zero in. • Pressing [CW T.] activates the Auto Zero-in (CW Auto Tune). • If the receive frequency is changed by long touching with your fingertip on the Bandscope screen, Auto Zero-in (CW Auto Tune) is executed without a press of [CW T.]. 7-10 Index Contents
-
 1
1 -
2
-
3
-
4
-
5
-
6
-
7
-
8
-
9
-
10
-
11
-
12
-
13
-
14
-
15
-
16
-
17
-
18
-
19
-
20
-
21
-
22
-
23
-
24
-
25
-
26
-
27
-
28
-
29
-
30
-
31
-
32
-
33
-
34
-
35
-
36
-
37
-
38
-
39
-
40
-
41
-
42
-
43
-
44
-
45
-
46
-
47
-
48
-
49
-
50
-
51
-
52
-
53
-
54
-
55
-
56
-
57
-
58
-
59
-
60
-
61
-
62
-
63
-
64
-
65
-
66
-
67
-
68
-
69
-
70
-
71
-
72
-
73
-
74
-
75
-
76
-
77
-
78
-
79
-
80
-
81
-
82
-
83
-
84
-
85
-
86
-
87
-
88
-
89
-
90
-
91
-
92
-
93
-
94
-
95
-
96
-
97
-
98
-
99
-
100
-
101
-
102
-
103
-
104
-
105
-
106
-
107
-
108
-
109
-
110
-
111
-
112
-
113
-
114
-
115
-
116
-
117
-
118
-
119
-
120
-
121
-
122
-
123
-
124
-
125
-
126
-
127
-
128
-
129
-
130
-
131
-
132
-
133
-
134
-
135
-
136
-
137
-
138
-
139
-
140
-
141
-
142
-
143
-
144
-
145
-
146
-
147
-
148
-
149
-
150
-
151
-
152
-
153
-
154
-
155
-
156
-
157
-
158
-
159
-
160
-
161
-
162
-
163
-
164
-
 165
165 -
 166
166 -
 167
167 -
 168
168 -
 169
169 -
 170
170 -
 171
171 -
 172
172 -
 173
173 -
 174
174 -
 175
175 -
176
-
177
-
178
-
179
-
180
-
181
-
182
-
183
-
184
-
185
-
186
-
187
-
188
-
189
-
190
-
191
-
192
-
193
-
194
-
195
-
196
-
197
-
198
-
199
-
200
-
201
-
202
-
203
-
204
-
205
-
206
-
207
-
208
-
209
-
210
-
211
-
212
-
213
-
214
-
215
-
216
-
217
-
218
-
219
-
220
-
221
-
222
-
223
-
224
-
225
-
226
-
227
-
228
-
229
-
230
-
231
-
232
-
233
-
234
-
235
-
236
-
237
-
238
-
239
-
240
-
241
-
242
-
243
-
244
-
245
-
246
-
247
-
248
-
249
-
250
-
251
-
252
-
253
-
254
-
255
-
256
-
257
-
258
-
259
-
260
-
261
-
262
-
263
-
264
-
265
-
266
-
267
-
268
-
269
-
270
-
271
-
272
-
273
-
274
-
275
-
276
-
277
-
278
-
279
-
280
-
281
-
282
-
283
-
284
-
285
-
286
-
287
-
288
-
289
-
290
-
291
-
292
-
293
-
294
-
295
-
296
-
297
-
298
-
299
-
300
 |
 |
