Kenwood TS-990S Operation Manual - Page 246

Mixing The Beeps, Etc. To The Received Audio Output From The Rear Panel

Page 246 highlights

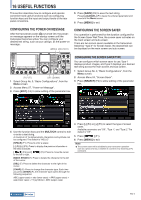
16 USEFUL FUNCTIONS MIXING THE BEEPS, ETC. TO THE RECEIVED AUDIO OUTPUT FROM THE Rear PANEL You can configure whether or not the audio emitted by the transceiver will be mixed with the received audio and transferred via the SANO and MANO pins of the ACC 2, OPTICAL OUT and (USB-B) connectors. If the beeps, voice guidance and error tones audible from the transceiver are mixed with the received audio, and, for instance, if the transceiver is installed at a distant location and operated using the KNS (KENWOOD NETWORK COMMAND SYSTEM), you can listen for such responses to the command or error tones of the unattended transceiver. 1 Select Group No. 7, "Rear Connectors", from the Menu screen. 2 Access Menu 14 "Audio Output Type (Rear Connectors)". 3 Press [SELECT] (F4) to allow editing of the parameter box. '

  • 1
  • 2
  • 3
  • 4
  • 5
  • 6
  • 7
  • 8
  • 9
  • 10
  • 11
  • 12
  • 13
  • 14
  • 15
  • 16
  • 17
  • 18
  • 19
  • 20
  • 21
  • 22
  • 23
  • 24
  • 25
  • 26
  • 27
  • 28
  • 29
  • 30
  • 31
  • 32
  • 33
  • 34
  • 35
  • 36
  • 37
  • 38
  • 39
  • 40
  • 41
  • 42
  • 43
  • 44
  • 45
  • 46
  • 47
  • 48
  • 49
  • 50
  • 51
  • 52
  • 53
  • 54
  • 55
  • 56
  • 57
  • 58
  • 59
  • 60
  • 61
  • 62
  • 63
  • 64
  • 65
  • 66
  • 67
  • 68
  • 69
  • 70
  • 71
  • 72
  • 73
  • 74
  • 75
  • 76
  • 77
  • 78
  • 79
  • 80
  • 81
  • 82
  • 83
  • 84
  • 85
  • 86
  • 87
  • 88
  • 89
  • 90
  • 91
  • 92
  • 93
  • 94
  • 95
  • 96
  • 97
  • 98
  • 99
  • 100
  • 101
  • 102
  • 103
  • 104
  • 105
  • 106
  • 107
  • 108
  • 109
  • 110
  • 111
  • 112
  • 113
  • 114
  • 115
  • 116
  • 117
  • 118
  • 119
  • 120
  • 121
  • 122
  • 123
  • 124
  • 125
  • 126
  • 127
  • 128
  • 129
  • 130
  • 131
  • 132
  • 133
  • 134
  • 135
  • 136
  • 137
  • 138
  • 139
  • 140
  • 141
  • 142
  • 143
  • 144
  • 145
  • 146
  • 147
  • 148
  • 149
  • 150
  • 151
  • 152
  • 153
  • 154
  • 155
  • 156
  • 157
  • 158
  • 159
  • 160
  • 161
  • 162
  • 163
  • 164
  • 165
  • 166
  • 167
  • 168
  • 169
  • 170
  • 171
  • 172
  • 173
  • 174
  • 175
  • 176
  • 177
  • 178
  • 179
  • 180
  • 181
  • 182
  • 183
  • 184
  • 185
  • 186
  • 187
  • 188
  • 189
  • 190
  • 191
  • 192
  • 193
  • 194
  • 195
  • 196
  • 197
  • 198
  • 199
  • 200
  • 201
  • 202
  • 203
  • 204
  • 205
  • 206
  • 207
  • 208
  • 209
  • 210
  • 211
  • 212
  • 213
  • 214
  • 215
  • 216
  • 217
  • 218
  • 219
  • 220
  • 221
  • 222
  • 223
  • 224
  • 225
  • 226
  • 227
  • 228
  • 229
  • 230
  • 231
  • 232
  • 233
  • 234
  • 235
  • 236
  • 237
  • 238
  • 239
  • 240
  • 241
  • 242
  • 243
  • 244
  • 245
  • 246
  • 247
  • 248
  • 249
  • 250
  • 251
  • 252
  • 253
  • 254
  • 255
  • 256
  • 257
  • 258
  • 259
  • 260
  • 261
  • 262
  • 263
  • 264
  • 265
  • 266
  • 267
  • 268
  • 269
  • 270
  • 271
  • 272
  • 273
  • 274
  • 275
  • 276
  • 277
  • 278
  • 279
  • 280
  • 281
  • 282
  • 283
  • 284
  • 285
  • 286
  • 287
  • 288
  • 289
  • 290
  • 291
  • 292
  • 293
  • 294
  • 295
  • 296
  • 297
  • 298
  • 299
  • 300

16 USEFUL FUNCTIONS
16-6
Index
Contents
MIXING THE BEEPS, ETC. TO THE RECEIVED
AUDIO OUTPUT FROM THE REAR PANEL
You can configure whether or not the audio emitted by
the transceiver will be mixed with the received audio and
transferred via the SANO and MANO pins of the
ACC 2
,
OPTICAL OUT
and
(USB-B) connectors.
If the beeps, voice guidance and error tones audible from
the transceiver are mixed with the received audio, and, for
instance, if the transceiver is installed at a distant location
and operated using the KNS (KENWOOD NETWORK
COMMAND SYSTEM), you can listen for such responses
to the command or error tones of the unattended
transceiver.
1
Select Group No. 7, "Rear Connectors", from the
Menu
screen.
2
Access Menu 14 "Audio Output Type (Rear
Connectors)".
3
Press
[SELECT]
(F4) to allow editing of the parameter
box.
4
Press
[-]
(F4) or
[+]
(F5) to select "All" (mixing the
audio) or "Received Audio Only".
The default is "All".
5
Press
[
]
(F1).
6
Press
[MENU]
to exit.
Note:
If "All" is configured in Menu 7-14, the transceiver transfers the
beeps, voice guidance, audio in the voice message memory,
recorded audio and sidetones from the rear panel connectors.
If you intend to decode the digital modulated signal using an
external device, select "Received Audio Only" for this function.
PF KEYS ±PROGRAMMABLE FUNCTION KEYS²
You can assign various functions of the transceiver to the
PF keys. If you assign a frequently used function or menu
to the PF key, you can activate that function or select the
menu by pressing the PF key.
Frequently used functions, such as access to the
Menu
screen, can be assigned to the front panel keys and
the memory channels. For details, refer to the list of
programmable functions.
{page 16-8}
You can allocate functions to the following PF keys:
Front panel: [PF A], [PF B], [VOICE] (M), and [VOICE] (S)
Microphone: [PF 1] to [PF 4], [DOWN], and [UP].
External equipment (self-made PF keys): [PF 1] (External) to
[PF 8] (External).
[F1]~[F7]
[MENU]
F[ADV.]
ASSIGNING VARIOUS FUNCTIONS TO THE FRONT
PANEL PF KEYS
You can assign various functions to the four PF keys on
the front panel.
1
Select Group No. 0, "Basic Configurations", from the
Menu
screen.
2
Access the desired menu from Menu 15, "PF A: Key
Assignment", to Menu 18, "VOICE (Sub Band): Key:
Key Assignment".
3
Press
[SELECT]
(F4) to allow editing of the parameter
box.
4
Press
[-]
(F4) or
[+]
(F5), or rotate the
MULTI/CH
control to select the function to be assigned to a PF
key.
The front panel has four PF keys. Refer to the List of
Functions for Key Assignment for the defaults of each PF
keys.
{page 16-8}
5
Press
[
]
(F1).
6
Press
[MENU]
to exit.