Kenwood TS-990S Operation Manual - Page 234
Configuring The Timezone For The Local Clock, Configuring The Date Display Format
 |
View all Kenwood TS-990S manuals
Add to My Manuals
Save this manual to your list of manuals |
Page 234 highlights
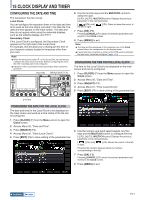
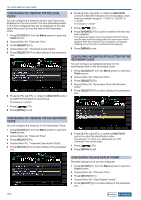
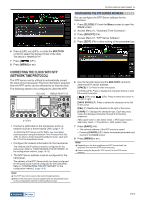
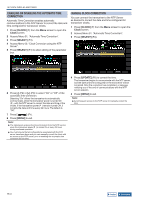
15 CLOCK DISPLAY AND TIMER CONFIGURING THE TIMEZONE FOR THE LOCAL CLOCK You can configure the timezone of the Local Clock to be displayed on the main screen. The time calculated based on the time configured here will be displayed on the right side of the Local Clock as the time for the Secondary Clock. 1 Press [CLOCK] (F) from the Menu screen to open the Clock screen. 2 Access Menu 00, "Date and Time". 3 Press [SELECT] (F4). 4 Access Menu 02, "Timezone (Local Clock)". 5 Press [SELECT] (F4) to allow editing of the parameter box. 6 Press [-] (F2), [+] (F3), or rotate the MULTI/CH control to select the timezone for Local Clock. The default is "+09:00". 7 Press [ ] (F1). 8 Press [MENU] to exit. 6 Press [-] (F2) or [+] (F3), or rotate the MULTI/CH control to select the timezone for the secondary clock from the available range of "-14:00" to "+00:00" to "+14:00". The default is "+00:00" 7 Press [ ] (F1). 8 Press [UPDATE] (F6) to confirm whether the time has been updated. The transceiver begins to communicate to the NTP server, and the date and time configured for the transceiver will be updated. After the correction has completed, a message notifying you of the end of communications appears. 9 Press [MENU] to exit. CONFIGURING AN IDENTIFICATION LETTER FOR THE SECONDARY CLOCK You can configure an alphabetical letter for the identification letter of the Secondary Clock. 1 Press [CLOCK] (F) from the Menu screen to open the Clock screen. 2 Access Menu 00, "Date and Time". 3 Press [SELECT] (F4). 4 Access Menu 04, "Secondary Clock Identification Letter". 5 Press [SELECT] (F4) to allow editing of the parameter box. CONFIGURING THE TIMEZONE FOR THE SECONDARY CLOCK You can configure the timezone for the Secondary Clock. 1 Press [CLOCK] (F) from the Menu screen to open the Clock screen. 2 Access Menu 00, "Date and Time". 3 Press [SELECT] (F4). 4 Access Menu 03, "Timezone (Secondary Clock)". 5 Press [SELECT] (F4) to allow editing of the parameter box. 6 Press [-] (F2) or [+] (F3), or rotate the MULTI/CH control to select the identification letter. The default is "U" which is an abbreviation for UTC (Universal Time Coordinated). 7 Press [ ] (F1). 8 Press [MENU] to exit. CONFIGURING THE DATE DISPLAY FORMAT The date display format can be configured. 1 Press [CLOCK] (F) from the Menu screen to open the Clock screen. 2 Access Menu 00, "Date and Time". 3 Press [SELECT] (F4). 4 Access Menu 05, "Date Display Format". 5 Press [SELECT] (F4) to allow editing of the parameter box. 15-2 Index Contents
-
 1
1 -
2
-
3
-
4
-
5
-
6
-
7
-
8
-
9
-
10
-
11
-
12
-
13
-
14
-
15
-
16
-
17
-
18
-
19
-
20
-
21
-
22
-
23
-
24
-
25
-
26
-
27
-
28
-
29
-
30
-
31
-
32
-
33
-
34
-
35
-
36
-
37
-
38
-
39
-
40
-
41
-
42
-
43
-
44
-
45
-
46
-
47
-
48
-
49
-
50
-
51
-
52
-
53
-
54
-
55
-
56
-
57
-
58
-
59
-
60
-
61
-
62
-
63
-
64
-
65
-
66
-
67
-
68
-
69
-
70
-
71
-
72
-
73
-
74
-
75
-
76
-
77
-
78
-
79
-
80
-
81
-
82
-
83
-
84
-
85
-
86
-
87
-
88
-
89
-
90
-
91
-
92
-
93
-
94
-
95
-
96
-
97
-
98
-
99
-
100
-
101
-
102
-
103
-
104
-
105
-
106
-
107
-
108
-
109
-
110
-
111
-
112
-
113
-
114
-
115
-
116
-
117
-
118
-
119
-
120
-
121
-
122
-
123
-
124
-
125
-
126
-
127
-
128
-
129
-
130
-
131
-
132
-
133
-
134
-
135
-
136
-
137
-
138
-
139
-
140
-
141
-
142
-
143
-
144
-
145
-
146
-
147
-
148
-
149
-
150
-
151
-
152
-
153
-
154
-
155
-
156
-
157
-
158
-
159
-
160
-
161
-
162
-
163
-
164
-
165
-
166
-
167
-
168
-
169
-
170
-
171
-
172
-
173
-
174
-
175
-
176
-
177
-
178
-
179
-
180
-
181
-
182
-
183
-
184
-
185
-
186
-
187
-
188
-
189
-
190
-
191
-
192
-
193
-
194
-
195
-
196
-
197
-
198
-
199
-
200
-
201
-
202
-
203
-
204
-
205
-
206
-
207
-
208
-
209
-
210
-
211
-
212
-
213
-
214
-
215
-
216
-
217
-
218
-
219
-
220
-
221
-
222
-
223
-
224
-
225
-
226
-
227
-
228
-
 229
229 -
 230
230 -
 231
231 -
 232
232 -
 233
233 -
 234
234 -
 235
235 -
 236
236 -
 237
237 -
 238
238 -
 239
239 -
240
-
241
-
242
-
243
-
244
-
245
-
246
-
247
-
248
-
249
-
250
-
251
-
252
-
253
-
254
-
255
-
256
-
257
-
258
-
259
-
260
-
261
-
262
-
263
-
264
-
265
-
266
-
267
-
268
-
269
-
270
-
271
-
272
-
273
-
274
-
275
-
276
-
277
-
278
-
279
-
280
-
281
-
282
-
283
-
284
-
285
-
286
-
287
-
288
-
289
-
290
-
291
-
292
-
293
-
294
-
295
-
296
-
297
-
298
-
299
-
300
 |
 |
