Kenwood TS-990S Operation Manual - Page 235
Correcting The Clock With Ntp (network Time Protocol), Configuring The Ntp Server Address
 |
View all Kenwood TS-990S manuals
Add to My Manuals
Save this manual to your list of manuals |
Page 235 highlights
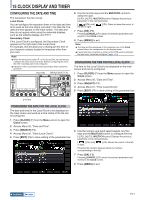
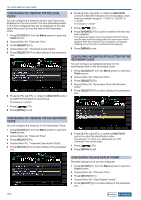
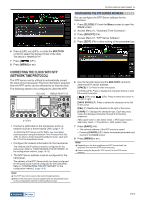
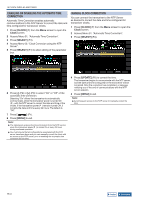
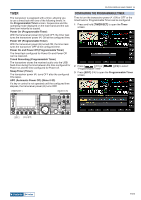
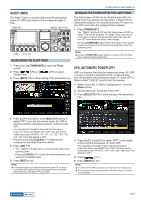
CLOCK DISPLAY AND TIMER 15 CONFIGURING THE NTP SERVER ADDRESS You can configure the NTP Server address for the transceiver. 1 Press [CLOCK] (F) from the Menu screen to open the Clock screen. 2 Access Menu 01, "Automatic Time Correction". 3 Press [SELECT] (F4). 4 Access Menu 01, "NTP Server Address". 5 Press [EDIT] (F4) to allow editing of the parameter box. 6 Press [-] (F2) or [+] (F3), or rotate the MULTI/CH control to select the display format of the date. The default is "MMM/DD/'YY". 7 Press [ ] (F1). 8 Press [MENU] to exit. CORRECTING THE CLOCK WITH NTP (NETWORK TIME PROTOCOL) The NTP server can be utilized to automatically correct the clock of the transceiver. The time information acquired from the NTP server can be reflected to an internal clock. The following needs to be configured to utilize the NTP. ' • Connect a LAN cable to the transceiver and to a network such as a home-based LAN. {page 1-9} To utilize the NTP Server via the WAN, you must allow communication using the Network Time Protocol Port (No. 123). To utilize a home-based broadband router, open port No. 123 of the broadband router. • Configure the network information for the transceiver. The network and IP address must be configured for the transceiver. Refer to "CONFIGURING THE NETWORK" for the configuration method. {page 16-12} • The NTP Server address must be configured for the transceiver. The address of the NTP Server which has been configured for the Local Clock must be configured for the transceiver. Refer to "CONFIGURING THE NTP SERVER" for the configuration method. {page 15-3} Note: ◆◆The NTP may not be used under some firewall systems. ◆◆Refer to the instruction manual supplied with the broadband router for the configuration method of the broadband router. 6 Use the function keys and the MULTI/CH control to enter the NTP server address. [SPACE] (F1): Press to enter one space. [-] (F2)/[+] (F3): Press to display the character before or after the current character. [ ] (F4) and [ the left or right. ] (F5): Press to move the cursor to [BACK SPACE] (F): Press to delete the character to the left of the cursor. [DEL] (F): Deletes the character to the right of the cursor. [CHAR] (F): Changes the character type. Each key press cycles the displayed character through the following sequence. ABC (upper case) > abc (lower case) > ÀÁÂ (upper case) > àáâ (lower case) > !"# (symbols) > ABC (upper case) 7 Press [SAVE] (F6). • The entered address of the NTP server is saved. • Pressing [CANCEL] (F7) clears the entered parameter and reverts to the Clock screen. 8 Press [MENU] to exit. Note: ◆◆Depending on the line conditions and NTP server itself, the response time from the NTP server may vary. ◆◆Search using the keywords "NTP server" for the NTP server address. Contents Index 15-3
-
 1
1 -
2
-
3
-
4
-
5
-
6
-
7
-
8
-
9
-
10
-
11
-
12
-
13
-
14
-
15
-
16
-
17
-
18
-
19
-
20
-
21
-
22
-
23
-
24
-
25
-
26
-
27
-
28
-
29
-
30
-
31
-
32
-
33
-
34
-
35
-
36
-
37
-
38
-
39
-
40
-
41
-
42
-
43
-
44
-
45
-
46
-
47
-
48
-
49
-
50
-
51
-
52
-
53
-
54
-
55
-
56
-
57
-
58
-
59
-
60
-
61
-
62
-
63
-
64
-
65
-
66
-
67
-
68
-
69
-
70
-
71
-
72
-
73
-
74
-
75
-
76
-
77
-
78
-
79
-
80
-
81
-
82
-
83
-
84
-
85
-
86
-
87
-
88
-
89
-
90
-
91
-
92
-
93
-
94
-
95
-
96
-
97
-
98
-
99
-
100
-
101
-
102
-
103
-
104
-
105
-
106
-
107
-
108
-
109
-
110
-
111
-
112
-
113
-
114
-
115
-
116
-
117
-
118
-
119
-
120
-
121
-
122
-
123
-
124
-
125
-
126
-
127
-
128
-
129
-
130
-
131
-
132
-
133
-
134
-
135
-
136
-
137
-
138
-
139
-
140
-
141
-
142
-
143
-
144
-
145
-
146
-
147
-
148
-
149
-
150
-
151
-
152
-
153
-
154
-
155
-
156
-
157
-
158
-
159
-
160
-
161
-
162
-
163
-
164
-
165
-
166
-
167
-
168
-
169
-
170
-
171
-
172
-
173
-
174
-
175
-
176
-
177
-
178
-
179
-
180
-
181
-
182
-
183
-
184
-
185
-
186
-
187
-
188
-
189
-
190
-
191
-
192
-
193
-
194
-
195
-
196
-
197
-
198
-
199
-
200
-
201
-
202
-
203
-
204
-
205
-
206
-
207
-
208
-
209
-
210
-
211
-
212
-
213
-
214
-
215
-
216
-
217
-
218
-
219
-
220
-
221
-
222
-
223
-
224
-
225
-
226
-
227
-
228
-
229
-
 230
230 -
 231
231 -
 232
232 -
 233
233 -
 234
234 -
 235
235 -
 236
236 -
 237
237 -
 238
238 -
 239
239 -
 240
240 -
241
-
242
-
243
-
244
-
245
-
246
-
247
-
248
-
249
-
250
-
251
-
252
-
253
-
254
-
255
-
256
-
257
-
258
-
259
-
260
-
261
-
262
-
263
-
264
-
265
-
266
-
267
-
268
-
269
-
270
-
271
-
272
-
273
-
274
-
275
-
276
-
277
-
278
-
279
-
280
-
281
-
282
-
283
-
284
-
285
-
286
-
287
-
288
-
289
-
290
-
291
-
292
-
293
-
294
-
295
-
296
-
297
-
298
-
299
-
300
 |
 |
