Kenwood TS-990S Operation Manual - Page 276
Firmware Updating With A Pc Connected, Preparation, Your Operation For The Transceiver And Your Pc
 |
View all Kenwood TS-990S manuals
Add to My Manuals
Save this manual to your list of manuals |
Page 276 highlights
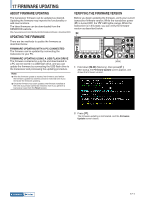
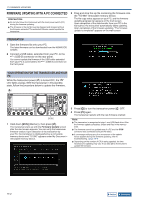
17 FIRMWARE UPDATING FIRMWARE UPDATING WITH A PC CONNECTED PRECAUTION: ◆◆Do not shut down the transceiver with the main power switch (I/O) during the firmware updating. ◆◆The firmware in the zip file must be dragged and dropped without the firmware extracted. The extracted firmware cannot update the transceiver. 2 Drag and drop the zip file containing the firmware onto the "TS-990" removable memory device. The file copy status appears on your PC, and the firmware updating progress bar appears on the main screen. Upon completion of the data transfer from your PC to the transceiver, the transceiver automatically starts updating. Upon completion of the firmware updating, "The firmware update is completed" appears on the main screen. PREPARATION 1 Save the firmware file onto your PC. The latest firmware can be downloaded from the KENWOOD website. 2 Connect a USB cable, extended from your PC, to the (USB-B) connector on the rear panel. You cannot update the firmware if the USB cable extended from your PC is connected to the (USB-A) connector on the front panel. YOUR OPERATION FOR THE TRANSCEIVER AND YOUR PC While the transceiver power ( ) is turned OFF, the " " LED lights orange. With the transceiver in this standby state, follow the procedure below to update the firmware. 1 Hold down [M.IN] (Memory), then press [ ]. The transceiver starts up with the Firmware Update screen after the start screen appears. You can verify the transceiver firmware version. Upon detection of the transceiver by your PC, the transceiver is distinguished as a removable memory device and "TS-990" appears under My Document > removable memory device. 3 Press [ ] to turn the transceiver power ( ) OFF. 4 Press [ ] again. The transceiver restarts with the new firmware enabled. Note: ◆◆The transceiver is recognized at step 1 as a USB flash drive. After the firmware update completes, folders and files in the memory area. ◆◆The firmware cannot be updated even if a PC and the COM connector was connected using an RS-232C. ◆◆If a message notifying you of an occurrence of the update failure appears during the firmware updating, refer to troubleshooting. {page 18-4} ◆◆Depending on the number of CPUs being updated, the time necessary for updating may vary. It can take 20 to 30 minutes to update the firmware. 17-2 Index Contents
-
 1
1 -
2
-
3
-
4
-
5
-
6
-
7
-
8
-
9
-
10
-
11
-
12
-
13
-
14
-
15
-
16
-
17
-
18
-
19
-
20
-
21
-
22
-
23
-
24
-
25
-
26
-
27
-
28
-
29
-
30
-
31
-
32
-
33
-
34
-
35
-
36
-
37
-
38
-
39
-
40
-
41
-
42
-
43
-
44
-
45
-
46
-
47
-
48
-
49
-
50
-
51
-
52
-
53
-
54
-
55
-
56
-
57
-
58
-
59
-
60
-
61
-
62
-
63
-
64
-
65
-
66
-
67
-
68
-
69
-
70
-
71
-
72
-
73
-
74
-
75
-
76
-
77
-
78
-
79
-
80
-
81
-
82
-
83
-
84
-
85
-
86
-
87
-
88
-
89
-
90
-
91
-
92
-
93
-
94
-
95
-
96
-
97
-
98
-
99
-
100
-
101
-
102
-
103
-
104
-
105
-
106
-
107
-
108
-
109
-
110
-
111
-
112
-
113
-
114
-
115
-
116
-
117
-
118
-
119
-
120
-
121
-
122
-
123
-
124
-
125
-
126
-
127
-
128
-
129
-
130
-
131
-
132
-
133
-
134
-
135
-
136
-
137
-
138
-
139
-
140
-
141
-
142
-
143
-
144
-
145
-
146
-
147
-
148
-
149
-
150
-
151
-
152
-
153
-
154
-
155
-
156
-
157
-
158
-
159
-
160
-
161
-
162
-
163
-
164
-
165
-
166
-
167
-
168
-
169
-
170
-
171
-
172
-
173
-
174
-
175
-
176
-
177
-
178
-
179
-
180
-
181
-
182
-
183
-
184
-
185
-
186
-
187
-
188
-
189
-
190
-
191
-
192
-
193
-
194
-
195
-
196
-
197
-
198
-
199
-
200
-
201
-
202
-
203
-
204
-
205
-
206
-
207
-
208
-
209
-
210
-
211
-
212
-
213
-
214
-
215
-
216
-
217
-
218
-
219
-
220
-
221
-
222
-
223
-
224
-
225
-
226
-
227
-
228
-
229
-
230
-
231
-
232
-
233
-
234
-
235
-
236
-
237
-
238
-
239
-
240
-
241
-
242
-
243
-
244
-
245
-
246
-
247
-
248
-
249
-
250
-
251
-
252
-
253
-
254
-
255
-
256
-
257
-
258
-
259
-
260
-
261
-
262
-
263
-
264
-
265
-
266
-
267
-
268
-
269
-
270
-
 271
271 -
 272
272 -
 273
273 -
 274
274 -
 275
275 -
 276
276 -
 277
277 -
 278
278 -
 279
279 -
 280
280 -
 281
281 -
282
-
283
-
284
-
285
-
286
-
287
-
288
-
289
-
290
-
291
-
292
-
293
-
294
-
295
-
296
-
297
-
298
-
299
-
300
 |
 |
