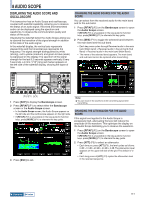
Kenwood TS-990S Operation Manual - Page 175
Transmit Functions, Selecting The Audio Line For Transmission
 |
View all Kenwood TS-990S manuals
Add to My Manuals
Save this manual to your list of manuals |
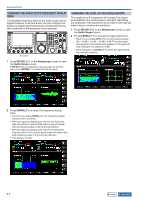
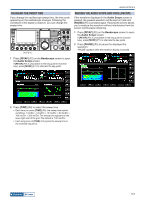
Page 175 highlights
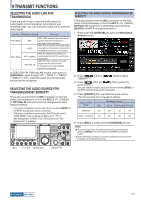
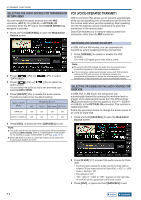
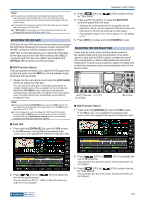
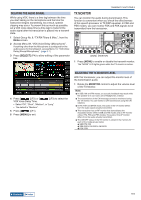
9 TRANSMIT FUNCTIONS SELECTING THE AUDIO LINE FOR TRANSMISSION There are audio lines to input the audio signal for transmission to the transceiver. According to your operating mode, you can select the audio line to enter the audio signal. Location Modulation Source Overview Front Panel Rear Panel MIC ACC2 (USB-B) OPTICAL IN With "MIC" enabled, the voice signal spoken into the microphone is sourced to the transceiver. With ACC 2 enabled, the audio signal sourced from the device connected to the ACC 2 connector is processed. With the USB Audio enabled, the audio signal from a PC is sent to the transceiver. With OPTICAL enabled, the audio signal from the audio device connected to the optical digital terminal is processed. In SSB, USB, FM, FMN and AM modes, each press of [DATA/SEL] cycles through "Off" > "DATA 1" > "DATA 2" > "DATA 3" > "Off", and three audio lines for the audio source can be configured. SELECTING THE AUDIO SOURCE FOR TRANSMISSION BY SEND/PTT The audio sourced from the MIC connector on the front panel of the transceiver or from the ACC 2, (USB-B), or OPTICAL IN connectors can be configured for each transmit method. • The audio modulation source when the front panel [SEND] or the PTT (microphone) switch is pressed • The audio modulation source when the PF key for which "DATA SEND" was configured in Menu 0-15, "PF A: Key Assignment" to Menu 0-32, "Microphone UP: Key Assignment" is pressed SELECTING THE AUDIO SOURCE TRANSMISSION BY SEND/PTT The audio sourced from the MIC connector on the front panel of this transceiver or from the ACC 2, (USB-B), OPTICAL IN connectors is transmitted upon pressing [SEND] or the PTT (microphone) switch. 1 Press and hold [DATA/SEL] to open the Modulation Source screen. 2 Press [ ] (F2) or [ "SEND/PTT". ] (F3) to select 3 Press [ ] (F4) or [ ] (F5) to select the audio source. You can select the audio source to transmit when [SEND] or the PTT (microphone) switch is pressed. 4 Press [ON/OFF] (F5) to enable the audio source. The following table shows the default settings. Status of DATA Modulation Source Mode MIC ACC 2 USB Audio OPTICAL DATA Off On Off Off Off DATA 1 to DATA 3 On Off Off Off 5 Press [ESC], or press and hold [DATA/SEL] to exit. Note: ◆◆The audio signal from the audio source will be transmitted by pressing [SEND] on the front panel or the PTT (microphone) switch. ◆◆Both USB Audio and ACC 2 cannot be enabled at the same time. Enabling one will disable the other. Contents Index 9-1
-
 1
1 -
2
-
3
-
4
-
5
-
6
-
7
-
8
-
9
-
10
-
11
-
12
-
13
-
14
-
15
-
16
-
17
-
18
-
19
-
20
-
21
-
22
-
23
-
24
-
25
-
26
-
27
-
28
-
29
-
30
-
31
-
32
-
33
-
34
-
35
-
36
-
37
-
38
-
39
-
40
-
41
-
42
-
43
-
44
-
45
-
46
-
47
-
48
-
49
-
50
-
51
-
52
-
53
-
54
-
55
-
56
-
57
-
58
-
59
-
60
-
61
-
62
-
63
-
64
-
65
-
66
-
67
-
68
-
69
-
70
-
71
-
72
-
73
-
74
-
75
-
76
-
77
-
78
-
79
-
80
-
81
-
82
-
83
-
84
-
85
-
86
-
87
-
88
-
89
-
90
-
91
-
92
-
93
-
94
-
95
-
96
-
97
-
98
-
99
-
100
-
101
-
102
-
103
-
104
-
105
-
106
-
107
-
108
-
109
-
110
-
111
-
112
-
113
-
114
-
115
-
116
-
117
-
118
-
119
-
120
-
121
-
122
-
123
-
124
-
125
-
126
-
127
-
128
-
129
-
130
-
131
-
132
-
133
-
134
-
135
-
136
-
137
-
138
-
139
-
140
-
141
-
142
-
143
-
144
-
145
-
146
-
147
-
148
-
149
-
150
-
151
-
152
-
153
-
154
-
155
-
156
-
157
-
158
-
159
-
160
-
161
-
162
-
163
-
164
-
165
-
166
-
167
-
168
-
169
-
 170
170 -
 171
171 -
 172
172 -
 173
173 -
 174
174 -
 175
175 -
 176
176 -
 177
177 -
 178
178 -
 179
179 -
 180
180 -
181
-
182
-
183
-
184
-
185
-
186
-
187
-
188
-
189
-
190
-
191
-
192
-
193
-
194
-
195
-
196
-
197
-
198
-
199
-
200
-
201
-
202
-
203
-
204
-
205
-
206
-
207
-
208
-
209
-
210
-
211
-
212
-
213
-
214
-
215
-
216
-
217
-
218
-
219
-
220
-
221
-
222
-
223
-
224
-
225
-
226
-
227
-
228
-
229
-
230
-
231
-
232
-
233
-
234
-
235
-
236
-
237
-
238
-
239
-
240
-
241
-
242
-
243
-
244
-
245
-
246
-
247
-
248
-
249
-
250
-
251
-
252
-
253
-
254
-
255
-
256
-
257
-
258
-
259
-
260
-
261
-
262
-
263
-
264
-
265
-
266
-
267
-
268
-
269
-
270
-
271
-
272
-
273
-
274
-
275
-
276
-
277
-
278
-
279
-
280
-
281
-
282
-
283
-
284
-
285
-
286
-
287
-
288
-
289
-
290
-
291
-
292
-
293
-
294
-
295
-
296
-
297
-
298
-
299
-
300
 |
 |
