Kenwood TS-990S Operation Manual - Page 177
Adjusting The Vox Gain, Acc 2, Optical In, Vox Gain], Data/sel], Multi/ch, Vox/sel]
 |
View all Kenwood TS-990S manuals
Add to My Manuals
Save this manual to your list of manuals |
Page 177 highlights
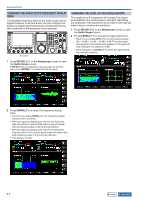
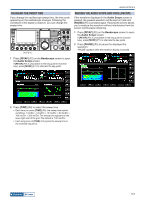
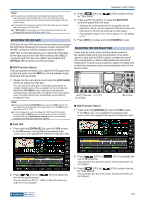
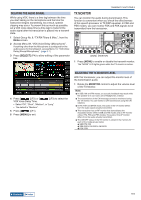
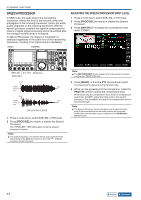
TRANSMIT FUNCTIONS 9 Note: ◆◆If the audio source with Data VOX disabled is selected while the transceiver is left connected to a PC, the transceiver may occasionally be placed in the transmit state by the signal from the audio source. ◆◆If you leave the transceiver connected to the audio source, disable the audio source for Data VOX. ◆◆If "DATA VOX" is assigned to a PF key, the audio source can be changed with a press of the key. {page 16-6} ADJUSTING THE VOX GAIN VOX Gain for the VOX function (Voice) allows you to adjust the VOX Gain following the volume of audio sourced from the MIC connector and the ambient noise conditions. Data VOX for the data allows you to adjust the VOX Gain of the data sourced from the ANI terminal of the ACC 2 connector and from the (USB-A and USB-B) and OPTICAL IN connectors on the rear panel. ■ VOX Function (Voice) VOX will operate correctly if you adjust the VOX gain level so that the audio from the MIC but not the ambient noise level keys the transmitter. 1 Speak into the microphone and rotate the [VOX GAIN] control to adjust the VOX gain. You can adjust the VOX gain, enabling the transceiver to reliably transmit each time you speak into the microphone. Rotate the VOX GAIN control clockwise to increase the sensitivity level, allowing VOX to recognize even a soft-spoken voice. The VOX function may occasionally be activated by background noise. Note: ◆◆Pressing and holding [VOX/SEL] also opens the VOX screen.You can adjust the VOX gain level of a signal input from the MIC jack in the range of "0" to "255". ◆◆In this configuration, you can adjust the VOX level for the audio sourced from the MIC jack. Even if the audio source is selected for Data VOX in the Modulation Source screen, the parameter configured for VOX Gain cannot be applied. 3 Press [ ] (F4) or [ for "VOX GAIN". ] (F5) to select the line 4 Press [-] (F6) or [+] (F7), or rotate the MULTI/CH control to adjust the VOX level. • Applying the audio signal from the modulation source selected in step 2, you can select the VOX level to allow the transceiver to transmit by receiving an audio signal. • The available range is "0" to "20" (in steps of 1). The default is "10". 5 Press [ESC], or press and hold [VOX/SEL] to exit. ADJUSTING THE VOX DELAY TIME There may be times when the transceiver reverts to the receive state during the transmission of an audio signal or data with the VOX function or when the end of your conversation or data is interrupted and cannot be transmitted. To avoid such problems, adjust the delay time so that the transceiver does not immediately revert to the receive state.
-
 1
1 -
2
-
3
-
4
-
5
-
6
-
7
-
8
-
9
-
10
-
11
-
12
-
13
-
14
-
15
-
16
-
17
-
18
-
19
-
20
-
21
-
22
-
23
-
24
-
25
-
26
-
27
-
28
-
29
-
30
-
31
-
32
-
33
-
34
-
35
-
36
-
37
-
38
-
39
-
40
-
41
-
42
-
43
-
44
-
45
-
46
-
47
-
48
-
49
-
50
-
51
-
52
-
53
-
54
-
55
-
56
-
57
-
58
-
59
-
60
-
61
-
62
-
63
-
64
-
65
-
66
-
67
-
68
-
69
-
70
-
71
-
72
-
73
-
74
-
75
-
76
-
77
-
78
-
79
-
80
-
81
-
82
-
83
-
84
-
85
-
86
-
87
-
88
-
89
-
90
-
91
-
92
-
93
-
94
-
95
-
96
-
97
-
98
-
99
-
100
-
101
-
102
-
103
-
104
-
105
-
106
-
107
-
108
-
109
-
110
-
111
-
112
-
113
-
114
-
115
-
116
-
117
-
118
-
119
-
120
-
121
-
122
-
123
-
124
-
125
-
126
-
127
-
128
-
129
-
130
-
131
-
132
-
133
-
134
-
135
-
136
-
137
-
138
-
139
-
140
-
141
-
142
-
143
-
144
-
145
-
146
-
147
-
148
-
149
-
150
-
151
-
152
-
153
-
154
-
155
-
156
-
157
-
158
-
159
-
160
-
161
-
162
-
163
-
164
-
165
-
166
-
167
-
168
-
169
-
170
-
171
-
 172
172 -
 173
173 -
 174
174 -
 175
175 -
 176
176 -
 177
177 -
 178
178 -
 179
179 -
 180
180 -
 181
181 -
 182
182 -
183
-
184
-
185
-
186
-
187
-
188
-
189
-
190
-
191
-
192
-
193
-
194
-
195
-
196
-
197
-
198
-
199
-
200
-
201
-
202
-
203
-
204
-
205
-
206
-
207
-
208
-
209
-
210
-
211
-
212
-
213
-
214
-
215
-
216
-
217
-
218
-
219
-
220
-
221
-
222
-
223
-
224
-
225
-
226
-
227
-
228
-
229
-
230
-
231
-
232
-
233
-
234
-
235
-
236
-
237
-
238
-
239
-
240
-
241
-
242
-
243
-
244
-
245
-
246
-
247
-
248
-
249
-
250
-
251
-
252
-
253
-
254
-
255
-
256
-
257
-
258
-
259
-
260
-
261
-
262
-
263
-
264
-
265
-
266
-
267
-
268
-
269
-
270
-
271
-
272
-
273
-
274
-
275
-
276
-
277
-
278
-
279
-
280
-
281
-
282
-
283
-
284
-
285
-
286
-
287
-
288
-
289
-
290
-
291
-
292
-
293
-
294
-
295
-
296
-
297
-
298
-
299
-
300
 |
 |
