Kenwood TS-990S Operation Manual - Page 171
Audio Scope, Displaying The Audio Scope And Oscilloscope
 |
View all Kenwood TS-990S manuals
Add to My Manuals
Save this manual to your list of manuals |
Page 171 highlights
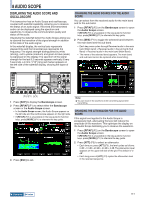
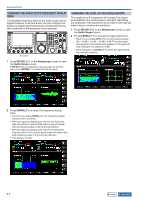
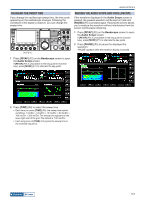
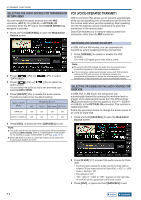
8 AUDIO SCOPE DISPLAYING THE AUDIO SCOPE AND OSCILLOSCOPE This transceiver has an Audio Scope and oscilloscope, coupled with waterfall capability, allowing you to observe the status of an audio signal. Received and transmitted audio can be displayed using the spectrum and waveforms, to observe the communication quality and status of the audio. Displaying the waterfall below the Audio Scope allows you to observe the transition of the signal strength in addition to the state of the audio signal. In the waterfall display, the vertical axis represents elapsed time and the horizontal axis represents the frequency. The signal strength distinguished by white (strong), red to yellow (medium) and green to blue (weak) is expressed on the display. The spectrum of the signal strength for the last 9.3 seconds appears vertically. Every 5 seconds, a 2-mm (1/10") long red marker appears on the left side of the waterfall display, showing the lapse of time. CHANGING THE AUDIO SOURCE FOR THE AUDIO SCOPE You can select from the received audio for the main band and for the sub band. 1 Press [RF/AF] (F2) on the Bandscope screen to open the Audio Scope screen. If [RF/AF] (F2) is unavailable in the key guide for function keys, press [MORE] (F1) to alternate the key guide. 2 Press [M/S] (F1) to toggle the selected band between the main band and the sub band. • Each key press cycles through Received audio in the main band (Main band) > Received audio in the sub band (Sub Band) > Received audio in the main band (Main Band). • The name of the selected band appears. The main band and sub band cannot be replaced while transmitting. 1 Press [SCP] to display the Bandscope screen. 2 Press [RF/AF] (F1) to select either the Bandscope screen or the Audio Scope screen. • In the Audio Scope screen, the Audio Scope appears on the left side and the oscilloscope appears on the right side. • If [RF/AF] (F2) is unavailable in the key guide for function keys, press [MORE] (F1) to alternate the key guide. 3 Press [ESC] to exit. Note: ◆◆You can observe the waveform of the transmitting signal while transmitting. CHANGING THE ATTENUATOR FOR THE AUDIO SCOPE If the signal level applied to the Audio Scope is excessively high, attenuating the level will reduce the amplitude of the waveform. This optimizes the display on the Audio Scope facilitating you to observe the waveform. 1 Press [RF/AF] (F2) on the Bandscope screen to open the Audio Scope screen. If [RF/AF] (F2) is unavailable in the key guide for function keys, press [MORE] (F1) to alternate the key guide. 2 Press [ATT] (F3) to select an attenuator. • Each time you press [ATT] (F3), the level cycles as follows: 0 dB > 10 dB > 20 dB > 30 dB > 0 dB. The attenuation level appears on the upper left side of the grid. The default is "0 dB". • Each long press of [ATT] (F3) cycles the attenuation level in the reversed sequence. Contents Index 8-1
-
 1
1 -
2
-
3
-
4
-
5
-
6
-
7
-
8
-
9
-
10
-
11
-
12
-
13
-
14
-
15
-
16
-
17
-
18
-
19
-
20
-
21
-
22
-
23
-
24
-
25
-
26
-
27
-
28
-
29
-
30
-
31
-
32
-
33
-
34
-
35
-
36
-
37
-
38
-
39
-
40
-
41
-
42
-
43
-
44
-
45
-
46
-
47
-
48
-
49
-
50
-
51
-
52
-
53
-
54
-
55
-
56
-
57
-
58
-
59
-
60
-
61
-
62
-
63
-
64
-
65
-
66
-
67
-
68
-
69
-
70
-
71
-
72
-
73
-
74
-
75
-
76
-
77
-
78
-
79
-
80
-
81
-
82
-
83
-
84
-
85
-
86
-
87
-
88
-
89
-
90
-
91
-
92
-
93
-
94
-
95
-
96
-
97
-
98
-
99
-
100
-
101
-
102
-
103
-
104
-
105
-
106
-
107
-
108
-
109
-
110
-
111
-
112
-
113
-
114
-
115
-
116
-
117
-
118
-
119
-
120
-
121
-
122
-
123
-
124
-
125
-
126
-
127
-
128
-
129
-
130
-
131
-
132
-
133
-
134
-
135
-
136
-
137
-
138
-
139
-
140
-
141
-
142
-
143
-
144
-
145
-
146
-
147
-
148
-
149
-
150
-
151
-
152
-
153
-
154
-
155
-
156
-
157
-
158
-
159
-
160
-
161
-
162
-
163
-
164
-
165
-
 166
166 -
 167
167 -
 168
168 -
 169
169 -
 170
170 -
 171
171 -
 172
172 -
 173
173 -
 174
174 -
 175
175 -
 176
176 -
177
-
178
-
179
-
180
-
181
-
182
-
183
-
184
-
185
-
186
-
187
-
188
-
189
-
190
-
191
-
192
-
193
-
194
-
195
-
196
-
197
-
198
-
199
-
200
-
201
-
202
-
203
-
204
-
205
-
206
-
207
-
208
-
209
-
210
-
211
-
212
-
213
-
214
-
215
-
216
-
217
-
218
-
219
-
220
-
221
-
222
-
223
-
224
-
225
-
226
-
227
-
228
-
229
-
230
-
231
-
232
-
233
-
234
-
235
-
236
-
237
-
238
-
239
-
240
-
241
-
242
-
243
-
244
-
245
-
246
-
247
-
248
-
249
-
250
-
251
-
252
-
253
-
254
-
255
-
256
-
257
-
258
-
259
-
260
-
261
-
262
-
263
-
264
-
265
-
266
-
267
-
268
-
269
-
270
-
271
-
272
-
273
-
274
-
275
-
276
-
277
-
278
-
279
-
280
-
281
-
282
-
283
-
284
-
285
-
286
-
287
-
288
-
289
-
290
-
291
-
292
-
293
-
294
-
295
-
296
-
297
-
298
-
299
-
300
 |
 |
