Kenwood TS-990S Operation Manual - Page 245
Configuring The Length Of Time For Key Long Press, Adjusting The Beep Volume
 |
View all Kenwood TS-990S manuals
Add to My Manuals
Save this manual to your list of manuals |
Page 245 highlights
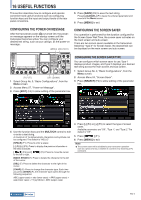
USEFUL FUNCTIONS 16 CONFIGURING THE LENGTH OF TIME FOR KEY LONG PRESS In this transceiver, with your key press on the front panel, the transceiver immediately behaves or enters another state. Also, there are functions and the configuration screen that cannot be enabled, activated or displayed without a long key press on the front panel. In this manual, the operation to activate such functions or to open the configuration screen is described as "press and hold". Some operations, such as operation using the PTT (microphone) switch, are described as "hold down". {page VII} You can configure the duration from when you press a key until the corresponding function is activated or enabled or until the configuration screen opens. The duration configured here will be applied to all operations described as "press and hold" in this manual. 1 Select Group No. 0, "Basic Configurations", from the Menu screen. 2 Access Menu 12, "Long Press Duration of Panel Keys". 3 Press [SELECT] (F4) to allow editing of the parameter box. 4 Press [-] (F4) or [+] (F5), or rotate the MULTI/CH control to select the long key press duration. • The available parameters are from "200 [ms]" to "2000 [ms]" (in steps of 100 [ms]". • The default is "500". 5 Press [ ] (F1). 6 Press [MENU] to exit. ADJUSTING THE BEEP VOLUME The transceiver beeps upon a key press or function acknowledgement. The transceiver does not beep if "Off" has been selected in Menu 1-00. 1 Select Group No. 1, "Audio Performance", from the Menu screen. 2 Access Menu 00, "Beep Volume". 3 Press [SELECT] (F4) to allow editing of the parameter box. 4 Press [-] (F4) or [+] (F5), or rotate the MULTI/CH control to select the beep volume level. • The available parameters are "Off" or from "1" to "20" (in steps of 1). • The default is "10". 5 Press [ ] (F1). 6 Press [MENU] to exit. Note: ◆◆You can configure in Menu 7-14, "Audio Output Type (Rear Connectors)", whether or not the audio emitted by the transceiver will be mixed with the received audio and transferred via the SANO and MANO pins of the ACC 2, OPTICAL OUT and (USB-B) connectors. Contents Index 16-5
-
 1
1 -
2
-
3
-
4
-
5
-
6
-
7
-
8
-
9
-
10
-
11
-
12
-
13
-
14
-
15
-
16
-
17
-
18
-
19
-
20
-
21
-
22
-
23
-
24
-
25
-
26
-
27
-
28
-
29
-
30
-
31
-
32
-
33
-
34
-
35
-
36
-
37
-
38
-
39
-
40
-
41
-
42
-
43
-
44
-
45
-
46
-
47
-
48
-
49
-
50
-
51
-
52
-
53
-
54
-
55
-
56
-
57
-
58
-
59
-
60
-
61
-
62
-
63
-
64
-
65
-
66
-
67
-
68
-
69
-
70
-
71
-
72
-
73
-
74
-
75
-
76
-
77
-
78
-
79
-
80
-
81
-
82
-
83
-
84
-
85
-
86
-
87
-
88
-
89
-
90
-
91
-
92
-
93
-
94
-
95
-
96
-
97
-
98
-
99
-
100
-
101
-
102
-
103
-
104
-
105
-
106
-
107
-
108
-
109
-
110
-
111
-
112
-
113
-
114
-
115
-
116
-
117
-
118
-
119
-
120
-
121
-
122
-
123
-
124
-
125
-
126
-
127
-
128
-
129
-
130
-
131
-
132
-
133
-
134
-
135
-
136
-
137
-
138
-
139
-
140
-
141
-
142
-
143
-
144
-
145
-
146
-
147
-
148
-
149
-
150
-
151
-
152
-
153
-
154
-
155
-
156
-
157
-
158
-
159
-
160
-
161
-
162
-
163
-
164
-
165
-
166
-
167
-
168
-
169
-
170
-
171
-
172
-
173
-
174
-
175
-
176
-
177
-
178
-
179
-
180
-
181
-
182
-
183
-
184
-
185
-
186
-
187
-
188
-
189
-
190
-
191
-
192
-
193
-
194
-
195
-
196
-
197
-
198
-
199
-
200
-
201
-
202
-
203
-
204
-
205
-
206
-
207
-
208
-
209
-
210
-
211
-
212
-
213
-
214
-
215
-
216
-
217
-
218
-
219
-
220
-
221
-
222
-
223
-
224
-
225
-
226
-
227
-
228
-
229
-
230
-
231
-
232
-
233
-
234
-
235
-
236
-
237
-
238
-
239
-
 240
240 -
 241
241 -
 242
242 -
 243
243 -
 244
244 -
 245
245 -
 246
246 -
 247
247 -
 248
248 -
 249
249 -
 250
250 -
251
-
252
-
253
-
254
-
255
-
256
-
257
-
258
-
259
-
260
-
261
-
262
-
263
-
264
-
265
-
266
-
267
-
268
-
269
-
270
-
271
-
272
-
273
-
274
-
275
-
276
-
277
-
278
-
279
-
280
-
281
-
282
-
283
-
284
-
285
-
286
-
287
-
288
-
289
-
290
-
291
-
292
-
293
-
294
-
295
-
296
-
297
-
298
-
299
-
300
 |
 |
