Kenwood TS-990S Operation Manual - Page 263
Configuring The Attenuation, Operating The Transceiver For A Voip Amateur Radio Station
 |
View all Kenwood TS-990S manuals
Add to My Manuals
Save this manual to your list of manuals |
Page 263 highlights
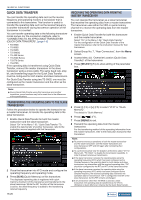
CONFIGURING THE ATTENUATION You can configure the attenuation level according to the specifications of the roofing filter that you have added. 1 Press [ADV.] (F) from the Menu screen to open the Advanced Menu screen. 2 Access Menu 07, "Attenuation (Additional Roofing Filter)". 3 Press [SELECT] (F4) to allow editing of the parameter box. 4 Press [-] (F4) or [+] (F5), or rotate the MULTI/CH control to select the attenuation level ranging from "-20" to "+20". You can configure the attenuation level of the roofing filter that you have added according to the specifications of the roofing filter. The default is "0". Match the S-meter reading of the added roofing filter with the A-meter reading of the built-in roofing filter. USEFUL FUNCTIONS 16 OPERATING THE TRANSCEIVER FOR A VOIP AMATEUR RADIO STATION If you operate the transceiver for a VoIP amateur radio station, select "SQL" from Advanced Menus 20 and 21, "MSQ/SSQ Output Conditions". If you use CTCSS as well, to avoid sending noise or unnecessary signals from the station to the Internet, select "Unmute" from Advanced Menus 16 and 17, "Muting the CTCSS tone". All received audio will then sound from the speaker regardless of the matching status of the CTCSS frequency. The received signal is transferred from the ACC 2/USB port only if the CTCSS frequency matches. CHANGING THE CTCSS MUTE '
-
 1
1 -
2
-
3
-
4
-
5
-
6
-
7
-
8
-
9
-
10
-
11
-
12
-
13
-
14
-
15
-
16
-
17
-
18
-
19
-
20
-
21
-
22
-
23
-
24
-
25
-
26
-
27
-
28
-
29
-
30
-
31
-
32
-
33
-
34
-
35
-
36
-
37
-
38
-
39
-
40
-
41
-
42
-
43
-
44
-
45
-
46
-
47
-
48
-
49
-
50
-
51
-
52
-
53
-
54
-
55
-
56
-
57
-
58
-
59
-
60
-
61
-
62
-
63
-
64
-
65
-
66
-
67
-
68
-
69
-
70
-
71
-
72
-
73
-
74
-
75
-
76
-
77
-
78
-
79
-
80
-
81
-
82
-
83
-
84
-
85
-
86
-
87
-
88
-
89
-
90
-
91
-
92
-
93
-
94
-
95
-
96
-
97
-
98
-
99
-
100
-
101
-
102
-
103
-
104
-
105
-
106
-
107
-
108
-
109
-
110
-
111
-
112
-
113
-
114
-
115
-
116
-
117
-
118
-
119
-
120
-
121
-
122
-
123
-
124
-
125
-
126
-
127
-
128
-
129
-
130
-
131
-
132
-
133
-
134
-
135
-
136
-
137
-
138
-
139
-
140
-
141
-
142
-
143
-
144
-
145
-
146
-
147
-
148
-
149
-
150
-
151
-
152
-
153
-
154
-
155
-
156
-
157
-
158
-
159
-
160
-
161
-
162
-
163
-
164
-
165
-
166
-
167
-
168
-
169
-
170
-
171
-
172
-
173
-
174
-
175
-
176
-
177
-
178
-
179
-
180
-
181
-
182
-
183
-
184
-
185
-
186
-
187
-
188
-
189
-
190
-
191
-
192
-
193
-
194
-
195
-
196
-
197
-
198
-
199
-
200
-
201
-
202
-
203
-
204
-
205
-
206
-
207
-
208
-
209
-
210
-
211
-
212
-
213
-
214
-
215
-
216
-
217
-
218
-
219
-
220
-
221
-
222
-
223
-
224
-
225
-
226
-
227
-
228
-
229
-
230
-
231
-
232
-
233
-
234
-
235
-
236
-
237
-
238
-
239
-
240
-
241
-
242
-
243
-
244
-
245
-
246
-
247
-
248
-
249
-
250
-
251
-
252
-
253
-
254
-
255
-
256
-
257
-
 258
258 -
 259
259 -
 260
260 -
 261
261 -
 262
262 -
 263
263 -
 264
264 -
 265
265 -
 266
266 -
 267
267 -
 268
268 -
269
-
270
-
271
-
272
-
273
-
274
-
275
-
276
-
277
-
278
-
279
-
280
-
281
-
282
-
283
-
284
-
285
-
286
-
287
-
288
-
289
-
290
-
291
-
292
-
293
-
294
-
295
-
296
-
297
-
298
-
299
-
300
 |
 |
