Kenwood TS-990S Operation Manual - Page 168
Off-range Markers For Frequencies Beyond The Lower And Upper Limits
 |
View all Kenwood TS-990S manuals
Add to My Manuals
Save this manual to your list of manuals |
Page 168 highlights
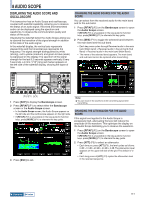
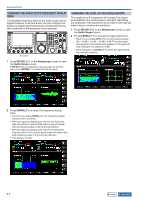
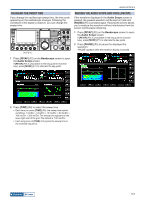
7 BANDSCOPE OFF-RANGE MARKERS FOR FREQUENCIES BEYOND THE LOWER AND UPPER LIMITS While the frequency markers appear on the bandscope and in Fixed mode, if the marked frequency goes beyond the display range of the bandscope, different markers will appear, notifying you that the marked frequency is outside the range of the bandscope. The ◁ marker will appear on the left side of the Bandscope screen if the marked frequency drops below the lower limit frequency and the ▷ marker will appear on the right side if the marked frequency exceeds the upper limit frequency. DISPLAYING THE MAXIMUM WAVEFORM VALUE Indication of the maximum waveform value to be retained and displayed on the Bandscope screen enables you to distinguish the status of the signal. ■ Displaying the Peak Values of Waveform 1 Press [SCP] to display the bandscope on the main display. 2 Press [MAX.HLD] (F7) to toggle the peak value of the waveform between maximized and normal. If [MAX.HLD] (F7) is unavailable in the key guide, press [MORE] (F1). ■ Configuring the Waveform Display Type 1 Select Group No. 8, "Bandscope", from the Menu screen. 2 Access Menu 02, "Bandscope Maximum Hold". 3 Press [SELECT] (F4) to allow editing of the parameter box. Note: ◆◆The off-range markers for frequencies beyond the upper and lower limits are distinguished by color as shown below. White: Receive frequency in the main band Yellow: Receive frequency in the sub band Red: Transmit frequency SHIFTING THE SCOPE AREA BY PLACING THE MARKER NEAR CENTER (FIXED MODE) If the frequency marker, representing the frequency received in Fixed mode, is on the edge of the display area or outside the display area, touching with your fingertip shifts the frequency marker near the center. 1 Press [MKR.CTR] (F4) to shift the marker near the center. • The scope area shifts with the same frequency width retained in order to display the marker for the selected band near the center (within one grid horizontally from the center). • If [MKR.CTR] (F4) is unavailable in the key guide, press [MORE] (F1). Note: ◆◆The marker cannot shift if the scope range is outside the lower limit frequency and upper limit frequency in a certain amateur band. ◆◆If the lower limit frequency and upper limit frequency are changed with a press of [MKR.CTR] (F4), the lower limit frequency and upper limit frequency configured in the menu will be overwritten. 4 Press [-] (F4) or [+] (F5) to select "10 [s]" or "Continuous" from the parameter box. • 10 [s]: Retains and displays the maximum waveform value of the last 10 seconds. • Continuous: Retains and displays the maximum waveform after the bandscope has appeared. • The default is "10 [s]". 5 Press [ ] (F1). 6 Press [MENU] to exit. 7-8 Index Contents
-
 1
1 -
2
-
3
-
4
-
5
-
6
-
7
-
8
-
9
-
10
-
11
-
12
-
13
-
14
-
15
-
16
-
17
-
18
-
19
-
20
-
21
-
22
-
23
-
24
-
25
-
26
-
27
-
28
-
29
-
30
-
31
-
32
-
33
-
34
-
35
-
36
-
37
-
38
-
39
-
40
-
41
-
42
-
43
-
44
-
45
-
46
-
47
-
48
-
49
-
50
-
51
-
52
-
53
-
54
-
55
-
56
-
57
-
58
-
59
-
60
-
61
-
62
-
63
-
64
-
65
-
66
-
67
-
68
-
69
-
70
-
71
-
72
-
73
-
74
-
75
-
76
-
77
-
78
-
79
-
80
-
81
-
82
-
83
-
84
-
85
-
86
-
87
-
88
-
89
-
90
-
91
-
92
-
93
-
94
-
95
-
96
-
97
-
98
-
99
-
100
-
101
-
102
-
103
-
104
-
105
-
106
-
107
-
108
-
109
-
110
-
111
-
112
-
113
-
114
-
115
-
116
-
117
-
118
-
119
-
120
-
121
-
122
-
123
-
124
-
125
-
126
-
127
-
128
-
129
-
130
-
131
-
132
-
133
-
134
-
135
-
136
-
137
-
138
-
139
-
140
-
141
-
142
-
143
-
144
-
145
-
146
-
147
-
148
-
149
-
150
-
151
-
152
-
153
-
154
-
155
-
156
-
157
-
158
-
159
-
160
-
161
-
162
-
 163
163 -
 164
164 -
 165
165 -
 166
166 -
 167
167 -
 168
168 -
 169
169 -
 170
170 -
 171
171 -
 172
172 -
 173
173 -
174
-
175
-
176
-
177
-
178
-
179
-
180
-
181
-
182
-
183
-
184
-
185
-
186
-
187
-
188
-
189
-
190
-
191
-
192
-
193
-
194
-
195
-
196
-
197
-
198
-
199
-
200
-
201
-
202
-
203
-
204
-
205
-
206
-
207
-
208
-
209
-
210
-
211
-
212
-
213
-
214
-
215
-
216
-
217
-
218
-
219
-
220
-
221
-
222
-
223
-
224
-
225
-
226
-
227
-
228
-
229
-
230
-
231
-
232
-
233
-
234
-
235
-
236
-
237
-
238
-
239
-
240
-
241
-
242
-
243
-
244
-
245
-
246
-
247
-
248
-
249
-
250
-
251
-
252
-
253
-
254
-
255
-
256
-
257
-
258
-
259
-
260
-
261
-
262
-
263
-
264
-
265
-
266
-
267
-
268
-
269
-
270
-
271
-
272
-
273
-
274
-
275
-
276
-
277
-
278
-
279
-
280
-
281
-
282
-
283
-
284
-
285
-
286
-
287
-
288
-
289
-
290
-
291
-
292
-
293
-
294
-
295
-
296
-
297
-
298
-
299
-
300
 |
 |
