Kenwood TS-990S Operation Manual - Page 274
Displaying The Operation Frequency On The Transverter, Configuring The Frequency Using The Transverter
 |
View all Kenwood TS-990S manuals
Add to My Manuals
Save this manual to your list of manuals |
Page 274 highlights
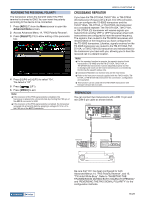
16 USEFUL FUNCTIONS DISPLAYING THE OPERATION FREQUENCY ON THE TRANSVERTER While the transverter is active, the last digit of the frequency display disappears, and the operating frequency to be configured for the transverter appears. 1 Rotate the Tuning control to select the operating frequency of the exciter (this transceiver). The transverter converts and generates this frequency. You must select the frequency to be within the range you can transmit. 2 Press [XVTR] to enable the transverter. "XVTR" appears on the main screen, and the frequency that can be configured appears on the transverter. 3 Press [XVTR] again. The transverter will be disabled. Note: ◆◆Even if the transverter is enabled, the frequencies to be displayed on the Memory Channel List screen and bandscope are the frequencies that have been configured for the transceiver. ◆◆While the SWL screen is open, the transverter cannot be enabled. ◆◆If the operating frequency to be configured for the transverter is not configured for the transceiver, activating the transverter results in the last digit of the operating frequency in the transceiver disappearing. Operation Example: Operation with 28 MHz Signal Entered to the Transverter for 430 MHz 1 Connect the transverter for 430 MHz to the transceiver. 2 Tune the receive frequency for the transceiver to be "28.000.000". 3 Press [XVTR] to enable the transverter. 4 Press [ENT] for the numeric and band selection keypad. 5 Subsequently, enter "430.000.00", then press [ENT]. 6 Rotate the Tuning or MULTI/CH control to select the frequency. CONFIGURING THE FREQUENCY USING THE TRANSVERTER Follow the procedure below to convert the operating frequency of the transceiver using the transverter. 1 Press [XVTR] to enable the transverter. "XVTR" appears on the main screen. 2 Press [ENT] to allow you to enter the frequency. 3 Use the numeric and band selection keypad to enter the transmit frequency for the transverter. 4 Press [ENT] to determine the entry. The transceiver displays the output frequency of the transverter in place of the actual operating frequency. Note: ◆◆The operating frequency for the transverter cannot be entered without using the numeric and band selection keypad. ◆◆If you change the frequency after you enter it using a numeric keypad, the frequency of the transverter may exceed "4.294.967.2" or fall below 30 kHz. In these cases, the frequency may not be displayed correctly. ◆◆The frequency is displayed on the main screen in units of 10 Hz or 100 Hz. ◆◆In both the main band and the sub band, the displayed frequency can be changed. ◆◆To connect a transverter which has a standby terminal or ALC output, use the REMOTE connector. 16-34 Index Contents
-
 1
1 -
2
-
3
-
4
-
5
-
6
-
7
-
8
-
9
-
10
-
11
-
12
-
13
-
14
-
15
-
16
-
17
-
18
-
19
-
20
-
21
-
22
-
23
-
24
-
25
-
26
-
27
-
28
-
29
-
30
-
31
-
32
-
33
-
34
-
35
-
36
-
37
-
38
-
39
-
40
-
41
-
42
-
43
-
44
-
45
-
46
-
47
-
48
-
49
-
50
-
51
-
52
-
53
-
54
-
55
-
56
-
57
-
58
-
59
-
60
-
61
-
62
-
63
-
64
-
65
-
66
-
67
-
68
-
69
-
70
-
71
-
72
-
73
-
74
-
75
-
76
-
77
-
78
-
79
-
80
-
81
-
82
-
83
-
84
-
85
-
86
-
87
-
88
-
89
-
90
-
91
-
92
-
93
-
94
-
95
-
96
-
97
-
98
-
99
-
100
-
101
-
102
-
103
-
104
-
105
-
106
-
107
-
108
-
109
-
110
-
111
-
112
-
113
-
114
-
115
-
116
-
117
-
118
-
119
-
120
-
121
-
122
-
123
-
124
-
125
-
126
-
127
-
128
-
129
-
130
-
131
-
132
-
133
-
134
-
135
-
136
-
137
-
138
-
139
-
140
-
141
-
142
-
143
-
144
-
145
-
146
-
147
-
148
-
149
-
150
-
151
-
152
-
153
-
154
-
155
-
156
-
157
-
158
-
159
-
160
-
161
-
162
-
163
-
164
-
165
-
166
-
167
-
168
-
169
-
170
-
171
-
172
-
173
-
174
-
175
-
176
-
177
-
178
-
179
-
180
-
181
-
182
-
183
-
184
-
185
-
186
-
187
-
188
-
189
-
190
-
191
-
192
-
193
-
194
-
195
-
196
-
197
-
198
-
199
-
200
-
201
-
202
-
203
-
204
-
205
-
206
-
207
-
208
-
209
-
210
-
211
-
212
-
213
-
214
-
215
-
216
-
217
-
218
-
219
-
220
-
221
-
222
-
223
-
224
-
225
-
226
-
227
-
228
-
229
-
230
-
231
-
232
-
233
-
234
-
235
-
236
-
237
-
238
-
239
-
240
-
241
-
242
-
243
-
244
-
245
-
246
-
247
-
248
-
249
-
250
-
251
-
252
-
253
-
254
-
255
-
256
-
257
-
258
-
259
-
260
-
261
-
262
-
263
-
264
-
265
-
266
-
267
-
268
-
 269
269 -
 270
270 -
 271
271 -
 272
272 -
 273
273 -
 274
274 -
 275
275 -
 276
276 -
 277
277 -
 278
278 -
 279
279 -
280
-
281
-
282
-
283
-
284
-
285
-
286
-
287
-
288
-
289
-
290
-
291
-
292
-
293
-
294
-
295
-
296
-
297
-
298
-
299
-
300
 |
 |
