Kenwood TS-990S Operation Manual - Page 233
Clock Display And Timer, Configuring The Date And Time, Configuring The Date For The Local Clock
 |
View all Kenwood TS-990S manuals
Add to My Manuals
Save this manual to your list of manuals |
Page 233 highlights
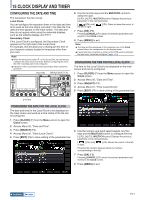
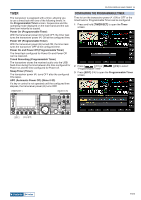
15 CLOCK DISPLAY AND TIMER CONFIGURING THE DATE AND TIME The transceiver has two clocks. Local Clock You can configure the expiration timer or the date and time to be used as the time stamp recorded in the data file. The date and time appear on the main screen. The date and time do not appear while using the extended displays, such as the waterfall display, and RTTY. Secondary Clock If the Local Clock is configured, the Secondary Clock appears on the right side of the Local Clock. For example, this will allow you to distinguish the time of your frequent contacts located in timezones other than your own. Note: ◆◆When the transceiver power ( ) is first turned ON, be sure that you configure the clock (your local time). Without configuring the clock, the timer recording cannot be configured. ◆◆Indication of the Local Clock and the Secondary Clock cannot be turned off. ' 6 Use the function keys and the MULTI/CH control to select the date. [-] (F2), [+] (F3), MULTI/CH control: Displays the previous parameter or the next parameter. [ ] (F4) and [ the left or right. ] (F5): Press to move the cursor to 7 Press [OK] (F6). Pressing [CANCEL] (F7) clears the entered parameter and reverts to the Clock screen. 8 Press [MENU] to exit. Note: ◆◆The date and time displayed on the parameter box in the Clock screen follows the configuration for the display format. ◆◆If automatic time correction by means of the NTP server is enabled, the local clock cannot be configured. {page 15-3} CONFIGURING THE TIME FOR THE LOCAL CLOCK The time for the Local Clock to be displayed on the main screen and can be configured. 1 Press [CLOCK] (F) from the Menu screen to open the Clock screen. 2 Access Menu 00, "Date and Time". 3 Press [SELECT] (F4). 4 Access Menu 01, "Time (Local Clock)". 5 Press [EDIT] (F4) to allow editing of the parameter box. CONFIGURING THE DATE FOR THE LOCAL CLOCK The date and time for the Local Clock to be displayed on the main screen and used as a time stamp of the file can be configured. 1 Press [CLOCK] (F) from the Menu screen to open the Clock screen. 2 Access Menu 00, "Date and Time". 3 Press [SELECT] (F4). 4 Access Menu 00, "Date (Local Clock)". 5 Press [EDIT] (F4) to allow editing of the parameter box. 6 Use the numeric and band select keypad, function keys and the MULTI/CH control to configure the time. [-] (F2), [+] (F3), MULTI/CH control: Displays the previous parameter or the next parameter. [ ] (F4) and [ or right. ] (F5): Moves the cursor to the left Pressing the numeric keypad enters the number corresponding to the key. 7 Press [OK] (F6). Pressing [CANCEL] (F7) clears the entered parameter and reverts to the Clock screen. 8 Press [MENU] to exit. Contents Index 15-1
-
 1
1 -
2
-
3
-
4
-
5
-
6
-
7
-
8
-
9
-
10
-
11
-
12
-
13
-
14
-
15
-
16
-
17
-
18
-
19
-
20
-
21
-
22
-
23
-
24
-
25
-
26
-
27
-
28
-
29
-
30
-
31
-
32
-
33
-
34
-
35
-
36
-
37
-
38
-
39
-
40
-
41
-
42
-
43
-
44
-
45
-
46
-
47
-
48
-
49
-
50
-
51
-
52
-
53
-
54
-
55
-
56
-
57
-
58
-
59
-
60
-
61
-
62
-
63
-
64
-
65
-
66
-
67
-
68
-
69
-
70
-
71
-
72
-
73
-
74
-
75
-
76
-
77
-
78
-
79
-
80
-
81
-
82
-
83
-
84
-
85
-
86
-
87
-
88
-
89
-
90
-
91
-
92
-
93
-
94
-
95
-
96
-
97
-
98
-
99
-
100
-
101
-
102
-
103
-
104
-
105
-
106
-
107
-
108
-
109
-
110
-
111
-
112
-
113
-
114
-
115
-
116
-
117
-
118
-
119
-
120
-
121
-
122
-
123
-
124
-
125
-
126
-
127
-
128
-
129
-
130
-
131
-
132
-
133
-
134
-
135
-
136
-
137
-
138
-
139
-
140
-
141
-
142
-
143
-
144
-
145
-
146
-
147
-
148
-
149
-
150
-
151
-
152
-
153
-
154
-
155
-
156
-
157
-
158
-
159
-
160
-
161
-
162
-
163
-
164
-
165
-
166
-
167
-
168
-
169
-
170
-
171
-
172
-
173
-
174
-
175
-
176
-
177
-
178
-
179
-
180
-
181
-
182
-
183
-
184
-
185
-
186
-
187
-
188
-
189
-
190
-
191
-
192
-
193
-
194
-
195
-
196
-
197
-
198
-
199
-
200
-
201
-
202
-
203
-
204
-
205
-
206
-
207
-
208
-
209
-
210
-
211
-
212
-
213
-
214
-
215
-
216
-
217
-
218
-
219
-
220
-
221
-
222
-
223
-
224
-
225
-
226
-
227
-
 228
228 -
 229
229 -
 230
230 -
 231
231 -
 232
232 -
 233
233 -
 234
234 -
 235
235 -
 236
236 -
 237
237 -
 238
238 -
239
-
240
-
241
-
242
-
243
-
244
-
245
-
246
-
247
-
248
-
249
-
250
-
251
-
252
-
253
-
254
-
255
-
256
-
257
-
258
-
259
-
260
-
261
-
262
-
263
-
264
-
265
-
266
-
267
-
268
-
269
-
270
-
271
-
272
-
273
-
274
-
275
-
276
-
277
-
278
-
279
-
280
-
281
-
282
-
283
-
284
-
285
-
286
-
287
-
288
-
289
-
290
-
291
-
292
-
293
-
294
-
295
-
296
-
297
-
298
-
299
-
300
 |
 |
