Kenwood TS-990S Operation Manual - Page 241
Useful Functions, Configuring The Power-on Message, Configuring The Screen Saver
 |
View all Kenwood TS-990S manuals
Add to My Manuals
Save this manual to your list of manuals |
Page 241 highlights
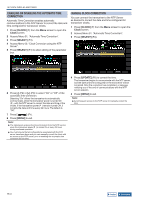
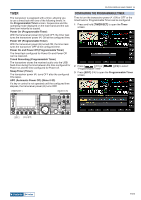
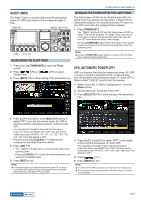
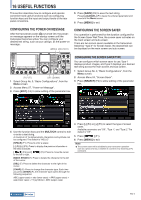
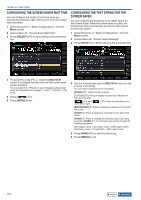
16 USEFUL FUNCTIONS This section describes how to configure and operate convenient and useful functions such as configuring function keys and the input and output levels of the rear panel connectors. 5 Press [SAVE] (F6) to save the text string. Pressing [CANCEL] (F7) clears the entered parameter and reverts to the Menu screen. 6 Press [MENU] to exit. CONFIGURING THE POWER-ON MESSAGE After the transceiver power ( ) is turned ON, the poweron message appears on the startup screen until the transceiver becomes active. You can configure your desired text string, such as your callsign, as the power-on message. CONFIGURING THE SCREEN SAVER If no operation is performed for the duration configured for the Screen Saver Wait Time, the screen saver activates on the main screen and sub-screen. There are two screen savers available in the transceiver. Selecting "Type 2" for Screen Saver, the desired text can be displayed on the main screen and sub screen. 1 Select Group No. 0, "Basic Configurations", from the Menu screen. 2 Access Menu 07, "Power-on Message". 3 Press [EDIT] (F4) to allow editing of the parameter box. CONFIGURING THE SCREEN SAVER TYPE You can configure which screen saver to use. Type 1 displays product images, and Type 2 displays your desired text string across the main screen and sub screen. 1 Select Group No. 0, "Basic Configurations", from the Menu screen. 2 Access Menu 04, "Screen Saver". 3 Press [SELECT] (F4) to allow editing of the parameter box. 4 Use the function keys and the MULTI/CH control to edit or enter a text string. A maximum of 15 alphanumeric characters and symbols can be configured. The default is "HELLO" [SPACE] (F1): Press to enter a space. [-] (F2)/[+] (F3): Press to display the previous character or the next character. [ ] (F4) and [ to the left or right. ] (F5): Press to move the cursor [BACK SPACE] (F): Press to delete the character to the left of the cursor. [DEL] (F): Press to delete the character to the right of the cursor. [CHAR] (F): Press to change the character type. Each time you press [CHAR] (F), the character type cycles through the following sequence: ABC (upper case) > abc (lower case) > ÀÁÂ (upper case) > àáâ (lower case) > !"# (symbols) > ABC (upper case) 4 Press [-] (F4) or [+] (F5) to select the type of screen saver. Available parameters are "Off", "Type 1", and "Type 2". The default is "Off". 5 Press [ ] (F1). 6 Press [MENU] to exit. Note: ◆◆The screen saver will be disabled by any transceiver operation such as a press of a key, a rotation of a control or by receiving a PC command. Contents Index 16-1
-
 1
1 -
2
-
3
-
4
-
5
-
6
-
7
-
8
-
9
-
10
-
11
-
12
-
13
-
14
-
15
-
16
-
17
-
18
-
19
-
20
-
21
-
22
-
23
-
24
-
25
-
26
-
27
-
28
-
29
-
30
-
31
-
32
-
33
-
34
-
35
-
36
-
37
-
38
-
39
-
40
-
41
-
42
-
43
-
44
-
45
-
46
-
47
-
48
-
49
-
50
-
51
-
52
-
53
-
54
-
55
-
56
-
57
-
58
-
59
-
60
-
61
-
62
-
63
-
64
-
65
-
66
-
67
-
68
-
69
-
70
-
71
-
72
-
73
-
74
-
75
-
76
-
77
-
78
-
79
-
80
-
81
-
82
-
83
-
84
-
85
-
86
-
87
-
88
-
89
-
90
-
91
-
92
-
93
-
94
-
95
-
96
-
97
-
98
-
99
-
100
-
101
-
102
-
103
-
104
-
105
-
106
-
107
-
108
-
109
-
110
-
111
-
112
-
113
-
114
-
115
-
116
-
117
-
118
-
119
-
120
-
121
-
122
-
123
-
124
-
125
-
126
-
127
-
128
-
129
-
130
-
131
-
132
-
133
-
134
-
135
-
136
-
137
-
138
-
139
-
140
-
141
-
142
-
143
-
144
-
145
-
146
-
147
-
148
-
149
-
150
-
151
-
152
-
153
-
154
-
155
-
156
-
157
-
158
-
159
-
160
-
161
-
162
-
163
-
164
-
165
-
166
-
167
-
168
-
169
-
170
-
171
-
172
-
173
-
174
-
175
-
176
-
177
-
178
-
179
-
180
-
181
-
182
-
183
-
184
-
185
-
186
-
187
-
188
-
189
-
190
-
191
-
192
-
193
-
194
-
195
-
196
-
197
-
198
-
199
-
200
-
201
-
202
-
203
-
204
-
205
-
206
-
207
-
208
-
209
-
210
-
211
-
212
-
213
-
214
-
215
-
216
-
217
-
218
-
219
-
220
-
221
-
222
-
223
-
224
-
225
-
226
-
227
-
228
-
229
-
230
-
231
-
232
-
233
-
234
-
235
-
 236
236 -
 237
237 -
 238
238 -
 239
239 -
 240
240 -
 241
241 -
 242
242 -
 243
243 -
 244
244 -
 245
245 -
 246
246 -
247
-
248
-
249
-
250
-
251
-
252
-
253
-
254
-
255
-
256
-
257
-
258
-
259
-
260
-
261
-
262
-
263
-
264
-
265
-
266
-
267
-
268
-
269
-
270
-
271
-
272
-
273
-
274
-
275
-
276
-
277
-
278
-
279
-
280
-
281
-
282
-
283
-
284
-
285
-
286
-
287
-
288
-
289
-
290
-
291
-
292
-
293
-
294
-
295
-
296
-
297
-
298
-
299
-
300
 |
 |
