Konica Minolta AccurioPress C14000 Plockmatic PowerSquare R2L User Manual - Page 22
Adjust the Stacker, Adjust the Connecting Bridge, Procedure for a Saved Job, Stacker
 |
View all Konica Minolta AccurioPress C14000 manuals
Add to My Manuals
Save this manual to your list of manuals |
Page 22 highlights
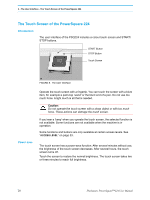
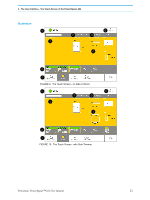
2 - How to Run the PowerSquare 224 - Adjust the Stacker Step Action Information 9 Enter the side-trim setting. The side trim dimension is calculated auto- (Only applicable if a Side- matically according to the PAGE SIZE. Trimmer is installed) To change the size and trim position, touch SIDE TRIM. See "SIDE TRIM" on page 28. If the side-trim size is 190mm or less, remove the book supports. See "Remove and re-fit the Side-Trimmer Book Supports" on page 56. 10 Touch CLOSE. 11 If needed, save the job set- If the same job settings are used frequently, tings to memory. then save the job settings to memory. See "Save a job" on page 36. Procedure for a Saved Job 1. Touch LOAD & SAVE . 2. Touch the job name or use the Up arrow and the Down arrow to select the job. 3. Touch LOAD. 4. Wait until the PowerSquare 224 is ready. Adjust the Stacker Stacker Adjust the stacker according to the size and thickness of the finished book. See "Adjust the Stacker" on page 48. Side-Trimmer Stacker Adjust the stacker according to the size and thickness of the finished book. See "Adjust the Side-Trimmer Stacker" on page 53. PBS Book Stacker Check the Book Stacker is ready to accept books. See "Adjust the PBS Book Stacker" on page 49. Adjust the Connecting Bridge Check the connecting bridge is adjusted correctly for the media used. See "Adjust the Connecting Bridge" on page 40. 16 Plockmatic PowerSquare™224 User Manual
-
 1
1 -
2
-
3
-
4
-
5
-
6
-
7
-
8
-
9
-
10
-
11
-
12
-
13
-
14
-
15
-
16
-
 17
17 -
 18
18 -
 19
19 -
 20
20 -
 21
21 -
 22
22 -
 23
23 -
 24
24 -
 25
25 -
 26
26 -
 27
27 -
28
-
29
-
30
-
31
-
32
-
33
-
34
-
35
-
36
-
37
-
38
-
39
-
40
-
41
-
42
-
43
-
44
-
45
-
46
-
47
-
48
-
49
-
50
-
51
-
52
-
53
-
54
-
55
-
56
-
57
-
58
-
59
-
60
-
61
-
62
-
63
-
64
-
65
-
66
-
67
-
68
-
69
-
70
-
71
-
72
-
73
-
74
-
75
-
76
-
77
-
78
-
79
-
80
-
81
-
82
-
83
-
84
-
85
-
86
-
87
-
88
-
89
-
90
-
91
-
92
-
93
-
94
-
95
-
96
-
97
-
98
-
99
-
100
-
101
-
102
-
103
-
104
-
105
-
106
-
107
-
108
-
109
-
110
-
111
-
112
-
113
-
114
-
115
-
116
-
117
-
118
-
119
-
120
-
121
-
122
-
123
-
124
-
125
-
126
-
127
-
128
-
129
-
130
-
131
-
132
-
133
-
134
-
135
-
136
-
137
-
138
-
139
-
140
-
141
-
142
-
143
-
144
-
145
-
146
-
147
-
148
-
149
-
150
-
151
-
152
-
153
-
154
-
155
-
156
 |
 |
