Konica Minolta AccurioPress C14000 Plockmatic PowerSquare R2L User Manual - Page 43
Adjust the Stitch Pitch, Stitch Limits
 |
View all Konica Minolta AccurioPress C14000 manuals
Add to My Manuals
Save this manual to your list of manuals |
Page 43 highlights
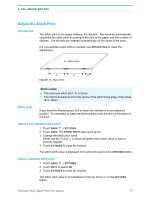
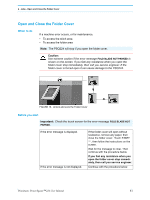
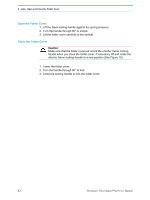
4 - Jobs - Adjust the Stitch Pitch Adjust the Stitch Pitch Introduction The stitch pitch is the space between the stitches. The machine automatically calculates the stitch pitch according to the size of the paper and the number of stitches. The stitches are inserted symmetrically on the spine of the book. If a non-standard stitch pitch is needed, use STITCH PITCH to make the adjustment. A = Stitch Pitch A A B FIGURE 13. Stitch Pitch Stitch Limits: • The minimum stitch pitch 'A' is 25mm. • The minimum distance from the centre of the stitch to the edge of the sheet 'B' is 15mm. When to do If you need the PowerSquare 224 to insert the stitches in a non-standard position. For example, to keep the stitches away from the text on the spine of the book. Select a non-standard stitch pitch 1. Touch BASIC > STITCHES 2. Touch AUTO. The STITCH PITCH value goes green. 3. Change the stitch pitch value. Either use the '+' and '-' or touch the green stitch pitch value to open a numeric keypad. 4. Touch STITCHES to close the window. The stitch pitch value is displayed in the job mimic and on the STITCHES button. Select a standard stitch pitch 1. Touch BASIC > STITCHES 2. Touch AUTO to select ON. 3. Touch STITCHES to close the window. The stitch pitch value is not displayed in the job mimic or on the STITCHES button. Plockmatic PowerSquare™224 User Manual 37
-
 1
1 -
2
-
3
-
4
-
5
-
6
-
7
-
8
-
9
-
10
-
11
-
12
-
13
-
14
-
15
-
16
-
17
-
18
-
19
-
20
-
21
-
22
-
23
-
24
-
25
-
26
-
27
-
28
-
29
-
30
-
31
-
32
-
33
-
34
-
35
-
36
-
37
-
 38
38 -
 39
39 -
 40
40 -
 41
41 -
 42
42 -
 43
43 -
 44
44 -
 45
45 -
 46
46 -
 47
47 -
 48
48 -
49
-
50
-
51
-
52
-
53
-
54
-
55
-
56
-
57
-
58
-
59
-
60
-
61
-
62
-
63
-
64
-
65
-
66
-
67
-
68
-
69
-
70
-
71
-
72
-
73
-
74
-
75
-
76
-
77
-
78
-
79
-
80
-
81
-
82
-
83
-
84
-
85
-
86
-
87
-
88
-
89
-
90
-
91
-
92
-
93
-
94
-
95
-
96
-
97
-
98
-
99
-
100
-
101
-
102
-
103
-
104
-
105
-
106
-
107
-
108
-
109
-
110
-
111
-
112
-
113
-
114
-
115
-
116
-
117
-
118
-
119
-
120
-
121
-
122
-
123
-
124
-
125
-
126
-
127
-
128
-
129
-
130
-
131
-
132
-
133
-
134
-
135
-
136
-
137
-
138
-
139
-
140
-
141
-
142
-
143
-
144
-
145
-
146
-
147
-
148
-
149
-
150
-
151
-
152
-
153
-
154
-
155
-
156
 |
 |