Lexmark X6575 User's Guide (Mac) - Page 107
Use the, Automatic Document Feeder ADF paper guide - carrier jam
 |
UPC - 734646066440
View all Lexmark X6575 manuals
Add to My Manuals
Save this manual to your list of manuals |
Page 107 highlights
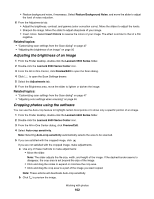
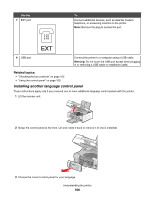
Use the To 9 Control panel Operate the printer. For more information, see "Using the control panel" on page 109. 10 Paper exit tray Hold paper as it exits. 11 Automatic Document Feeder (ADF) paper guide Keep paper straight when feeding into the ADF. 12 Automatic Document Feeder (ADF) Scan, copy, or fax multiple-page letter-, legal-, and A4-size documents. 13 Scanner glass Copy or remove an item. 14 Top cover Access the scanner glass. 1 2 EXT 87 65 43 Use the To 1 Scanner unit Access the print cartridges. 2 Print cartridge carrier Install, replace, or remove a print cartridge. 3 Power supply with port Plug the power cord into the power supply at the back of the printer and then into the wall outlet. 4 Duplex cover • Print on both sides of a sheet of paper. • Remove paper jams. 5 Lexmark N2050 (internal wireless print server) Connect the printer to a wireless network. Note: The internal wireless print server may not come installed on all printers. To purchase the Lexmark N2050, see "Ordering paper and other supplies" on page 140. 6 LINE port Connect the printer to an active telephone line to send and receive faxes. The printer must be connected to this telephone line to receive incoming fax calls. Note: Do not connect additional devices to the LINE port, and do not connect a DSL (digital subscriber line), ISDN (integrated services digital network), or cable modem to the printer. LINE Understanding the printer 107
-
 1
1 -
2
-
3
-
4
-
5
-
6
-
7
-
8
-
9
-
10
-
11
-
12
-
13
-
14
-
15
-
16
-
17
-
18
-
19
-
20
-
21
-
22
-
23
-
24
-
25
-
26
-
27
-
28
-
29
-
30
-
31
-
32
-
33
-
34
-
35
-
36
-
37
-
38
-
39
-
40
-
41
-
42
-
43
-
44
-
45
-
46
-
47
-
48
-
49
-
50
-
51
-
52
-
53
-
54
-
55
-
56
-
57
-
58
-
59
-
60
-
61
-
62
-
63
-
64
-
65
-
66
-
67
-
68
-
69
-
70
-
71
-
72
-
73
-
74
-
75
-
76
-
77
-
78
-
79
-
80
-
81
-
82
-
83
-
84
-
85
-
86
-
87
-
88
-
89
-
90
-
91
-
92
-
93
-
94
-
95
-
96
-
97
-
98
-
99
-
100
-
101
-
 102
102 -
 103
103 -
 104
104 -
 105
105 -
 106
106 -
 107
107 -
 108
108 -
 109
109 -
 110
110 -
 111
111 -
 112
112 -
113
-
114
-
115
-
116
-
117
-
118
-
119
-
120
-
121
-
122
-
123
-
124
-
125
-
126
-
127
-
128
-
129
-
130
-
131
-
132
-
133
-
134
-
135
-
136
-
137
-
138
-
139
-
140
-
141
-
142
-
143
-
144
-
145
-
146
-
147
-
148
-
149
-
150
-
151
-
152
-
153
-
154
-
155
-
156
-
157
-
158
-
159
-
160
-
161
-
162
-
163
-
164
-
165
-
166
-
167
-
168
-
169
-
170
-
171
-
172
-
173
-
174
-
175
-
176
-
177
-
178
-
179
-
180
-
181
-
182
-
183
-
184
-
185
-
186
-
187
-
188
-
189
-
190
-
191
-
192
-
193
-
194
-
195
-
196
-
197
-
198
-
199
-
200
-
201
-
202
-
203
-
204
-
205
-
206
-
207
-
208
-
209
-
210
-
211
-
212
-
213
-
214
-
215
-
216
-
217
 |
 |
