Lexmark X6575 User's Guide (Mac) - Page 185
Banner paper jams, Paper continues to jam
 |
UPC - 734646066440
View all Lexmark X6575 manuals
Add to My Manuals
Save this manual to your list of manuals |
Page 185 highlights
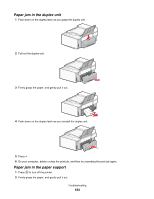
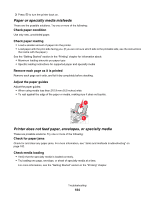
Make sure the printer is set as the default printer and is not on hold or paused To set printer as default: 1 From the Finder desktop, choose Applications Œ Utilities Œ Print Center or Printer Setup Utility, depending on the operating system version you are using. 2 From the Printer List dialog, select your printer. 3 Click the Make Default icon. To resume print jobs: 1 From the Finder desktop, choose Applications Œ Utilities Œ Print Center or Printer Setup Utility, depending on the operating system version you are using. 2 From the list of printers, double-click your printer. The printer pop-up menu appears. 3 If you want to resume all print jobs in the queue, click Start Jobs. If you want to resume a particular print job, select the document name, and then click Resume. Banner paper jams These are possible causes and solutions. Try one or more of the following: Clear banner paper jams 1 Press to turn off the printer. 2 Remove the jammed banner paper from the printer. Adjust the paper type settings To keep a banner print job from jamming: • Use only the number of sheets needed for the banner. • Select the following settings to enable the printer to feed paper continuously without jamming: 1 With your document open, choose File Œ Page Setup. 2 From the Settings pop-up menu, choose Page Attributes. 3 From the "Format for" pop-up menu, choose the printer. 4 From the Paper Size pop-up menu, choose A4 Banner or US Letter Banner. 5 Select an orientation. 6 Click OK. Paper continues to jam Are you using paper designed for an inkjet printer? Check the type of paper you are using. Some low-quality papers may be too thin or too slick to be fed correctly into the printer. For more information, see "Choosing compatible specialty paper types" on page 20. Are you loading the paper correctly? For more information, see "Loading paper" on page 17. Note: Do not force paper into the printer. Troubleshooting 185
-
 1
1 -
2
-
3
-
4
-
5
-
6
-
7
-
8
-
9
-
10
-
11
-
12
-
13
-
14
-
15
-
16
-
17
-
18
-
19
-
20
-
21
-
22
-
23
-
24
-
25
-
26
-
27
-
28
-
29
-
30
-
31
-
32
-
33
-
34
-
35
-
36
-
37
-
38
-
39
-
40
-
41
-
42
-
43
-
44
-
45
-
46
-
47
-
48
-
49
-
50
-
51
-
52
-
53
-
54
-
55
-
56
-
57
-
58
-
59
-
60
-
61
-
62
-
63
-
64
-
65
-
66
-
67
-
68
-
69
-
70
-
71
-
72
-
73
-
74
-
75
-
76
-
77
-
78
-
79
-
80
-
81
-
82
-
83
-
84
-
85
-
86
-
87
-
88
-
89
-
90
-
91
-
92
-
93
-
94
-
95
-
96
-
97
-
98
-
99
-
100
-
101
-
102
-
103
-
104
-
105
-
106
-
107
-
108
-
109
-
110
-
111
-
112
-
113
-
114
-
115
-
116
-
117
-
118
-
119
-
120
-
121
-
122
-
123
-
124
-
125
-
126
-
127
-
128
-
129
-
130
-
131
-
132
-
133
-
134
-
135
-
136
-
137
-
138
-
139
-
140
-
141
-
142
-
143
-
144
-
145
-
146
-
147
-
148
-
149
-
150
-
151
-
152
-
153
-
154
-
155
-
156
-
157
-
158
-
159
-
160
-
161
-
162
-
163
-
164
-
165
-
166
-
167
-
168
-
169
-
170
-
171
-
172
-
173
-
174
-
175
-
176
-
177
-
178
-
179
-
 180
180 -
 181
181 -
 182
182 -
 183
183 -
 184
184 -
 185
185 -
 186
186 -
 187
187 -
 188
188 -
 189
189 -
 190
190 -
191
-
192
-
193
-
194
-
195
-
196
-
197
-
198
-
199
-
200
-
201
-
202
-
203
-
204
-
205
-
206
-
207
-
208
-
209
-
210
-
211
-
212
-
213
-
214
-
215
-
216
-
217
 |
 |