Lexmark X6575 User's Guide (Mac) - Page 116
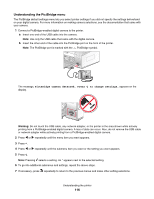
Understanding the PictBridge menu, PictBridge camera detected. Press, to change settings.
 |
UPC - 734646066440
View all Lexmark X6575 manuals
Add to My Manuals
Save this manual to your list of manuals |
Page 116 highlights
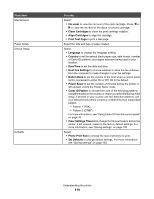
Understanding the PictBridge menu The PictBridge default settings menu lets you select printer settings if you did not specify the settings beforehand on your digital camera. For more information on making camera selections, see the documentation that came with your camera. 1 Connect a PictBridge-enabled digital camera to the printer. a Insert one end of the USB cable into the camera. Note: Use only the USB cable that came with the digital camera. b Insert the other end of the cable into the PictBridge port on the front of the printer. Note: The PictBridge port is marked with the PictBridge symbol. The message, PictBridge camera detected. Press to change settings. appears on the display. Warning: Do not touch the USB cable, any network adapter, or the printer in the area shown while actively printing from a PictBridge-enabled digital camera. A loss of data can occur. Also, do not remove the USB cable or network adapter while actively printing from a PictBridge-enabled digital camera. 2 Press or repeatedly until the menu item you want appears. 3 Press . 4 Press or repeatedly until the submenu item you want or the setting you want appears. 5 Press . Note: Pressing selects a setting. An * appears next to the selected setting. 6 To go into additional submenus and settings, repeat the above steps. 7 If necessary, press repeatedly to return to the previous menus and make other setting selections. Understanding the printer 116
-
 1
1 -
2
-
3
-
4
-
5
-
6
-
7
-
8
-
9
-
10
-
11
-
12
-
13
-
14
-
15
-
16
-
17
-
18
-
19
-
20
-
21
-
22
-
23
-
24
-
25
-
26
-
27
-
28
-
29
-
30
-
31
-
32
-
33
-
34
-
35
-
36
-
37
-
38
-
39
-
40
-
41
-
42
-
43
-
44
-
45
-
46
-
47
-
48
-
49
-
50
-
51
-
52
-
53
-
54
-
55
-
56
-
57
-
58
-
59
-
60
-
61
-
62
-
63
-
64
-
65
-
66
-
67
-
68
-
69
-
70
-
71
-
72
-
73
-
74
-
75
-
76
-
77
-
78
-
79
-
80
-
81
-
82
-
83
-
84
-
85
-
86
-
87
-
88
-
89
-
90
-
91
-
92
-
93
-
94
-
95
-
96
-
97
-
98
-
99
-
100
-
101
-
102
-
103
-
104
-
105
-
106
-
107
-
108
-
109
-
110
-
 111
111 -
 112
112 -
 113
113 -
 114
114 -
 115
115 -
 116
116 -
 117
117 -
 118
118 -
 119
119 -
 120
120 -
 121
121 -
122
-
123
-
124
-
125
-
126
-
127
-
128
-
129
-
130
-
131
-
132
-
133
-
134
-
135
-
136
-
137
-
138
-
139
-
140
-
141
-
142
-
143
-
144
-
145
-
146
-
147
-
148
-
149
-
150
-
151
-
152
-
153
-
154
-
155
-
156
-
157
-
158
-
159
-
160
-
161
-
162
-
163
-
164
-
165
-
166
-
167
-
168
-
169
-
170
-
171
-
172
-
173
-
174
-
175
-
176
-
177
-
178
-
179
-
180
-
181
-
182
-
183
-
184
-
185
-
186
-
187
-
188
-
189
-
190
-
191
-
192
-
193
-
194
-
195
-
196
-
197
-
198
-
199
-
200
-
201
-
202
-
203
-
204
-
205
-
206
-
207
-
208
-
209
-
210
-
211
-
212
-
213
-
214
-
215
-
216
-
217
 |
 |
