Lexmark X6575 User's Guide (Mac) - Page 150
Cannot print from digital camera using PictBridge, Check USB cable - printer drivers
 |
UPC - 734646066440
View all Lexmark X6575 manuals
Add to My Manuals
Save this manual to your list of manuals |
Page 150 highlights
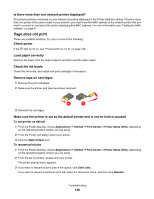
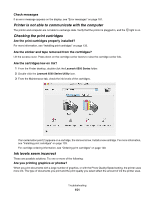
Make sure the cartridges are properly installed With the front of the printer facing you, check for proper print cartridge installation. If you are using a color cartridge, make sure it is properly installed in the right carrier. If you are using a black cartridge or photo cartridge, make sure it is properly installed in the left carrier. For more information, see the related topic below. Make sure the Lexmark printer driver is set as the default printer and is not on hold or paused To set the printer as default 1 From the Finder desktop, choose Applications ΠUtilities ΠPrint Center or Printer Setup Utility. 2 From the printer list dialog, select your printer. 3 Click the Make Default icon. To resume print jobs 1 From the Finder desktop, choose Applications ΠUtilities ΠPrint Center or Printer Setup Utility. 2 From the list of printers, double-click your printer. 3 From the Printer pop-up menu, click Start Jobs if you want to resume all print jobs in the queue; if you want to resume a particular print job, select the document name, and then click Resume. Check your USB connection 1 Check the USB cable for any obvious damage. 2 Firmly plug the square end of the USB cable into the back of the printer. 3 Firmly plug the rectangular end of the USB cable into the USB port of the computer. The USB port is marked with the USB symbol. Cannot print from digital camera using PictBridge These are possible solutions. Try one or more of the following: Enable PictBridge printing from camera Enable PictBridge printing on the camera by selecting the correct USB mode. For more information, see the digital camera documentation. Make sure the camera is a PictBridge-enabled digital camera 1 Disconnect the camera. 2 Connect a PictBridge-enabled digital camera to the PictBridge port. See the digital camera documentation to determine whether it is PictBridge-enabled. Check USB cable Use only the USB cable that came with the camera. Remove memory cards Remove any memory cards from the printer. Troubleshooting 150
-
 1
1 -
2
-
3
-
4
-
5
-
6
-
7
-
8
-
9
-
10
-
11
-
12
-
13
-
14
-
15
-
16
-
17
-
18
-
19
-
20
-
21
-
22
-
23
-
24
-
25
-
26
-
27
-
28
-
29
-
30
-
31
-
32
-
33
-
34
-
35
-
36
-
37
-
38
-
39
-
40
-
41
-
42
-
43
-
44
-
45
-
46
-
47
-
48
-
49
-
50
-
51
-
52
-
53
-
54
-
55
-
56
-
57
-
58
-
59
-
60
-
61
-
62
-
63
-
64
-
65
-
66
-
67
-
68
-
69
-
70
-
71
-
72
-
73
-
74
-
75
-
76
-
77
-
78
-
79
-
80
-
81
-
82
-
83
-
84
-
85
-
86
-
87
-
88
-
89
-
90
-
91
-
92
-
93
-
94
-
95
-
96
-
97
-
98
-
99
-
100
-
101
-
102
-
103
-
104
-
105
-
106
-
107
-
108
-
109
-
110
-
111
-
112
-
113
-
114
-
115
-
116
-
117
-
118
-
119
-
120
-
121
-
122
-
123
-
124
-
125
-
126
-
127
-
128
-
129
-
130
-
131
-
132
-
133
-
134
-
135
-
136
-
137
-
138
-
139
-
140
-
141
-
142
-
143
-
144
-
 145
145 -
 146
146 -
 147
147 -
 148
148 -
 149
149 -
 150
150 -
 151
151 -
 152
152 -
 153
153 -
 154
154 -
 155
155 -
156
-
157
-
158
-
159
-
160
-
161
-
162
-
163
-
164
-
165
-
166
-
167
-
168
-
169
-
170
-
171
-
172
-
173
-
174
-
175
-
176
-
177
-
178
-
179
-
180
-
181
-
182
-
183
-
184
-
185
-
186
-
187
-
188
-
189
-
190
-
191
-
192
-
193
-
194
-
195
-
196
-
197
-
198
-
199
-
200
-
201
-
202
-
203
-
204
-
205
-
206
-
207
-
208
-
209
-
210
-
211
-
212
-
213
-
214
-
215
-
216
-
217
 |
 |
