Lexmark X6575 User's Guide (Mac) - Page 120
Saving settings, Print Setup Wireless Setup, Network Name, Wireless Signal Quality
 |
UPC - 734646066440
View all Lexmark X6575 manuals
Add to My Manuals
Save this manual to your list of manuals |
Page 120 highlights
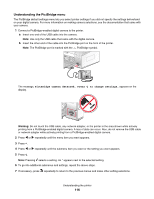
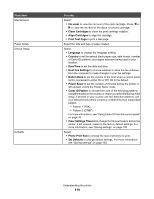
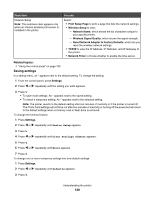
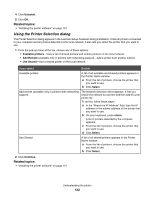
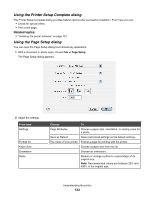
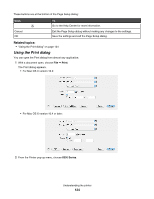
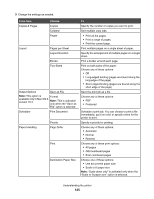
From here Network Setup Note: This submenu item appears only when an internal wireless print server is installed in the printer. You can Select: • Print Setup Page to print a page that lists the network settings. • Wireless Setup to view: - Network Name, which shows the six characters unique to your specific printer. - Wireless Signal Quality, which shows the signal strength. - Reset Network Adapter to Factory Defaults, which lets you reset the wireless network settings. • TCP/IP to view the IP Address, IP Netmask, and IP Gateway of the printer. • Network Time to choose whether to enable the time server. Related topics: • "Using the control panel" on page 109 Saving settings In a setting menu, an * appears next to the default setting. To change the setting: 1 From the control panel, press Settings. 2 Press or repeatedly until the setting you want appears. 3 Press : • To save most settings. An * appears next to the saved setting. • To select a temporary setting. An * appears next to the selected setting. Note: The printer reverts to the default setting after two minutes of inactivity or if the printer is turned off. The Photo Card settings will not time out after two minutes of inactivity or turning off the power but will return to the default settings when a memory card or flash drive is removed. To change the timeout feature: 1 Press Settings. 2 Press or repeatedly until Device Setup appears. 3 Press . 4 Press or repeatedly until Clear Settings Timeout appears. 5 Press . 6 Press or repeatedly until Never appears. 7 Press . To change one or more temporary settings into new default settings: 1 Press Settings. 2 Press or repeatedly until Defaults appears. 3 Press . Understanding the printer 120
-
 1
1 -
2
-
3
-
4
-
5
-
6
-
7
-
8
-
9
-
10
-
11
-
12
-
13
-
14
-
15
-
16
-
17
-
18
-
19
-
20
-
21
-
22
-
23
-
24
-
25
-
26
-
27
-
28
-
29
-
30
-
31
-
32
-
33
-
34
-
35
-
36
-
37
-
38
-
39
-
40
-
41
-
42
-
43
-
44
-
45
-
46
-
47
-
48
-
49
-
50
-
51
-
52
-
53
-
54
-
55
-
56
-
57
-
58
-
59
-
60
-
61
-
62
-
63
-
64
-
65
-
66
-
67
-
68
-
69
-
70
-
71
-
72
-
73
-
74
-
75
-
76
-
77
-
78
-
79
-
80
-
81
-
82
-
83
-
84
-
85
-
86
-
87
-
88
-
89
-
90
-
91
-
92
-
93
-
94
-
95
-
96
-
97
-
98
-
99
-
100
-
101
-
102
-
103
-
104
-
105
-
106
-
107
-
108
-
109
-
110
-
111
-
112
-
113
-
114
-
 115
115 -
 116
116 -
 117
117 -
 118
118 -
 119
119 -
 120
120 -
 121
121 -
 122
122 -
 123
123 -
 124
124 -
 125
125 -
126
-
127
-
128
-
129
-
130
-
131
-
132
-
133
-
134
-
135
-
136
-
137
-
138
-
139
-
140
-
141
-
142
-
143
-
144
-
145
-
146
-
147
-
148
-
149
-
150
-
151
-
152
-
153
-
154
-
155
-
156
-
157
-
158
-
159
-
160
-
161
-
162
-
163
-
164
-
165
-
166
-
167
-
168
-
169
-
170
-
171
-
172
-
173
-
174
-
175
-
176
-
177
-
178
-
179
-
180
-
181
-
182
-
183
-
184
-
185
-
186
-
187
-
188
-
189
-
190
-
191
-
192
-
193
-
194
-
195
-
196
-
197
-
198
-
199
-
200
-
201
-
202
-
203
-
204
-
205
-
206
-
207
-
208
-
209
-
210
-
211
-
212
-
213
-
214
-
215
-
216
-
217
 |
 |
