Lexmark X6575 User's Guide (Mac) - Page 74
Sending a fax while listening to a call (On Hook Dial), Receiving a fax, Receiving a fax automatically
 |
UPC - 734646066440
View all Lexmark X6575 manuals
Add to My Manuals
Save this manual to your list of manuals |
Page 74 highlights
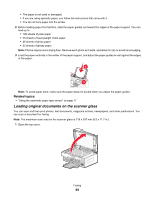
8 Enter the time you want to send the fax. 9 Press . 10 If the printer is not set to the 24-hour mode, press or repeatedly to select AM or PM, and then press to save your settings. 11 Enter a fax number, or press Phone Book to select a number from the Speed Dial or Group Dial list. For more information, see "Entering a fax number" on page 72. 12 If needed, add more fax numbers, and press until all, for a maximum of 30, have been entered. 13 Press Start Color or Start Black. Note: At the designated time, the fax program dials and sends the fax to all of the designated fax numbers. If the fax transmission is unsuccessful to any of the numbers on the broadcast list, the unsuccessful numbers will be dialed again. Sending a fax while listening to a call (On Hook Dial) The manual dialing feature lets you dial a telephone number while listening to the call through a speaker on the printer. It is useful when you must navigate an automated answering system or enter a calling card number before sending your fax. 1 From the control panel, press Fax Mode. 2 Press . 3 Press or repeatedly until On Hook Dial appears, and then press . You can now hear the dial tone of the telephone line. 4 Enter a fax number. For more information, see the related topic, "Entering a fax number." Note: Press the keypad numbers to use an automated answering system. 5 Press Start Color or Start Black. Receiving a fax Receiving a fax automatically 1 Make sure the printer is on and is connected to a working phone line. 2 Make sure that Auto Answer is on. For more information, see "Setting Auto Answer to On" on page 76. Note: An indicator, resembling a telephone handset with the word FAX under it, is shown in the top left corner of the display when Auto Answer is on. 3 Set the number of times the telephone rings before the printer automatically receives faxes. To set this, see "Setting the number of rings before receiving a fax automatically" on page 79. Receiving a fax with an answering machine Note: You must set up the equipment as shown in the related topic, "Connecting to an answering machine" on page 65. Faxing 74
-
 1
1 -
2
-
3
-
4
-
5
-
6
-
7
-
8
-
9
-
10
-
11
-
12
-
13
-
14
-
15
-
16
-
17
-
18
-
19
-
20
-
21
-
22
-
23
-
24
-
25
-
26
-
27
-
28
-
29
-
30
-
31
-
32
-
33
-
34
-
35
-
36
-
37
-
38
-
39
-
40
-
41
-
42
-
43
-
44
-
45
-
46
-
47
-
48
-
49
-
50
-
51
-
52
-
53
-
54
-
55
-
56
-
57
-
58
-
59
-
60
-
61
-
62
-
63
-
64
-
65
-
66
-
67
-
68
-
 69
69 -
 70
70 -
 71
71 -
 72
72 -
 73
73 -
 74
74 -
 75
75 -
 76
76 -
 77
77 -
 78
78 -
 79
79 -
80
-
81
-
82
-
83
-
84
-
85
-
86
-
87
-
88
-
89
-
90
-
91
-
92
-
93
-
94
-
95
-
96
-
97
-
98
-
99
-
100
-
101
-
102
-
103
-
104
-
105
-
106
-
107
-
108
-
109
-
110
-
111
-
112
-
113
-
114
-
115
-
116
-
117
-
118
-
119
-
120
-
121
-
122
-
123
-
124
-
125
-
126
-
127
-
128
-
129
-
130
-
131
-
132
-
133
-
134
-
135
-
136
-
137
-
138
-
139
-
140
-
141
-
142
-
143
-
144
-
145
-
146
-
147
-
148
-
149
-
150
-
151
-
152
-
153
-
154
-
155
-
156
-
157
-
158
-
159
-
160
-
161
-
162
-
163
-
164
-
165
-
166
-
167
-
168
-
169
-
170
-
171
-
172
-
173
-
174
-
175
-
176
-
177
-
178
-
179
-
180
-
181
-
182
-
183
-
184
-
185
-
186
-
187
-
188
-
189
-
190
-
191
-
192
-
193
-
194
-
195
-
196
-
197
-
198
-
199
-
200
-
201
-
202
-
203
-
204
-
205
-
206
-
207
-
208
-
209
-
210
-
211
-
212
-
213
-
214
-
215
-
216
-
217
 |
 |