Lexmark X6575 User's Guide (Mac) - Page 122
Using the Printer Selection dialog, Uninstall, Available printers, Add Remote, Use Shared, Select
 |
UPC - 734646066440
View all Lexmark X6575 manuals
Add to My Manuals
Save this manual to your list of manuals |
Page 122 highlights
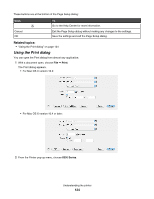
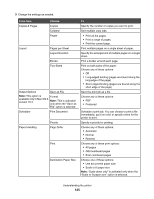
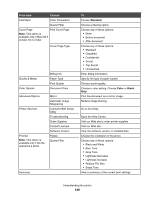
4 Click Uninstall. 5 Click OK. Related topics: • "Installing the printer software" on page 121 Using the Printer Selection dialog The Printer Selection dialog appears in the Lexmark Setup Assistant during installation. It lists all printers connected to your computer and all printers detected on the local network. It also lets you select the printer that you want to use. 1 From the pop-up menu at the top, choose any of these options: • Available printers-View a list of shared printers and remote printers on the local network. • Add Remote (available only in printers with networking support)-Add a printer from another subnet. • Use Shared-Use a shared printer on the local network. If you select Do this Available printers A list of all available and shared printers appears in the Printer Name window. a From the list of printers, choose the printer that you want to use. b Click Select. Add remote (available only in printers with networking support) The Network Selection sheet appears. It lets you search the network for a printer and then add it to your printer list. To do this, follow these steps: a In the "Search by IP Address" field, type the IP address or the subnet address of the printer that you want to use. b On your keyboard, press return. A list of printers detected by the computer appears. c From the list of printers, choose the printer that you want to use. d Click Select. Use Shared A list of all shared printers appears in the Printer Name window. a From the list of printers, choose the printer that you want to use. b Click Select. 2 Click Continue. Related topics: • "Installing the printer software" on page 121 Understanding the printer 122
-
 1
1 -
2
-
3
-
4
-
5
-
6
-
7
-
8
-
9
-
10
-
11
-
12
-
13
-
14
-
15
-
16
-
17
-
18
-
19
-
20
-
21
-
22
-
23
-
24
-
25
-
26
-
27
-
28
-
29
-
30
-
31
-
32
-
33
-
34
-
35
-
36
-
37
-
38
-
39
-
40
-
41
-
42
-
43
-
44
-
45
-
46
-
47
-
48
-
49
-
50
-
51
-
52
-
53
-
54
-
55
-
56
-
57
-
58
-
59
-
60
-
61
-
62
-
63
-
64
-
65
-
66
-
67
-
68
-
69
-
70
-
71
-
72
-
73
-
74
-
75
-
76
-
77
-
78
-
79
-
80
-
81
-
82
-
83
-
84
-
85
-
86
-
87
-
88
-
89
-
90
-
91
-
92
-
93
-
94
-
95
-
96
-
97
-
98
-
99
-
100
-
101
-
102
-
103
-
104
-
105
-
106
-
107
-
108
-
109
-
110
-
111
-
112
-
113
-
114
-
115
-
116
-
 117
117 -
 118
118 -
 119
119 -
 120
120 -
 121
121 -
 122
122 -
 123
123 -
 124
124 -
 125
125 -
 126
126 -
 127
127 -
128
-
129
-
130
-
131
-
132
-
133
-
134
-
135
-
136
-
137
-
138
-
139
-
140
-
141
-
142
-
143
-
144
-
145
-
146
-
147
-
148
-
149
-
150
-
151
-
152
-
153
-
154
-
155
-
156
-
157
-
158
-
159
-
160
-
161
-
162
-
163
-
164
-
165
-
166
-
167
-
168
-
169
-
170
-
171
-
172
-
173
-
174
-
175
-
176
-
177
-
178
-
179
-
180
-
181
-
182
-
183
-
184
-
185
-
186
-
187
-
188
-
189
-
190
-
191
-
192
-
193
-
194
-
195
-
196
-
197
-
198
-
199
-
200
-
201
-
202
-
203
-
204
-
205
-
206
-
207
-
208
-
209
-
210
-
211
-
212
-
213
-
214
-
215
-
216
-
217
 |
 |
