Netgear DGN2200M DGN2200M User Manual (PDF) - Page 85
Configuring WPS Settings, Apply, Enable WPS check box
 |
UPC - 606449072433
View all Netgear DGN2200M manuals
Add to My Manuals
Save this manual to your list of manuals |
Page 85 highlights
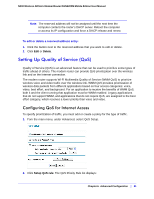
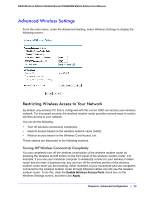
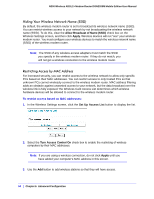
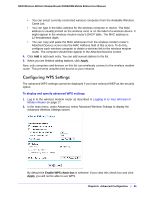
N300 Wireless ADSL2+ Modem Router DGN2200M Mobile Edition User Manual • You can select currently connected wireless computers from the Available Wireless Cards List. • You can type in the MAC address for the wireless computer or device. The MAC address is usually printed on the wireless card, or on the label of a wireless device. It might appear in the wireless modem router's DHCP table. The MAC address is 12 hexadecimal digits. • You can copy and paste the MAC addresses from the wireless modem router's Attached Devices screen into the MAC Address field of this screen. To do this, configure each wireless computer to obtain a wireless link to the wireless modem router. The computer should then appear in the Attached Devices screen. 4. Click Add to add each entry. You can add several stations to the list. 5. When you are finished adding stations, click Apply. Now, only computers and devices on this list can wirelessly connect to the wireless modem router. This prevents unauthorized access to your network. Configuring WPS Settings The advanced WPS settings cannot be displayed if you have selected WEP as the security option. To display and specify advanced WPS settings: 1. Log in to the wireless modem router as described in Logging In to Your Wireless-N Modem Router on page 17. 2. In the main menu, under Advanced, select Advanced Wireless Settings to display the Advanced Wireless Settings screen: By default the Enable WPS check box is selected. If you clear this check box and click Apply, you will not be able to use WPS. Chapter 6. Advanced Configuration | 85
-
 1
1 -
2
-
3
-
4
-
5
-
6
-
7
-
8
-
9
-
10
-
11
-
12
-
13
-
14
-
15
-
16
-
17
-
18
-
19
-
20
-
21
-
22
-
23
-
24
-
25
-
26
-
27
-
28
-
29
-
30
-
31
-
32
-
33
-
34
-
35
-
36
-
37
-
38
-
39
-
40
-
41
-
42
-
43
-
44
-
45
-
46
-
47
-
48
-
49
-
50
-
51
-
52
-
53
-
54
-
55
-
56
-
57
-
58
-
59
-
60
-
61
-
62
-
63
-
64
-
65
-
66
-
67
-
68
-
69
-
70
-
71
-
72
-
73
-
74
-
75
-
76
-
77
-
78
-
79
-
 80
80 -
 81
81 -
 82
82 -
 83
83 -
 84
84 -
 85
85 -
 86
86 -
 87
87 -
 88
88 -
 89
89 -
 90
90 -
91
-
92
-
93
-
94
-
95
-
96
-
97
-
98
-
99
-
100
-
101
-
102
-
103
-
104
-
105
-
106
-
107
-
108
-
109
-
110
-
111
-
112
-
113
-
114
-
115
-
116
-
117
-
118
-
119
-
120
-
121
-
122
-
123
 |
 |
