Netgear DGN2200M DGN2200M User Manual (PDF) - Page 94
Port Forwarding and Port Triggering, Remote MAC, Address, Remote MAC Address, Obtain an IP address
 |
UPC - 606449072433
View all Netgear DGN2200M manuals
Add to My Manuals
Save this manual to your list of manuals |
Page 94 highlights
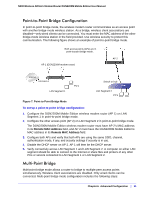
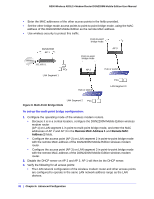
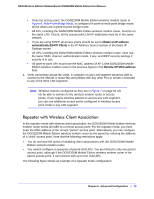
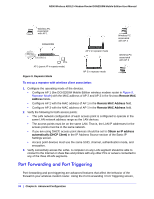
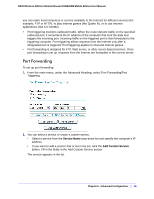
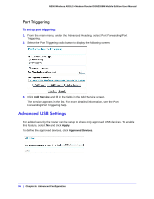
N300 Wireless ADSL2+ Modem Router DGN2200M Mobile Edition User Manual Wireless PC associated with AP 1 DGN2200M Wireless PC associated with AP 2 Internet 192.168.0.1 PCs AP 1 (parent AP in repeater mode) Figure 9. Repeater Mode AP 2 in repeater mode AP 3 in repeater mode Wireless PC associated with AP 3 To set up a repeater with wireless client association: 1. Configure the operating mode of the devices. • Configure AP 1 (the DGN2200M Mobile Edition wireless modem router in Figure 9, Repeater Mode) with the MAC address of AP 2 and AP 3 in the first two Remote MAC Address fields. • Configure AP 2 with the MAC address of AP 1 in the Remote MAC Address field. • Configure AP 3 with the MAC address of AP 1 in the Remote MAC Address field. 2. Verify the following for both access points: • The LAN network configuration of each access point is configured to operate in the same LAN network address range as the LAN devices. • The access points must be on the same LAN. That is, the LAN IP addresses for the access points must be in the same network. • If you are using DHCP, access point devices should be set to Obtain an IP address automatically (DHCP Client) in the IP Address Source section of the Basic IP Settings screen. • Access point devices must use the same SSID, channel, authentication mode, and encryption. 3. Verify connectivity across the LANs. A computer on any LAN segment should be able to connect to the Internet or share files and printers with any other PCs or servers connected to any of the three WLAN segments. Port Forwarding and Port Triggering Port forwarding and port triggering are advanced features that affect the behavior of the firewall in your wireless modem router. Using the Port Forwarding / Port Triggering screen, 94 | Chapter 6. Advanced Configuration
-
 1
1 -
2
-
3
-
4
-
5
-
6
-
7
-
8
-
9
-
10
-
11
-
12
-
13
-
14
-
15
-
16
-
17
-
18
-
19
-
20
-
21
-
22
-
23
-
24
-
25
-
26
-
27
-
28
-
29
-
30
-
31
-
32
-
33
-
34
-
35
-
36
-
37
-
38
-
39
-
40
-
41
-
42
-
43
-
44
-
45
-
46
-
47
-
48
-
49
-
50
-
51
-
52
-
53
-
54
-
55
-
56
-
57
-
58
-
59
-
60
-
61
-
62
-
63
-
64
-
65
-
66
-
67
-
68
-
69
-
70
-
71
-
72
-
73
-
74
-
75
-
76
-
77
-
78
-
79
-
80
-
81
-
82
-
83
-
84
-
85
-
86
-
87
-
88
-
 89
89 -
 90
90 -
 91
91 -
 92
92 -
 93
93 -
 94
94 -
 95
95 -
 96
96 -
 97
97 -
 98
98 -
 99
99 -
100
-
101
-
102
-
103
-
104
-
105
-
106
-
107
-
108
-
109
-
110
-
111
-
112
-
113
-
114
-
115
-
116
-
117
-
118
-
119
-
120
-
121
-
122
-
123
 |
 |
