Netgear R7900P User Manual - Page 140
Disable LED Blinking or Turn Off LEDs, Manage the Router and Monitor the Traffic
 |
View all Netgear R7900P manuals
Add to My Manuals
Save this manual to your list of manuals |
Page 140 highlights
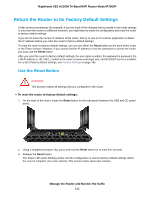
Nighthawk X6S AC3000 Tri-Band WiFi Router Model R7900P The BASIC Home page displays. 4. Select ADVANCED > Administration > Backup Settings. The Backup Settings page displays. 5. Click the Browse button and navigate to and select the saved configuration file. The name of the backup file from which you can restore the configuration is NETGEAR_R7900P.cfg. 6. Click the Restore button. The configuration is uploaded to the router. When the restoration is complete, the router reboots. This process takes about two minutes. WARNING: To avoid the risk of corrupting the firmware, do not interrupt the restoration. For example, do not close the browser, click a link, or load a new page. Do not turn off the router. Wait until the router finishes restarting and the Power LED turns solid white. Disable LED Blinking or Turn Off LEDs The LEDs on the top panel of the router indicate activities and behavior. You can disable LED blinking for network communications, or turn off all LEDs except the Power LED. To disable LED blinking or turn off the LEDs: 1. Launch a web browser from a computer or mobile device that is connected to the network. 2. Enter http://www.routerlogin.net. A login window opens. 3. Enter the router user name and password. The user name is admin. The default password is password. The user name and password are case-sensitive. The BASIC Home page displays. 4. Select ADVANCED > Advanced Setup > LED Control Settings. The LED Control Settings page displays. By default, the first radio button is selected, which allows standard LED behavior. For more information about LEDs, see LEDs and Buttons on the Top Panel on page 11. 5. To disable blinking, select the Disable blinking on Internet LED, LAN LED, Wireless LED and USB LED when data traffic is detected radio button. 6. To turn off all LEDs except the Power LED, select the Turn off all LEDs except Power LED radio button. 7. Click the Apply button. Your settings are saved. Manage the Router and Monitor the Traffic 140
-
 1
1 -
2
-
3
-
4
-
5
-
6
-
7
-
8
-
9
-
10
-
11
-
12
-
13
-
14
-
15
-
16
-
17
-
18
-
19
-
20
-
21
-
22
-
23
-
24
-
25
-
26
-
27
-
28
-
29
-
30
-
31
-
32
-
33
-
34
-
35
-
36
-
37
-
38
-
39
-
40
-
41
-
42
-
43
-
44
-
45
-
46
-
47
-
48
-
49
-
50
-
51
-
52
-
53
-
54
-
55
-
56
-
57
-
58
-
59
-
60
-
61
-
62
-
63
-
64
-
65
-
66
-
67
-
68
-
69
-
70
-
71
-
72
-
73
-
74
-
75
-
76
-
77
-
78
-
79
-
80
-
81
-
82
-
83
-
84
-
85
-
86
-
87
-
88
-
89
-
90
-
91
-
92
-
93
-
94
-
95
-
96
-
97
-
98
-
99
-
100
-
101
-
102
-
103
-
104
-
105
-
106
-
107
-
108
-
109
-
110
-
111
-
112
-
113
-
114
-
115
-
116
-
117
-
118
-
119
-
120
-
121
-
122
-
123
-
124
-
125
-
126
-
127
-
128
-
129
-
130
-
131
-
132
-
133
-
134
-
 135
135 -
 136
136 -
 137
137 -
 138
138 -
 139
139 -
 140
140 -
 141
141 -
 142
142 -
 143
143 -
 144
144 -
 145
145 -
146
-
147
-
148
-
149
-
150
-
151
-
152
-
153
-
154
-
155
-
156
-
157
-
158
-
159
-
160
-
161
-
162
-
163
-
164
-
165
-
166
-
167
-
168
-
169
-
170
-
171
-
172
-
173
-
174
-
175
-
176
-
177
-
178
-
179
-
180
-
181
-
182
-
183
-
184
-
185
-
186
-
187
-
188
-
189
 |
 |