Netgear R7900P User Manual - Page 98
Safely Remove a USB Device, To remove a USB device safely
 |
View all Netgear R7900P manuals
Add to My Manuals
Save this manual to your list of manuals |
Page 98 highlights
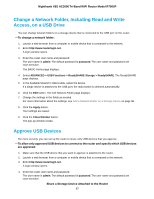
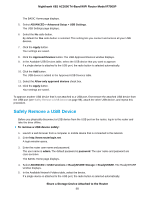
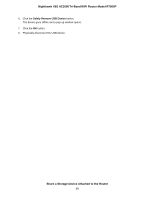
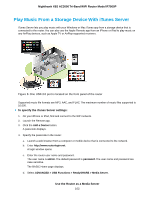
Nighthawk X6S AC3000 Tri-Band WiFi Router Model R7900P The BASIC Home page displays. 5. Select ADVANCED > Advanced Setup > USB Settings. The USB Settings page displays. 6. Select the No radio button. By default the Yes radio button is selected. This setting lets you connect and access all your USB devices. 7. Click the Apply button. Your settings are saved. 8. Click the Approved Devices button. The USB Approved Devices window displays. 9. In the Available USB Devices table, select the USB device that you want to approve. If a single device is attached to the USB port, the radio button is selected automatically. 10. Click the Add button. The USB device is added to the Approved USB Devices table. 11. Select the Allow only approved devices check box. 12. Click the Apply button. Your settings are saved. To approve another USB device that is not attached to a USB port, first remove the attached USB device from the USB port (see Safely Remove a USB Device on page 98), attach the other USB device, and repeat this procedure. Safely Remove a USB Device Before you physically disconnect a USB device from the USB port on the router, log in to the router and take the drive offline. To remove a USB device safely: 1. Launch a web browser from a computer or mobile device that is connected to the network. 2. Enter http://www.routerlogin.net. A login window opens. 3. Enter the router user name and password. The user name is admin. The default password is password. The user name and password are case-sensitive. The BASIC Home page displays. 4. Select ADVANCED > USB Functions > ReadySHARE Storage > ReadySHARE. The ReadySHARE window displays. 5. In the Available Network Folders table, select the device. If a single device is attached to the USB port, the radio button is selected automatically. Share a Storage Device Attached to the Router 98
-
 1
1 -
2
-
3
-
4
-
5
-
6
-
7
-
8
-
9
-
10
-
11
-
12
-
13
-
14
-
15
-
16
-
17
-
18
-
19
-
20
-
21
-
22
-
23
-
24
-
25
-
26
-
27
-
28
-
29
-
30
-
31
-
32
-
33
-
34
-
35
-
36
-
37
-
38
-
39
-
40
-
41
-
42
-
43
-
44
-
45
-
46
-
47
-
48
-
49
-
50
-
51
-
52
-
53
-
54
-
55
-
56
-
57
-
58
-
59
-
60
-
61
-
62
-
63
-
64
-
65
-
66
-
67
-
68
-
69
-
70
-
71
-
72
-
73
-
74
-
75
-
76
-
77
-
78
-
79
-
80
-
81
-
82
-
83
-
84
-
85
-
86
-
87
-
88
-
89
-
90
-
91
-
92
-
 93
93 -
 94
94 -
 95
95 -
 96
96 -
 97
97 -
 98
98 -
 99
99 -
 100
100 -
 101
101 -
 102
102 -
 103
103 -
104
-
105
-
106
-
107
-
108
-
109
-
110
-
111
-
112
-
113
-
114
-
115
-
116
-
117
-
118
-
119
-
120
-
121
-
122
-
123
-
124
-
125
-
126
-
127
-
128
-
129
-
130
-
131
-
132
-
133
-
134
-
135
-
136
-
137
-
138
-
139
-
140
-
141
-
142
-
143
-
144
-
145
-
146
-
147
-
148
-
149
-
150
-
151
-
152
-
153
-
154
-
155
-
156
-
157
-
158
-
159
-
160
-
161
-
162
-
163
-
164
-
165
-
166
-
167
-
168
-
169
-
170
-
171
-
172
-
173
-
174
-
175
-
176
-
177
-
178
-
179
-
180
-
181
-
182
-
183
-
184
-
185
-
186
-
187
-
188
-
189
 |
 |