Netgear WN203 User Manual - Page 16
Ethernet Cabling Requirements, LAN Configuration Requirements
 |
View all Netgear WN203 manuals
Add to My Manuals
Save this manual to your list of manuals |
Page 16 highlights
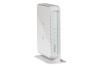
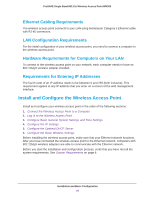
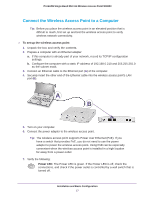
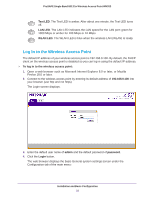
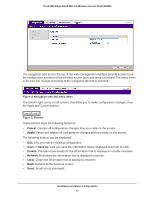
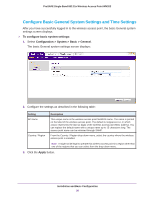
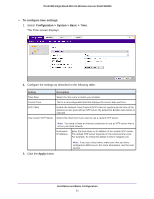
ProSAFE Single Band 802.11n Wireless Access Point WN203 Ethernet Cabling Requirements The wireless access point connects to your LAN using twisted-pair Category 5 Ethernet cable with RJ-45 connectors. LAN Configuration Requirements For the initial configuration of your wireless access point, you need to connect a computer to the wireless access point. Hardware Requirements for Computers on Your LAN To connect to the wireless access point on your network, each computer needs to have an 802.11b/g/n wireless adapter installed. Requirements for Entering IP Addresses The fourth octet of an IP address needs to be between 0 and 255 (both inclusive). This requirement applies to any IP address that you enter on a screen of the web management interface. Install and Configure the Wireless Access Point Install and configure your wireless access point in the order of the following sections: 1. Connect the Wireless Access Point to a Computer 2. Log In to the Wireless Access Point 3. Configure Basic General System Settings and Time Settings 4. Configure the IP Settings 5. Configure the Optional DHCP Server 6. Configure the Basic Wireless Settings Before installing the wireless access point, make sure that your Ethernet network functions. After you have connected the wireless access point to the Ethernet network, computers with 802.11b/g/n wireless adapters are able to communicate with the Ethernet network. Before you start the installation and configuration process, verify that you have met all the system requirements. See System Requirements on page 8. Installation and Basic Configuration 16
-
 1
1 -
2
-
3
-
4
-
5
-
6
-
7
-
8
-
9
-
10
-
 11
11 -
 12
12 -
 13
13 -
 14
14 -
 15
15 -
 16
16 -
 17
17 -
 18
18 -
 19
19 -
 20
20 -
 21
21 -
22
-
23
-
24
-
25
-
26
-
27
-
28
-
29
-
30
-
31
-
32
-
33
-
34
-
35
-
36
-
37
-
38
-
39
-
40
-
41
-
42
-
43
-
44
-
45
-
46
-
47
-
48
-
49
-
50
-
51
-
52
-
53
-
54
-
55
-
56
-
57
-
58
-
59
-
60
-
61
-
62
-
63
-
64
-
65
-
66
-
67
-
68
-
69
-
70
-
71
-
72
-
73
-
74
-
75
-
76
-
77
-
78
-
79
-
80
-
81
-
82
-
83
-
84
-
85
-
86
-
87
-
88
-
89
-
90
-
91
-
92
-
93
-
94
-
95
-
96
-
97
-
98
-
99
-
100
-
101
-
102
-
103
-
104
-
105
-
106
-
107
-
108
-
109
-
110
-
111
-
112
-
113
-
114
-
115
-
116
-
117
-
118
-
119
-
120
-
121
-
122
-
123
-
124
-
125
-
126
-
127
-
128
-
129
-
130
-
131
-
132
-
133
 |
 |
