Panasonic AG-HPX600PJ Operating Instructions - Page 109
Deleting clips, Restoring clips, Reconnecting incomplete clips
 |
View all Panasonic AG-HPX600PJ manuals
Add to My Manuals
Save this manual to your list of manuals |
Page 109 highlights
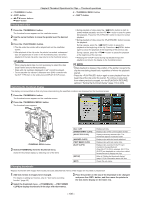
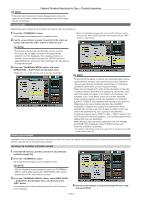
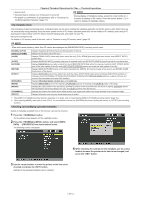
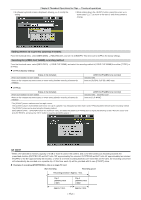
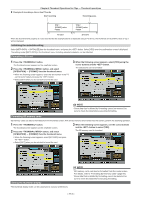
Chapter 6 Thumbnail Operations for Clips - Thumbnail operations Using a text memo to divide a clip and copy the necessary portion 1 Perform steps 1 to 3 in "Playing back from the text memo position" (page 108) to select the desired text memo in a clip. 2 Move the pointer to the text memo to be copied and press the button. You can select multiple text memos. 3 Press the button, and select [OPERATION] → [COPY]. 4 Use the cursor buttons and the button to select the destination slot, and then select [YES]. ffCopying starts. Deleting clips ffThe portion between the selected text memo and the next one is copied. If no text memo is found after the selected one, then the part after the selected text memo to the end of the clip is copied. ffIf multiple text memos are selected, the selected sections are copied. ffWhile the clip is being copied, the camera indicates the progress of the copy process and cancelation status. To discontinue the copy process, press the button. When the [YES]/[NO] confirmation screen is displayed, use the cursor buttons and the button to select [YES]. @@NOTE tt In clip division and copying using the text memo function, the area copied may be automatically modified depending on the recording format of the clip. 1 Press the button. The thumbnail screen appears on the viewfinder screen. 2 Use the cursor buttons to move the pointer over the clip to be delete and press the button to select the clip. 3 Press the button, and select [OPERATION] → [DELETE] from the thumbnail menu. 4 When the following screen appears, use the cursor buttons and the button to select [YES]. The clip is deleted. All selected clips (in blue-green frames) are deleted by this operation. @@NOTE tt To interrupt deleting, press the button + button or the button to cancel the operation. The already deleted clips cannot be restored even if the deletion process is aborted. Restoring clips Restores clips that are defective as a result of sudden power-down during recording or removal of the P2 card being accessed. @@NOTE tt The clips with yellow defective clip indicators can be restored. Delete clips with red defective clip indicators. If the clips cannot be deleted, format the P2 card. During restoration of the clips, however, the defective clip indicator may change from yellow to red, and result in inability to restore the clips. 1 Press the button. The thumbnail screen appears on the viewfinder screen. 2 Use the cursor buttons to move the pointer over the clip to be restored (defective clips are indicated by defective clip marks) and press the button to select the clip. 3 Press the button, and select [OPERATION] → [REPAIR CLIP] from the thumbnail menu. When a confirmation screen asks you to confirm that you want to repair the clip, select [YES] using the cursor buttons and the button to restore the clip. Reconnecting incomplete clips Incomplete clips may be generated when clips recorded on multiple P2 cards (connected clips) are separately copied from each card. The reconnection function generates one clip (the original, connected clip) from incomplete clips. 1 Press the button. The thumbnail screen appears on the viewfinder screen. 2 Use the cursor buttons and the button to select incomplete clips to be reconnected. Usually, thumbnails of incomplete clips (clips with [ ] indicator) are displayed in line. 3 Press the button, and select [OPERATION] → [RE-CONNECTION] from the thumbnail menu. When a confirmation screen asks you to confirm that you want to reconnect the clip, select [YES] using the cursor buttons and the button to reconnect the incomplete clips. - 109 -
-
 1
1 -
2
-
3
-
4
-
5
-
6
-
7
-
8
-
9
-
10
-
11
-
12
-
13
-
14
-
15
-
16
-
17
-
18
-
19
-
20
-
21
-
22
-
23
-
24
-
25
-
26
-
27
-
28
-
29
-
30
-
31
-
32
-
33
-
34
-
35
-
36
-
37
-
38
-
39
-
40
-
41
-
42
-
43
-
44
-
45
-
46
-
47
-
48
-
49
-
50
-
51
-
52
-
53
-
54
-
55
-
56
-
57
-
58
-
59
-
60
-
61
-
62
-
63
-
64
-
65
-
66
-
67
-
68
-
69
-
70
-
71
-
72
-
73
-
74
-
75
-
76
-
77
-
78
-
79
-
80
-
81
-
82
-
83
-
84
-
85
-
86
-
87
-
88
-
89
-
90
-
91
-
92
-
93
-
94
-
95
-
96
-
97
-
98
-
99
-
100
-
101
-
102
-
103
-
 104
104 -
 105
105 -
 106
106 -
 107
107 -
 108
108 -
 109
109 -
 110
110 -
 111
111 -
 112
112 -
 113
113 -
 114
114 -
115
-
116
-
117
-
118
-
119
-
120
-
121
-
122
-
123
-
124
-
125
-
126
-
127
-
128
-
129
-
130
-
131
-
132
-
133
-
134
-
135
-
136
-
137
-
138
-
139
-
140
-
141
-
142
-
143
-
144
-
145
-
146
-
147
-
148
-
149
-
150
-
151
-
152
-
153
-
154
-
155
-
156
-
157
-
158
-
159
-
160
-
161
-
162
-
163
-
164
-
165
-
166
-
167
-
168
-
169
-
170
-
171
-
172
-
173
-
174
-
175
-
176
-
177
-
178
 |
 |
