Panasonic AG-HPX600PJ Operating Instructions - Page 150
Writing back to the P2 card when the hard disk drive type is [TYPE S] or [P2STORE], Notes when using
 |
View all Panasonic AG-HPX600PJ manuals
Add to My Manuals
Save this manual to your list of manuals |
Page 150 highlights
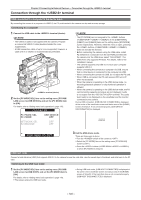
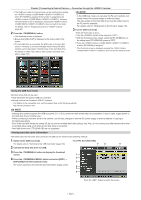
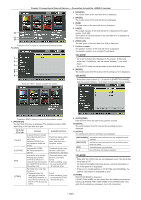
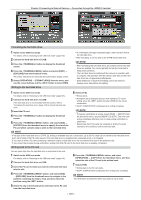
Chapter 9 Connecting to External Devices - Connection through the terminal Writing back to the P2 card when the hard disk drive type is [TYPE S] or [P2STORE] You can write back on a card basis. Format the P2 card to be written back in advance. 1 Switch to the USB host mode. For details, refer to "Switching to the USB host mode" (page 146). 2 Connect the hard disk drive via USB. 3 Insert the P2 card to which you want to write back the clips into the slot. 4 Press the button, and select [HDD] → [EXPLORE] from the thumbnail menu to navigate to the partition containing the data to read, and then select the partition using the button. 5 Select [OPERATION] → [IMPORT] from the thumbnail menu, and select the slot where the empty P2 card is installed. 6 Select [YES]. Writing to the card starts. ff[COPY COMPLETED!] is displayed when writing back completes. @@NOTE tt You cannot perform an import operation to P2 cards of different models on a partition basis. Import on a clip basis. tt To bypass verification at writing back, select [HDD] → [SETUP] from the thumbnail menu, and set [VERIFY] to [OFF]. The time until writing back completes shortens, but no data writing back verification is performed. tt If you write back a clip to a P2 card other than the P2 card to which that clip was originally saved, the clip written back may be an incomplete clip. In that case, merge the clips. For details, refer to "Reconnecting incomplete clips" (page 109). Notes when using a hard disk drive ffUse the hard disk drive (including [P2STORE]) in the following conditions. -- Use the hard disk drive within its operational range (such as temperature). -- Do not place the hard disk drive in a location that is unstable or subject to vibration. ffSome hard disk drives may not function properly. ffA hard disk drive with the SATA (serial ATA) or PATA (parallel ATA) interface connected with a USB conversion cable may not be recognized. ffUse a hard disk drive with a sufficient space for a copy operation. ffDuring a format or copy operation, do not unplug the cable, eject the target P2 card, or turn off the camera or the hard disk drive. Reboot of the camera and hard disk drive reboot may be required. For the power supply for the camera, use the fully charged battery or external DC power supply. ffBecause the hard disk drive is a very sensitive device, there is a chance that you may not be able to read or write data depending on your usage. ffPlease note that Panasonic has no responsibility for data loss caused from a hard disk drive failure or other defects and any direct or indirect damage related to these. ffIf the contents of the hard disk drive used for a copy operation from the camera are replaced using another computer, the behavior of that hard disk drive with the camera or its data is not guaranteed afterwards. ffUse the drive mount converter published in the support desk at the following Web site to mount the connected hard disk drive to a specified folder. http://pro-av.panasonic.net/ - 150 -
-
 1
1 -
2
-
3
-
4
-
5
-
6
-
7
-
8
-
9
-
10
-
11
-
12
-
13
-
14
-
15
-
16
-
17
-
18
-
19
-
20
-
21
-
22
-
23
-
24
-
25
-
26
-
27
-
28
-
29
-
30
-
31
-
32
-
33
-
34
-
35
-
36
-
37
-
38
-
39
-
40
-
41
-
42
-
43
-
44
-
45
-
46
-
47
-
48
-
49
-
50
-
51
-
52
-
53
-
54
-
55
-
56
-
57
-
58
-
59
-
60
-
61
-
62
-
63
-
64
-
65
-
66
-
67
-
68
-
69
-
70
-
71
-
72
-
73
-
74
-
75
-
76
-
77
-
78
-
79
-
80
-
81
-
82
-
83
-
84
-
85
-
86
-
87
-
88
-
89
-
90
-
91
-
92
-
93
-
94
-
95
-
96
-
97
-
98
-
99
-
100
-
101
-
102
-
103
-
104
-
105
-
106
-
107
-
108
-
109
-
110
-
111
-
112
-
113
-
114
-
115
-
116
-
117
-
118
-
119
-
120
-
121
-
122
-
123
-
124
-
125
-
126
-
127
-
128
-
129
-
130
-
131
-
132
-
133
-
134
-
135
-
136
-
137
-
138
-
139
-
140
-
141
-
142
-
143
-
144
-
 145
145 -
 146
146 -
 147
147 -
 148
148 -
 149
149 -
 150
150 -
 151
151 -
 152
152 -
 153
153 -
 154
154 -
 155
155 -
156
-
157
-
158
-
159
-
160
-
161
-
162
-
163
-
164
-
165
-
166
-
167
-
168
-
169
-
170
-
171
-
172
-
173
-
174
-
175
-
176
-
177
-
178
 |
 |
