Panasonic AG-HPX600PJ Operating Instructions - Page 23
Shooting and recording/playback functions Dial position, Setting, Description, <OFF>
 |
View all Panasonic AG-HPX600PJ manuals
Add to My Manuals
Save this manual to your list of manuals |
Page 23 highlights
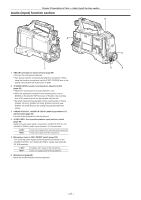
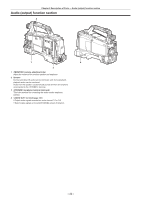
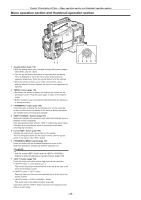
Chapter 2 Description of Parts - Shooting and recording/playback functions section Shooting and recording/playback functions section 1 2 34 5678 9 rr Shooting and recording (Camera unit) 1 (filter switching) dial (page 35) Adjust the amount of light entering the MOS sensor. Used when there is strong natural light. Dial position Setting Description The ND filter is not used. The amount of light entering the MOS sensor is reduced to 1/4. The amount of light entering the MOS sensor is reduced to 1/16. The amount of light entering the MOS sensor is reduced to 1/64. 2 Shutter switch (page 56) Turn on/off the electronic shutter. The electronic shutter is disabled. The electronic shutter is enabled. The speed of the electronic shutter can be changed. This is a spring switch. Each turn towards the side alters the shutter speed. 3 switch (page 53) White balance is automatically adjusted. When this switch is operated with the switch on the side set to the or position, adjustment is performed in several seconds and adjustment values are stored in memory. When the switch is at the position, the preset color temperature can be changed by setting the switch towards the side, and setting it once again towards the side while the color temperature is displayed. Black balance is automatically adjusted. 4 buttons (//) (page 60) Assign user-selected functions to each button. Pressing each button performs the assigned function. 5 switch (page 78) This is the spring switch to check the shooting status of the camera. ffWhen it is pushed towards the side, all displays other than the operating mode display and frame display such as area, and the counter, marker, and safety zone on the viewfinder screen turn off. ffPush it towards the side to display all information such as the setting status of the shooting functions and functions assigned to the buttons (//) on the viewfinder screen during camera standby or shooting. While the information is displayed, push it towards the side again to display the proxy and network setting status (only when the option is installed). The mode check information display disappears after approximately three seconds. 6 switch (page 53) ffSwitch the video amplifier gain according to the lighting conditions under which you are shooting. ffThe gain values for the // positions can be set by [LOW GAIN], [MID GAIN] or [HIGH GAIN] items on the setting menu [SW MODE] screen. ffFactory settings are L=0 dB, M=6 dB and H=12 dB. 7 / selector switch Select the video signals output to the memory, viewfinder and video monitor from the camera unit. CAM.AUTO KNEE ON CAM.AUTO KNEE OFF Video captured on the camera is output and the auto knee function is activated. Instead of the auto knee function, the dynamic range stretcher (DRS) function can be assigned. Video captured with the camera is output and the auto knee function is not activated. The knee point is fixed to the level set by menu operations. The color bar signal is output. The auto knee function is disabled. @@NOTE tt Auto knee function Usually, when you adjust levels to shoot people or scenery against a strongly lit background, the background will be totally white-out, with buildings and other objects blurred. In such a case, the auto knee function reproduces the background clearly. The auto knee function is effective when shooting the following scenes: - The subject is a person positioned in the shade under a clear sky. - The subject is a person inside a car or a building, and you also want to capture the background visible through a window. - The subject is a high-contrast scene. 8 (white balance memory selector) switch (page 53) Select the white balance adjustment method. - 23 -
-
 1
1 -
2
-
3
-
4
-
5
-
6
-
7
-
8
-
9
-
10
-
11
-
12
-
13
-
14
-
15
-
16
-
17
-
 18
18 -
 19
19 -
 20
20 -
 21
21 -
 22
22 -
 23
23 -
 24
24 -
 25
25 -
 26
26 -
 27
27 -
 28
28 -
29
-
30
-
31
-
32
-
33
-
34
-
35
-
36
-
37
-
38
-
39
-
40
-
41
-
42
-
43
-
44
-
45
-
46
-
47
-
48
-
49
-
50
-
51
-
52
-
53
-
54
-
55
-
56
-
57
-
58
-
59
-
60
-
61
-
62
-
63
-
64
-
65
-
66
-
67
-
68
-
69
-
70
-
71
-
72
-
73
-
74
-
75
-
76
-
77
-
78
-
79
-
80
-
81
-
82
-
83
-
84
-
85
-
86
-
87
-
88
-
89
-
90
-
91
-
92
-
93
-
94
-
95
-
96
-
97
-
98
-
99
-
100
-
101
-
102
-
103
-
104
-
105
-
106
-
107
-
108
-
109
-
110
-
111
-
112
-
113
-
114
-
115
-
116
-
117
-
118
-
119
-
120
-
121
-
122
-
123
-
124
-
125
-
126
-
127
-
128
-
129
-
130
-
131
-
132
-
133
-
134
-
135
-
136
-
137
-
138
-
139
-
140
-
141
-
142
-
143
-
144
-
145
-
146
-
147
-
148
-
149
-
150
-
151
-
152
-
153
-
154
-
155
-
156
-
157
-
158
-
159
-
160
-
161
-
162
-
163
-
164
-
165
-
166
-
167
-
168
-
169
-
170
-
171
-
172
-
173
-
174
-
175
-
176
-
177
-
178
 |
 |
