Panasonic AG-HPX600PJ Operating Instructions - Page 94
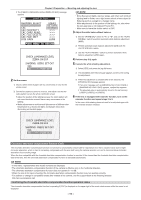
White shading compensation, SHADINGUSER, CAC PROPERTY, CAC CARD READ, CAC FILE DELETE, CAC FILE INIT
 |
View all Panasonic AG-HPX600PJ manuals
Add to My Manuals
Save this manual to your list of manuals |
Page 94 highlights
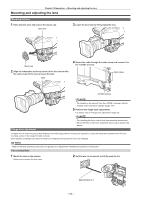
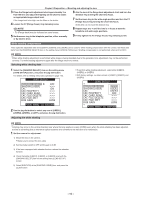
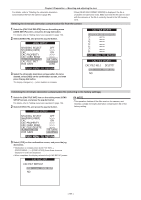
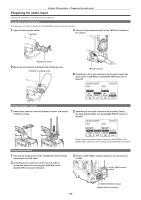
Chapter 5 Preparation - Mounting and adjusting the lens 3 Place the flange back adjustment chart approximately 3 m from the lens and adjust the lighting on the chart to obtain an appropriate image output level. If the image level is too high, use the filters or the shutter. 4 Loosen the F.f (Flange focus) ring clamping screw. 6 Aim the lens at the flange back adjustment chart and turn the distance ring to bring the chart into focus. 7 Set the zoom ring to the wide-angle position and turn the F.f (Flange focus) ring to bring the chart into focus. At this time, do not move the distance ring. @@NOTE tt F.b (Flange back) may be indicated on some lenses. 5 Set the zoom ring to the telephoto position, either manually or by electric drive. 8 Repeat steps 5 to 7 until the lens is in focus at both the telephoto and wide-angle positions. 9 Firmly tighten the F.f (Flange focus) ring clamping screw. White shading compensation Three optionally adjustable data items [USER1], [USER2], and [USER3] can be used for white shading compensation with the camera. Set these data items from the [SHADING SELECT] item on the setting menu [LENS SETUP] screen. Shading compensation is not performed when set it to [OFF]. @@NOTE tt When white shading adjustment is performed while image is being disturbed due to the generator lock, adjustment may not be performed correctly. Try white shading adjustment again after the image returns to normal. Selecting white shading data 1 Select the [SHADING SELECT] item on the setting menu [LENS SETUP] screen, and press the jog dial button. For details, refer to "Setting menu basic operations" (page 118). LENS SETUP SHADING SELECT SHADING(USER) CAC CAC PROPERTY CAC CARD READ CAC FILE DELETE CAC FILE INIT IRIS GAIN OFF >>> ON LENS PUSH MENU TO RETURN 2 Use the jog dial button to select any one of [USER1], [USER2], [USER3], or [OFF], and press the jog dial button. Adjusting the white shading ffTo perform white shading adjustment, select either [USER1], [USER2], or [USER3]. ffWith factory settings, no data is stored in [USER1], [USER2], and [USER3]. LENS SETUP SHADING SELECT SHADING(USER) CAC CAC PROPERTY CAC CARD READ CAC FILE DELETE CAC FILE INIT IRIS GAIN USER1 USER2 USER3 OFF LENS PUSH MENU TO RETURN @@NOTE tt Coloring may occur in the vertical direction near where the lens aperture is open (OPEN) even when the white shading has been adjusted, but this is something that is inherent to optical systems and is therefore not indicative of a malfunction. 1 Set the camera for adjustment. 1) Mount the lens on the camera. ffMake sure to connect the lens cable. 2) Set the shutter switch to OFF and the gain to 0 dB. 3) If the lens is equipped with extender function, release the extender function. 4) Check that either [USER1], [USER2], or [USER3] is set with the [SHADING SELECT] item on the setting menu [LENS SETUP] screen. 5) Select [EXECUTE] at the [SHADING (USER)] item, and press the jog dial button. - 94 -
-
 1
1 -
2
-
3
-
4
-
5
-
6
-
7
-
8
-
9
-
10
-
11
-
12
-
13
-
14
-
15
-
16
-
17
-
18
-
19
-
20
-
21
-
22
-
23
-
24
-
25
-
26
-
27
-
28
-
29
-
30
-
31
-
32
-
33
-
34
-
35
-
36
-
37
-
38
-
39
-
40
-
41
-
42
-
43
-
44
-
45
-
46
-
47
-
48
-
49
-
50
-
51
-
52
-
53
-
54
-
55
-
56
-
57
-
58
-
59
-
60
-
61
-
62
-
63
-
64
-
65
-
66
-
67
-
68
-
69
-
70
-
71
-
72
-
73
-
74
-
75
-
76
-
77
-
78
-
79
-
80
-
81
-
82
-
83
-
84
-
85
-
86
-
87
-
88
-
 89
89 -
 90
90 -
 91
91 -
 92
92 -
 93
93 -
 94
94 -
 95
95 -
 96
96 -
 97
97 -
 98
98 -
 99
99 -
100
-
101
-
102
-
103
-
104
-
105
-
106
-
107
-
108
-
109
-
110
-
111
-
112
-
113
-
114
-
115
-
116
-
117
-
118
-
119
-
120
-
121
-
122
-
123
-
124
-
125
-
126
-
127
-
128
-
129
-
130
-
131
-
132
-
133
-
134
-
135
-
136
-
137
-
138
-
139
-
140
-
141
-
142
-
143
-
144
-
145
-
146
-
147
-
148
-
149
-
150
-
151
-
152
-
153
-
154
-
155
-
156
-
157
-
158
-
159
-
160
-
161
-
162
-
163
-
164
-
165
-
166
-
167
-
168
-
169
-
170
-
171
-
172
-
173
-
174
-
175
-
176
-
177
-
178
 |
 |
