Panasonic AG-HPX600PJ Operating Instructions - Page 149
Formatting the hard disk drive, Writing back to the P2 card, Select [OPERATION]
 |
View all Panasonic AG-HPX600PJ manuals
Add to My Manuals
Save this manual to your list of manuals |
Page 149 highlights
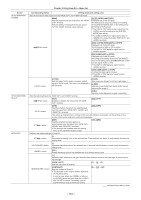
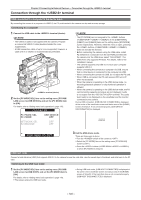
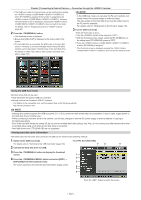
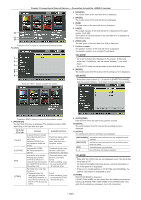
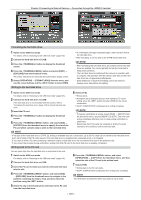
Chapter 9 Connecting to External Devices - Connection through the terminal Formatting the hard disk drive 1 Switch to the USB host mode. For details, refer to "Switching to the USB host mode" (page 146). 2 Connect the hard disk drive via USB. 3 Press the button to display the thumbnail screen. 4 Press the button and select [HDD] → [EXPLORE] from the thumbnail menu. The screen switches to the hard disk drive information display screen. 5 Select [OPERATION] → [FORMAT (HDD)] from the menu, and use the cursor buttons and the button to select [YES]. Writing to the hard disk drive ffA confirmation message is displayed again. Select [YES] to format the hard disk drive. ffAfter formatting, it can be used as the [TYPE S] hard disk drive. @@NOTE tt After formatting the hard disk drive, all contents of the hard disk drive are deleted. You cannot partially format the hard disk to keep some partitions. tt The hard disk drive formatted with the camera is rewritten with a computer, the operation with the camera and data on the hard disk drive are not guaranteed afterwards. tt Data deleted as a result of formatting cannot be restored. Always check data before formatting. 1 Switch to the USB host mode. For details, refer to "Switching to the USB host mode" (page 146). 2 Connect the hard disk drive via USB. If the hard disk drive is not formatted with the camera, refer to "Formatting the hard disk drive" (page 149) to format the hard disk drive. 3 Insert the P2 card. 4 Press the button to display the thumbnail screen. 5 Press the button, and select [HDD] → [EXPORT] from the thumbnail menu to specify the slot of the P2 card which contains data to write to the hard disk drive. 6 Select [YES]. ffWriting starts. ffA progress bar is displayed during a write operation. To cancel writing, press the button and select [YES] for the cancel confirmation. ff[COPY COMPLETED!] is displayed when writing completes. @@NOTE tt To bypass verification at writing, select [HDD] → [SETUP] from the thumbnail menu, and set [VERIFY] to [OFF]. The time until writing completes shortens, but no data writing verification is performed. tt Select [ALL SLOT] to write the contents of all the P2 cards inserted in the camera in bulk to the hard disk. @@NOTE tt If the type of the hard disk drive is [TYPE S], writing is available only on a card basis. Up to 23 P2 cards can be saved to the hard disk drive. Each set of data in the P2 cards saved in the hard disk drive is recognized as a separate drive in a computer. tt If you want to write a P2 card containing a defective clip to a hard disk drive, we recommend that you fix the defective clip. tt If you cancel the process during verification, writing from that P2 card to the hard disk drive is already completed. Writing back to the P2 card You can select clips from the hard disk drive to write back to the card. 1 Switch to the USB host mode. For details, refer to "Switching to the USB host mode" (page 146). 2 Connect the hard disk drive via USB. 3 Insert the P2 card to which you want to write back the clips into the slot. 4 Press the button, and select [HDD] → [EXPLORE] from the thumbnail menu to navigate to the partition containing the data to read, and then select the partition using the button. 6 Press the button, and select [OPERATION] → [COPY] from the thumbnail menu, and then select the slot of the P2 card to be written back. 7 Select [YES]. ffWriting back to the P2 card starts. ff[COPY COMPLETED!] is displayed when writing back completes. @@NOTE tt No verification is performed when you select a clip to write. 5 Select the clip in the thumbnail to write back to the P2 card from the hard disk drive. - 149 -
-
 1
1 -
2
-
3
-
4
-
5
-
6
-
7
-
8
-
9
-
10
-
11
-
12
-
13
-
14
-
15
-
16
-
17
-
18
-
19
-
20
-
21
-
22
-
23
-
24
-
25
-
26
-
27
-
28
-
29
-
30
-
31
-
32
-
33
-
34
-
35
-
36
-
37
-
38
-
39
-
40
-
41
-
42
-
43
-
44
-
45
-
46
-
47
-
48
-
49
-
50
-
51
-
52
-
53
-
54
-
55
-
56
-
57
-
58
-
59
-
60
-
61
-
62
-
63
-
64
-
65
-
66
-
67
-
68
-
69
-
70
-
71
-
72
-
73
-
74
-
75
-
76
-
77
-
78
-
79
-
80
-
81
-
82
-
83
-
84
-
85
-
86
-
87
-
88
-
89
-
90
-
91
-
92
-
93
-
94
-
95
-
96
-
97
-
98
-
99
-
100
-
101
-
102
-
103
-
104
-
105
-
106
-
107
-
108
-
109
-
110
-
111
-
112
-
113
-
114
-
115
-
116
-
117
-
118
-
119
-
120
-
121
-
122
-
123
-
124
-
125
-
126
-
127
-
128
-
129
-
130
-
131
-
132
-
133
-
134
-
135
-
136
-
137
-
138
-
139
-
140
-
141
-
142
-
143
-
 144
144 -
 145
145 -
 146
146 -
 147
147 -
 148
148 -
 149
149 -
 150
150 -
 151
151 -
 152
152 -
 153
153 -
 154
154 -
155
-
156
-
157
-
158
-
159
-
160
-
161
-
162
-
163
-
164
-
165
-
166
-
167
-
168
-
169
-
170
-
171
-
172
-
173
-
174
-
175
-
176
-
177
-
178
 |
 |
