Panasonic AG-HPX600PJ Operating Instructions - Page 26
Menu operation and thumbnail operation
 |
View all Panasonic AG-HPX600PJ manuals
Add to My Manuals
Save this manual to your list of manuals |
Page 26 highlights
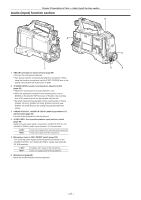
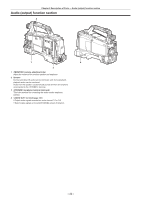
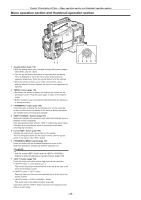
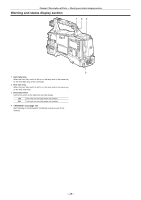
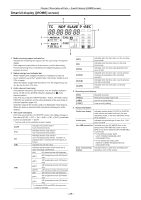
Chapter 2 Description of Parts - Menu operation section and thumbnail operation section Menu operation section and thumbnail operation section 12 1 Jog dial button (page 118) ffWith the setting menu open, navigate through setting menu pages, select items, and set values. ffTurn the jog dial button downwards or upwards while the setting menu is displayed to move the menu cursor downwards and upwards, respectively. Press the jog dial button to fix the settings. ffWhen the shutter switch is set to and synchro scan is selected without the menu opened, the synchro scan speed can be adjusted. 2 button (page 118) ffHold down this button to display the setting menu screen on the viewfinder screen. Press the button again to return to the original image. ffButton operations are not accepted while thumbnails are displayed or during recording. 3 button (page 105) Press the button to display the thumbnail screen on the viewfinder screen and the monitor connected to the camera. Button operations are disabled during recording and playback. 4 / buttons (page 105) Restore the display to the previous state while the thumbnail menu or property screen is displayed. Also, pressing this button with the button held down makes it function as a cancel button, which is convenient when batchcanceling clip selections. 5 Cursor/ button (page 105) Operate the setting menu, menu bars and thumbnails. The four triangular buttons are the cursor buttons, and the square button in the center is the button. 6 button (page 105) Press this button with the thumbnail displayed to move to the thumbnail operations, allowing clip deletion operation, etc. @@NOTE tt Use the cursor/ button and the / buttons to select thumbnails or operate menus. (page 105) 7 button (page 105) Press this button with other buttons held down at the same time. ff button + cursor button (`/{) This moves the pointer to the thumbnail of the clip at the start or the end in the thumbnail screen. ff button + button Select all clips from the previously selected clip up to the clip at the pointer position. ff button + / button This works as the cancelation function. (page 26) Operations with the button held down are displayed at the bottom of each button. 34567 - 26 -
-
 1
1 -
2
-
3
-
4
-
5
-
6
-
7
-
8
-
9
-
10
-
11
-
12
-
13
-
14
-
15
-
16
-
17
-
18
-
19
-
20
-
 21
21 -
 22
22 -
 23
23 -
 24
24 -
 25
25 -
 26
26 -
 27
27 -
 28
28 -
 29
29 -
 30
30 -
 31
31 -
32
-
33
-
34
-
35
-
36
-
37
-
38
-
39
-
40
-
41
-
42
-
43
-
44
-
45
-
46
-
47
-
48
-
49
-
50
-
51
-
52
-
53
-
54
-
55
-
56
-
57
-
58
-
59
-
60
-
61
-
62
-
63
-
64
-
65
-
66
-
67
-
68
-
69
-
70
-
71
-
72
-
73
-
74
-
75
-
76
-
77
-
78
-
79
-
80
-
81
-
82
-
83
-
84
-
85
-
86
-
87
-
88
-
89
-
90
-
91
-
92
-
93
-
94
-
95
-
96
-
97
-
98
-
99
-
100
-
101
-
102
-
103
-
104
-
105
-
106
-
107
-
108
-
109
-
110
-
111
-
112
-
113
-
114
-
115
-
116
-
117
-
118
-
119
-
120
-
121
-
122
-
123
-
124
-
125
-
126
-
127
-
128
-
129
-
130
-
131
-
132
-
133
-
134
-
135
-
136
-
137
-
138
-
139
-
140
-
141
-
142
-
143
-
144
-
145
-
146
-
147
-
148
-
149
-
150
-
151
-
152
-
153
-
154
-
155
-
156
-
157
-
158
-
159
-
160
-
161
-
162
-
163
-
164
-
165
-
166
-
167
-
168
-
169
-
170
-
171
-
172
-
173
-
174
-
175
-
176
-
177
-
178
 |
 |
