Panasonic AG-HPX600PJ Operating Instructions - Page 136
Setting menu basic operations, SmartUI basic operations, Initializing SmartUI setting menu items
 |
View all Panasonic AG-HPX600PJ manuals
Add to My Manuals
Save this manual to your list of manuals |
Page 136 highlights
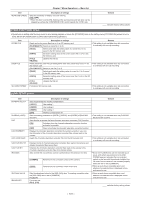
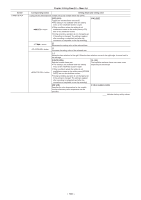
Chapter 8 Using SmartUI - Setting menu basic operations Setting menu basic operations SmartUI basic operations HOLD COUNTER RESET MONITOR SEL LIGHT 1 TC NDF SLAVE P -REC CAM 2 7 MEDIA CH1 A E F BATT CH2 E F 0 AUDIO -10 -18 3 -20 -30 SETUP dB 12 4 /REW STOP FF/ PLAY/PAUSE HOME 5 KEY LOCK 6 THUMBNAIL SET TOP SHIFT When the camera is turned on, the [HOME] screen is displayed. The status of the [HOME] screen at previous start-up is retained. 1 button Toggles the backlight of SmartUI on and off. Can be operated regardless of the status of the switch. 2 button Displays a settings screen related to the camera image. Each time you press the button, the settings screens change in order. 3 button Displays a settings screen related to audio. Each time you press the button, the settings screens change in order. 4 button Displays a settings screen related to time code and image output. Each time you press the button, the settings screens change in order. 5 button ffWhile another screen is displayed, press this button to return to the [HOME] screen. ffWhile the [HOME] screen is displayed, press this button to change the status information display at the bottom of the screen. 6 switch Slide to the right to lock the operations of all buttons of SmartUI. Slide to the left to unlock. * Buttons for thumbnail operations will be locked as well. 7 button, button, button, button, button, button, button, and button ffWhen the [HOME] screen is displayed The function printed above or below each button is performed. ffWhen the setting screen is displayed by pressing the button, button, or button on the [HOME] screen Instead of the printed functions, the functions in the [ ] of SmartUI are assigned to upper or lower buttons corresponding to each setting screen. For details, refer to "Menu list" (page 139). Initializing SmartUI setting menu items Items configured with SmartUI are saved in the user file. By selecting [INITIAL] in the [USER FILE] item of the [OTHER FUNCTIONS] screen, you can restore the user file menu setting to its factory setting. Use the [MENU INIT] item in the [OTHER FUNCTIONS] screen to restore all of the user files and six scene files to their factory settings. - 136 -
-
 1
1 -
2
-
3
-
4
-
5
-
6
-
7
-
8
-
9
-
10
-
11
-
12
-
13
-
14
-
15
-
16
-
17
-
18
-
19
-
20
-
21
-
22
-
23
-
24
-
25
-
26
-
27
-
28
-
29
-
30
-
31
-
32
-
33
-
34
-
35
-
36
-
37
-
38
-
39
-
40
-
41
-
42
-
43
-
44
-
45
-
46
-
47
-
48
-
49
-
50
-
51
-
52
-
53
-
54
-
55
-
56
-
57
-
58
-
59
-
60
-
61
-
62
-
63
-
64
-
65
-
66
-
67
-
68
-
69
-
70
-
71
-
72
-
73
-
74
-
75
-
76
-
77
-
78
-
79
-
80
-
81
-
82
-
83
-
84
-
85
-
86
-
87
-
88
-
89
-
90
-
91
-
92
-
93
-
94
-
95
-
96
-
97
-
98
-
99
-
100
-
101
-
102
-
103
-
104
-
105
-
106
-
107
-
108
-
109
-
110
-
111
-
112
-
113
-
114
-
115
-
116
-
117
-
118
-
119
-
120
-
121
-
122
-
123
-
124
-
125
-
126
-
127
-
128
-
129
-
130
-
 131
131 -
 132
132 -
 133
133 -
 134
134 -
 135
135 -
 136
136 -
 137
137 -
 138
138 -
 139
139 -
 140
140 -
 141
141 -
142
-
143
-
144
-
145
-
146
-
147
-
148
-
149
-
150
-
151
-
152
-
153
-
154
-
155
-
156
-
157
-
158
-
159
-
160
-
161
-
162
-
163
-
164
-
165
-
166
-
167
-
168
-
169
-
170
-
171
-
172
-
173
-
174
-
175
-
176
-
177
-
178
 |
 |
