Panasonic AG-HPX600PJ Operating Instructions - Page 143
[SETUP] screen, Screen, Corresponding button, Setting details and setting value, 0] to [9], TC_MD]
 |
View all Panasonic AG-HPX600PJ manuals
Add to My Manuals
Save this manual to your list of manuals |
Page 143 highlights
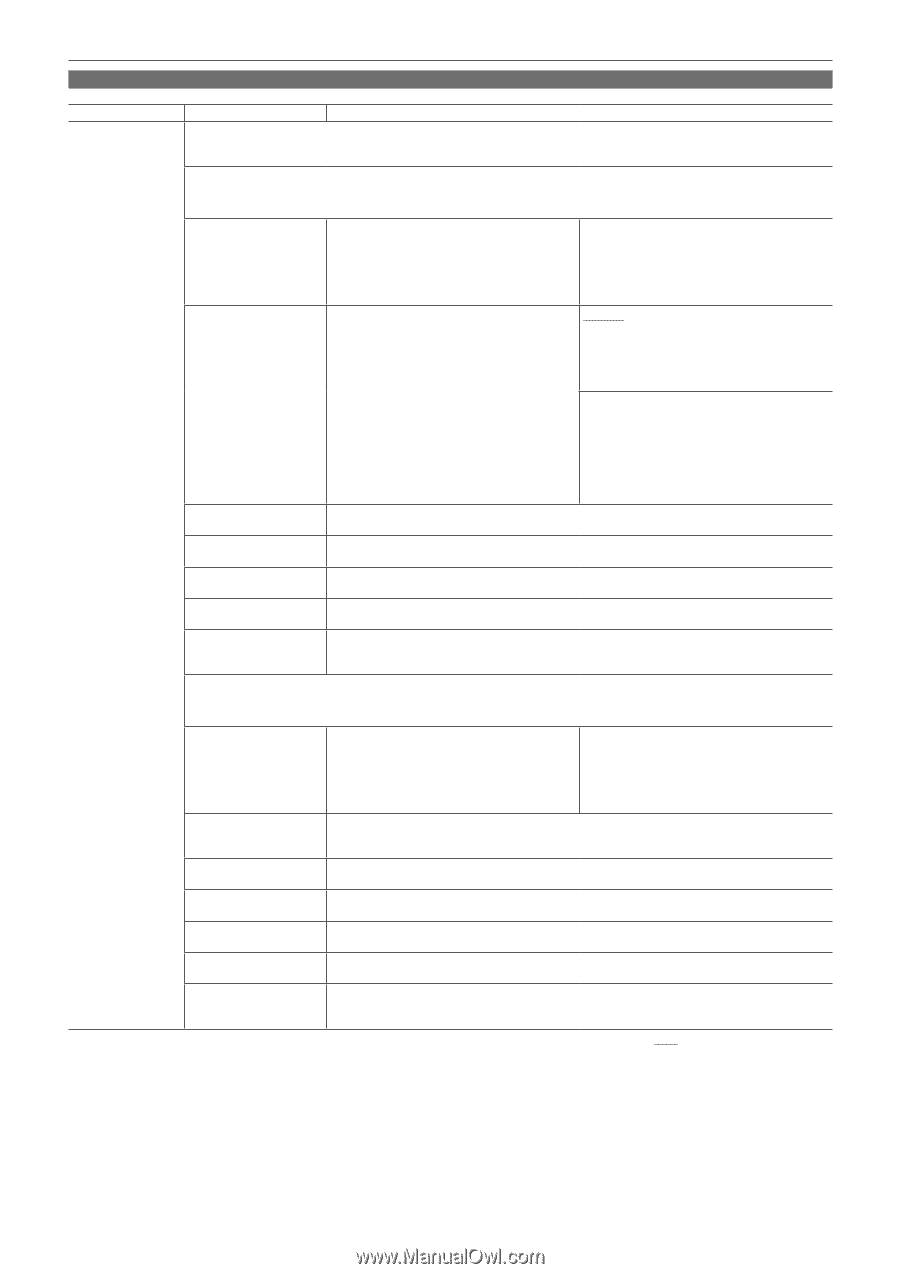
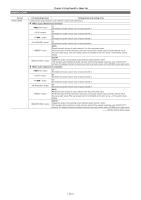
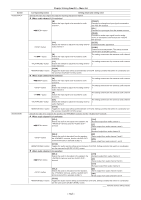
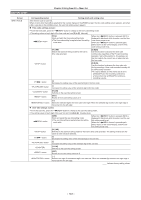
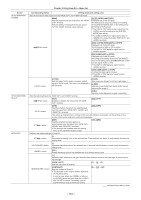
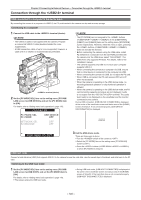
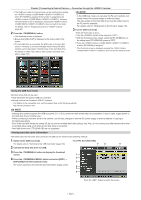
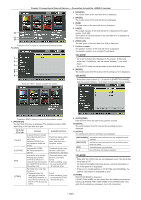
[SETUP] screen Chapter 8 Using SmartUI - Menu list Screen SET01:TC/UB Corresponding button Setting details and setting value Sets the time code or user bits. When an item other than [UB] is selected for the counter display on the [HOME] screen, the time code setting screen appears, and when [UB] is selected on the [HOME] screen, the user bits setting screen appears. rr Time code settings screen: ffTo set the time code, press the button to change to the time code setting mode. ffThe setting values of each digit of the time code are from [0] to [9] (decimal). button [TCG] Starts and exits the time code setting mode. ffThe time code setting is applied when the setting mode exits. When the button is pressed, [SET] is displayed in black and white inversion, and the time code setting mode is set. When the button is pressed again, [SET] returns to the normal display, and the time code setting mode exits. [TC_MD] Selects the advance setting mode for the built-in time code generator. [F‑RUN] Use this function to advance the time code continuously, regardless of the P2 card recording operation. Set to this position to, for example, set the time code to the current time or externally lock the time code. button [R‑RUN] Use this function to advance the time code only during recording. A time code recorded normally will be continuously recorded. ffIf a clip is deleted, or if the frame rate is set to [24P]/[24PA] and the recording continues to a frame other than [24P]/[24PA], continuous recording may fail. button [−] Decreases the setting value of the selected digit in the time code. button [+] Increases the setting value of the selected digit in the time code. button [TC/UB] Switches to the user bits setting screen. button [RST] Resets all time code setting values to 0. button [→] Moves the selected digit in the time code to the right. When the selected digit moves to the right edge, it moves back to the left edge. rr User bits settings screen: ffTo set the user bits, press the button to change to the user bits setting mode. ffThe setting values of each digit of the user bits are from [0] to [F] (hexadecimal). button [UBG] Starts and exists the user bits setting mode. ffThe user bits setting is applied when the setting mode exits. When the button is pressed, [SET] is displayed in black and white inversion, and the user bits setting mode is set. When the button is pressed again, [SET] returns to the normal display, and the user bits setting mode exits. button [TC_MD] Switches to the advance setting mode for the built-in time code generator. The setting contents are the same as when [TCG] is selected. button [−] Decreases the setting value of the selected digit in the user bits. button [+] Increases the setting value of the selected digit in the user bits. [TC/UB] Switches to the user bits setting screen. button [RST] Resets all user bits setting values to 0. button [→] Moves to the right of the selected digit in the user bits. When the selected digit moves to the right edge, it moves back to the left edge. indicates factory setting values. - 143 -
-
 1
1 -
2
-
3
-
4
-
5
-
6
-
7
-
8
-
9
-
10
-
11
-
12
-
13
-
14
-
15
-
16
-
17
-
18
-
19
-
20
-
21
-
22
-
23
-
24
-
25
-
26
-
27
-
28
-
29
-
30
-
31
-
32
-
33
-
34
-
35
-
36
-
37
-
38
-
39
-
40
-
41
-
42
-
43
-
44
-
45
-
46
-
47
-
48
-
49
-
50
-
51
-
52
-
53
-
54
-
55
-
56
-
57
-
58
-
59
-
60
-
61
-
62
-
63
-
64
-
65
-
66
-
67
-
68
-
69
-
70
-
71
-
72
-
73
-
74
-
75
-
76
-
77
-
78
-
79
-
80
-
81
-
82
-
83
-
84
-
85
-
86
-
87
-
88
-
89
-
90
-
91
-
92
-
93
-
94
-
95
-
96
-
97
-
98
-
99
-
100
-
101
-
102
-
103
-
104
-
105
-
106
-
107
-
108
-
109
-
110
-
111
-
112
-
113
-
114
-
115
-
116
-
117
-
118
-
119
-
120
-
121
-
122
-
123
-
124
-
125
-
126
-
127
-
128
-
129
-
130
-
131
-
132
-
133
-
134
-
135
-
136
-
137
-
 138
138 -
 139
139 -
 140
140 -
 141
141 -
 142
142 -
 143
143 -
 144
144 -
 145
145 -
 146
146 -
 147
147 -
 148
148 -
149
-
150
-
151
-
152
-
153
-
154
-
155
-
156
-
157
-
158
-
159
-
160
-
161
-
162
-
163
-
164
-
165
-
166
-
167
-
168
-
169
-
170
-
171
-
172
-
173
-
174
-
175
-
176
-
177
-
178
 |
 |