Panasonic AG-HPX600PJ Operating Instructions - Page 86
How to use scene file data, Changing scene file settings
 |
View all Panasonic AG-HPX600PJ manuals
Add to My Manuals
Save this manual to your list of manuals |
Page 86 highlights
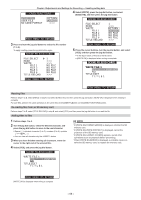
Chapter 4 Adjustments and Settings for Recording - Handling setting data 3 Select [YES] on the confirmation screen, and press the jog dial button. [SD CARD FORMAT OK] is displayed, and the SD memory card is formatted. @@NOTE tt Since data that is deleted by formatting cannot be restored, be sure to check the data before executing formatting. The card will not be formatted if the following message is displayed while the jog dial button is pressed: Error message [SD CARD FORMAT NG NO CARD] (No SD memory card is inserted.) [SD CARD FORMAT NG ERROR] (The card cannot be formatted.) [SD CARD FORMAT NG WRITE PROTECT] (The card is write-protected.) [SD CARD FORMAT NG CANNOT ACCESS] (The card cannot be accessed.) Remedy Insert an SD memory card. The SD memory card may be defective. Replace the card. Remove the SD memory card and cancel the protection. The SD memory card cannot be accessed. Wait for accessing to end and then reformat the card. How to use scene file data ffSettings matching various shooting conditions can be saved as individual scene file numbers. ffThe required files can be read in the [CAM02:SCENE FILE] screen of SmartUI. ffThe setting values of scene files can also be changed at each item of the setting menu (page 122). After a scene file is changed, it can also be saved as individual scene file numbers. ffEven when the [VFR] item (option) and the [F.RATE] item (option) are switched on SmartUI during recording, operation is not changed. The operation changes after recording completes. Same applies when the [VFR] item or the [F.RATE] item is changed by switching between [F1] to [F6] of scene files. rr Factory settings [F1] [F2]: [FLUO.] [F3]: [SPARK] [F4]: [B‑STR] [F5]: [CINE V] [F6]: [CINE D] File suitable for standard shooting File suitable for shooting factoring in the characteristics of fluorescent lighting (e.g. indoor shooting) File suitable for SD shooting with resolution, hue and contrast enhanced File suitable for shooting with shadow tones extended (e.g. sunsets) File suitable for film-like shooting with priority given to contrast File suitable for film-like shooting with priority given to dynamic range @@NOTE tt The [SYSTEM MODE] item is not changed even if a scene file is changed. Set this at each item on the setting menu [SYSTEM SETUP] screen. Changing scene file settings rr Renaming scene files 1 Use the button to display the [CAM02:SCENE FILE] screen of SmartUI, and select the scene file to be changed. 2 Select the [NAME EDIT] item on the setting menu [SCENE FILE] screen, and press the jog dial button. For details, refer to "Setting menu basic operations" (page 118). SCENE FILE F3:SPARK KNEE MATRIX SKIN TONE DTL V DETAIL FREQ NAME EDIT MID NORM1 OFF THIN RETURN CHANGE PUSH MENU TO RETURN 3 Select [CHANGE], and press the jog dial button. SCENE FILE F3:SPARK KNEE MATRIX SKIN TONE DTL V DETAIL FREQ NAME EDIT MID NORM1 OFF THIN RETURN CHANGE PUSH MENU TO RETURN 4 When the following screen is displayed, use the jog dial button to set a 6-character file name. ffTurning the jog dial button switches the character display in the order of space (m) → alphabet characters (A to Z) → numbers (0 to 9) → symbols - 86 -
-
 1
1 -
2
-
3
-
4
-
5
-
6
-
7
-
8
-
9
-
10
-
11
-
12
-
13
-
14
-
15
-
16
-
17
-
18
-
19
-
20
-
21
-
22
-
23
-
24
-
25
-
26
-
27
-
28
-
29
-
30
-
31
-
32
-
33
-
34
-
35
-
36
-
37
-
38
-
39
-
40
-
41
-
42
-
43
-
44
-
45
-
46
-
47
-
48
-
49
-
50
-
51
-
52
-
53
-
54
-
55
-
56
-
57
-
58
-
59
-
60
-
61
-
62
-
63
-
64
-
65
-
66
-
67
-
68
-
69
-
70
-
71
-
72
-
73
-
74
-
75
-
76
-
77
-
78
-
79
-
80
-
 81
81 -
 82
82 -
 83
83 -
 84
84 -
 85
85 -
 86
86 -
 87
87 -
 88
88 -
 89
89 -
 90
90 -
 91
91 -
92
-
93
-
94
-
95
-
96
-
97
-
98
-
99
-
100
-
101
-
102
-
103
-
104
-
105
-
106
-
107
-
108
-
109
-
110
-
111
-
112
-
113
-
114
-
115
-
116
-
117
-
118
-
119
-
120
-
121
-
122
-
123
-
124
-
125
-
126
-
127
-
128
-
129
-
130
-
131
-
132
-
133
-
134
-
135
-
136
-
137
-
138
-
139
-
140
-
141
-
142
-
143
-
144
-
145
-
146
-
147
-
148
-
149
-
150
-
151
-
152
-
153
-
154
-
155
-
156
-
157
-
158
-
159
-
160
-
161
-
162
-
163
-
164
-
165
-
166
-
167
-
168
-
169
-
170
-
171
-
172
-
173
-
174
-
175
-
176
-
177
-
178
 |
 |
