Panasonic AG-HPX600PJ Operating Instructions - Page 154
Inspections before shooting, Preparing to inspect, Inspecting the camera unit
 |
View all Panasonic AG-HPX600PJ manuals
Add to My Manuals
Save this manual to your list of manuals |
Page 154 highlights
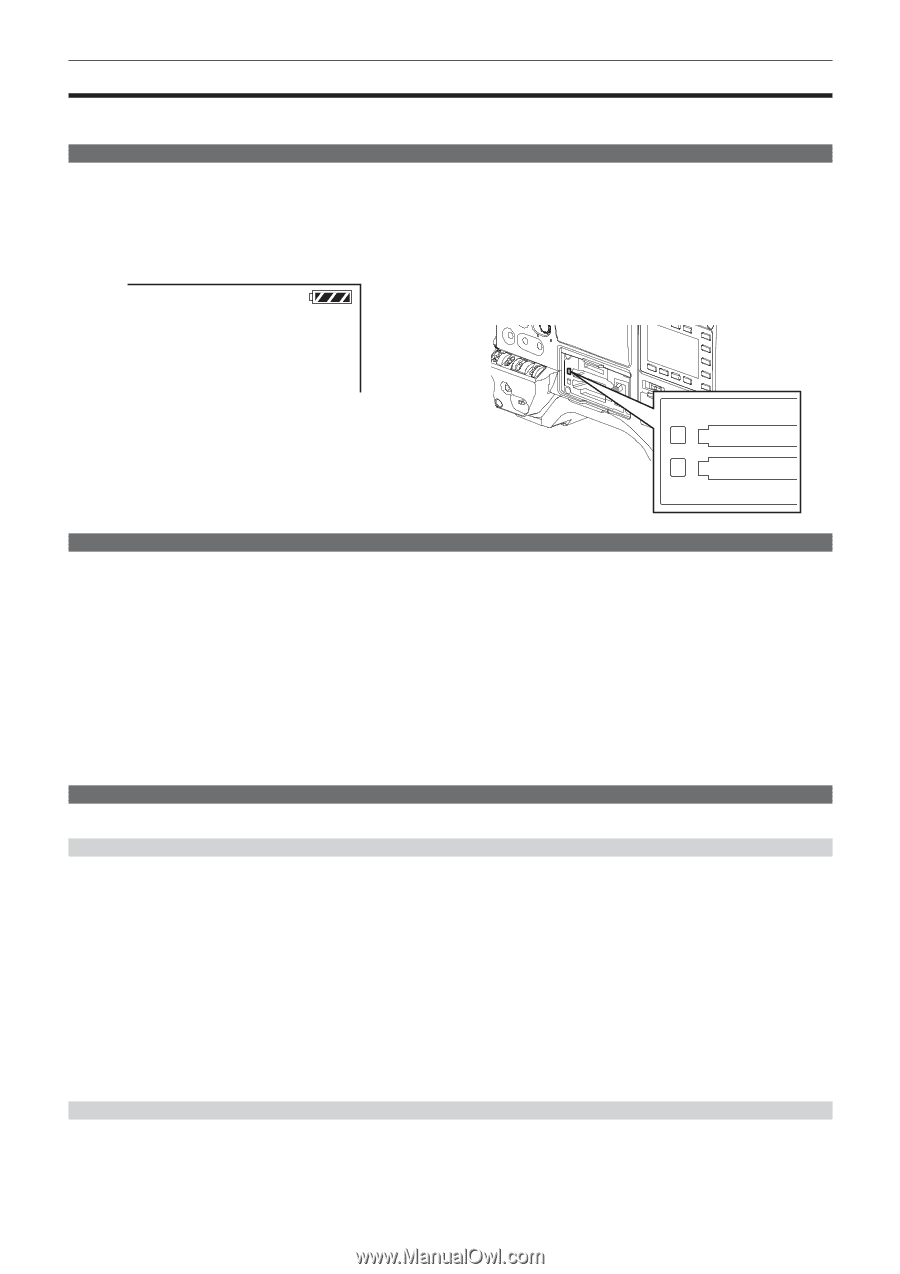
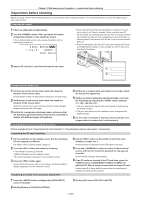
Chapter 10 Maintenance and Inspection - Inspections before shooting Inspections before shooting Before recording, perform the following inspection to ensure that the system operates properly. It is recommended that you check the image using a color video monitor. Preparing to inspect 1 Attach an adequately charged battery. 2 Turn the switch , and check the battery charge level indicator on the viewfinder screen. If the remaining battery level is low, replace the battery with an adequately charged one. 9 9 min B 9 0 % 1 -CL I P USER - 1 CAC DZ x 2 ffEnsure that the P2 card access LED lights in orange for the card slot to which the P2 card is inserted. If both card slots have P2 cards inserted, the orange access LED for the P2 card slot of the P2 card inserted first (the one that completed an access first) lights up, and the green P2 card access LED for the P2 card inserted second lights up. ffIf the P2 card access LED for the P2 card slot to which the P2 card is inserted flashes in green or does not light up, that P2 card is not available for recording. 3 Insert a P2 card into a card slot and close the slot cover. 1 2 Inspecting the camera unit 1 Set the zoom to the electric zoom mode and check the behavior of the electric zoom. Ensure that the image changes between telescopic and wide-angle. 2 Set the zoom to the manual zoom mode and check the behavior of the manual zoom. Rotate the manual zoom lever and ensure that the image changes between telescopic and wide-angle. 3 Set the iris to automatic adjustment mode, and ensure that the automatic adjustment works when the lens is pointed at objects with different degree of brightness. 4 Set the iris to manual mode and rotate the iris ring to check the manual iris adjustment. 5 Set the iris back to automatic adjustment mode, and check the followings by switching the switch setting to , , and then : ffThe iris is adjusted for objects with same degree of brightness as the setting changes. ffThe gain value display on the viewfinder screen changes as the setting changes. 6 If a lens with an extender is attached, set the extender to its usage position to ensure that it works properly. Inspecting the memory recording functions Perform procedures from "Inspecting the P2 card recording" to "Inspecting the earphone and speaker" successively. Inspecting the P2 card recording 1 On the viewfinder screen display, ensure that the remaining P2 card capacity is sufficient. For details, refer to "Screen display" (page 73). 2 Press the button and check the following: ffThe orange P2 access LED flashes. ff[REC] is displayed on the viewfinder screen. ffNo system warning is displayed on the viewfinder screen. 3 Press the button again. Ensure that the P2 access LED turns to orange, and that the [REC] display disappears from the viewfinder screen. Inspecting the audio level automatic adjustment 4 Use the button on the handle to check the same behaviors in steps 2 to 3. Perform the same inspection for the VTR button on the lens. 5 Press the button to switch to the thumbnail screen, and from the thumbnail, playback the clip you just recorded. Ensure that the clip plays back properly. 6 If two P2 cards are inserted in the P2 card slots, press the buttons (//) to which [SLOT SEL] is assigned and switch the target P2 card. Perform steps 2 to 3 and step 5 to ensure that the recording and playback functions operate properly. 1 Press the button to display the [AUD02:INPUT] screen of SmartUI. 2 Set the [IN] item in CH1/CH2 to [FRONT]. 3 Set the [LVL] item in CH1/CH2 to [AUTO]. - 154 -
-
 1
1 -
2
-
3
-
4
-
5
-
6
-
7
-
8
-
9
-
10
-
11
-
12
-
13
-
14
-
15
-
16
-
17
-
18
-
19
-
20
-
21
-
22
-
23
-
24
-
25
-
26
-
27
-
28
-
29
-
30
-
31
-
32
-
33
-
34
-
35
-
36
-
37
-
38
-
39
-
40
-
41
-
42
-
43
-
44
-
45
-
46
-
47
-
48
-
49
-
50
-
51
-
52
-
53
-
54
-
55
-
56
-
57
-
58
-
59
-
60
-
61
-
62
-
63
-
64
-
65
-
66
-
67
-
68
-
69
-
70
-
71
-
72
-
73
-
74
-
75
-
76
-
77
-
78
-
79
-
80
-
81
-
82
-
83
-
84
-
85
-
86
-
87
-
88
-
89
-
90
-
91
-
92
-
93
-
94
-
95
-
96
-
97
-
98
-
99
-
100
-
101
-
102
-
103
-
104
-
105
-
106
-
107
-
108
-
109
-
110
-
111
-
112
-
113
-
114
-
115
-
116
-
117
-
118
-
119
-
120
-
121
-
122
-
123
-
124
-
125
-
126
-
127
-
128
-
129
-
130
-
131
-
132
-
133
-
134
-
135
-
136
-
137
-
138
-
139
-
140
-
141
-
142
-
143
-
144
-
145
-
146
-
147
-
148
-
 149
149 -
 150
150 -
 151
151 -
 152
152 -
 153
153 -
 154
154 -
 155
155 -
 156
156 -
 157
157 -
 158
158 -
 159
159 -
160
-
161
-
162
-
163
-
164
-
165
-
166
-
167
-
168
-
169
-
170
-
171
-
172
-
173
-
174
-
175
-
176
-
177
-
178
 |
 |