Panasonic AG-HPX600PJ Operating Instructions - Page 162
Video encoder board (AG‑YDX600G), Proxy settings
 |
View all Panasonic AG-HPX600PJ manuals
Add to My Manuals
Save this manual to your list of manuals |
Page 162 highlights
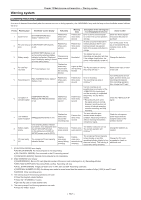
Chapter 11 Additional Functions from the Optional Board - Video encoder board (AG‑YDX600G) Video encoder board (AG‑YDX600G) When installing the video encoder board, consult the shop of purchase. For instructions to add the board, refer to the manual supplied with the video encoder board. rr Video encoder board (AG‑YDX600G) Install this board to enable high-resolution proxy video recording. The materials recorded with the camera can be converted to a compressed data file to save into a different area than that of the original materials. Images can be saved in high-resolution H.264/AVC format as well as MPEG4 format. For audio, besides AAC, uncompressed audio (LPCM) is supported. In addition to the traditional MPEG4 format, the MOV format more suitable for nonlinear editing is available. Video files, audio files, and real-time metadata file (time code, user bits, and UMID information) can be saved to the P2 card and SD memory card at the same time. The recorded materials can be saved as a smaller data file to allow efficient clip check or editing. Proxy settings Setting menu When recording the proxy data using the camera, use the setting menu [PROXY SETTING] screen. After a video encoder board is added, the following setting menu becomes available. Item REC MEDIA REC MODE (1080) REC MODE (720) REC MODE (SD) TC SUPER Description of settings Remark Selects media for recording proxy data. [P2] Records the proxy data to the P2 card. - [P2&SD] Records proxy data in both the P2 card and SD memory card. [OFF] Does not record proxy data. Sets the recording mode of proxy data. (Only in 1080i mode) For details on each mode, refer to "Recording modes and recording signals (video/audio)" (page 163). - [STD 2CH MP4], [SHQ 2CH MOV], [HQ 4CH MOV], [HQ 2CH MOV], [LOW 2CH MOV] Sets the proxy data recording mode when the 720P mode is selected. (Only in 720P mode) For details on each mode, refer to "Recording modes and recording signals (video/audio)" (page 163). - [STD 2CH MP4], [SHQ 2CH MOV], [HQ 4CH MOV], [HQ 2CH MOV] Sets the proxy data recording mode (in the SD mode only). For details on each mode, refer to "Recording modes and recording signals (video/audio)" (page 163). - [STD 2CH MP4], [LOW 2CH MOV] Sets superimposition of time code display on proxy data recorded images. [UPPER] [LOWER] Superimposes the time code display at the top of the recorded video. Superimposes the time code display at the bottom of the recorded - video. [OFF] Does not superimpose time code on recorded images. indicates factory setting values. ffIn the following modes, the proxy data is not recorded even if the [REC MEDIA] item is set to [P2] or [P2&SD]. -- Interval recording (including one-shot recording) -- Loop recording ffThe proxy function cannot be set when recording can be done to combine to the precedent clip during one-clip recording (when [1"CLIP] is displayed). Close the menu and press the button for approximately two seconds to stop combining to the clip, and try the operations again. ffThe proxy setting menu may change if the SD memory card data, where the user file settings are saved with [WRITE] selected at the [USER FILE] item on the setting menu [CARD FUNCTIONS] screen using the camera without this board, is read into the camera with this board. Checking the setting status Push the switch on the camera towards the side twice to check the menu values of [REC MEDIA], [REC MODE], and [TC SUPER] with the mode check function. Checking the version information The following version information is displayed in the [VERSION] item of the setting menu [DIAGNOSTIC] screen. Item PROXY SOFT PROXY FPGA Description of settings The software version of this board is displayed. The FPGA version of this board is displayed. Remark - 162 -
-
 1
1 -
2
-
3
-
4
-
5
-
6
-
7
-
8
-
9
-
10
-
11
-
12
-
13
-
14
-
15
-
16
-
17
-
18
-
19
-
20
-
21
-
22
-
23
-
24
-
25
-
26
-
27
-
28
-
29
-
30
-
31
-
32
-
33
-
34
-
35
-
36
-
37
-
38
-
39
-
40
-
41
-
42
-
43
-
44
-
45
-
46
-
47
-
48
-
49
-
50
-
51
-
52
-
53
-
54
-
55
-
56
-
57
-
58
-
59
-
60
-
61
-
62
-
63
-
64
-
65
-
66
-
67
-
68
-
69
-
70
-
71
-
72
-
73
-
74
-
75
-
76
-
77
-
78
-
79
-
80
-
81
-
82
-
83
-
84
-
85
-
86
-
87
-
88
-
89
-
90
-
91
-
92
-
93
-
94
-
95
-
96
-
97
-
98
-
99
-
100
-
101
-
102
-
103
-
104
-
105
-
106
-
107
-
108
-
109
-
110
-
111
-
112
-
113
-
114
-
115
-
116
-
117
-
118
-
119
-
120
-
121
-
122
-
123
-
124
-
125
-
126
-
127
-
128
-
129
-
130
-
131
-
132
-
133
-
134
-
135
-
136
-
137
-
138
-
139
-
140
-
141
-
142
-
143
-
144
-
145
-
146
-
147
-
148
-
149
-
150
-
151
-
152
-
153
-
154
-
155
-
156
-
 157
157 -
 158
158 -
 159
159 -
 160
160 -
 161
161 -
 162
162 -
 163
163 -
 164
164 -
 165
165 -
 166
166 -
 167
167 -
168
-
169
-
170
-
171
-
172
-
173
-
174
-
175
-
176
-
177
-
178
 |
 |
