Panasonic AG-HPX600PJ Operating Instructions - Page 129
[display Setup] Screen, Time&date]
 |
View all Panasonic AG-HPX600PJ manuals
Add to My Manuals
Save this manual to your list of manuals |
Page 129 highlights
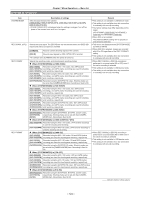
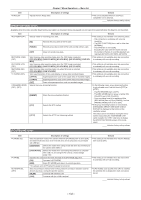
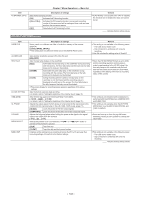
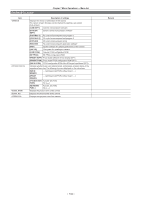
Item AUTO REC (OP2) MON/HDMI ZEBRA TC IN/OUT SEL TC OUT TC VIDEO SYNC Chapter 7 Menu Operations - Menu list Description of settings Selects the function that automatically starts or stops recording by detecting REC START/STOP mark from the frame rate information of user bits added to the HD SDI input signal in HD mode. [TYPE1] Performs automatic recording by detecting from LTC of the HD SDI input signal. [TYPE2] Performs automatic recording by detecting from VITC of the HD SDI input signal. [OFF] Does not perform automatic recording. Selects whether the zebra pattern is superimposed over the output signals from the , , and terminals. (The remote VBS signal also interlocks.) [ON] Superimposes zebra patterns. [OFF] Does not superimpose zebra patterns. Selects whether to use the terminal in TC IN or TC OUT. [TC OUT] Uses TC OUT. [TC IN] Uses TC IN. Sets the time code type output from the terminal. [TCG] Always outputs the time code generator value of the camera. [TCG/TCR] Outputs the time code generator value when outputting camera images, and outputs the played time code value when outputting playback images. Sets the output delay of time code output from the terminal. [RECORDING] Outputs TCG to be recorded without delay. [VIDEO OUT] Outputs images according to the delay of output images from the and terminals. Remark ffSet the user bits added to the HD SDI signal at the output device of the HD SDI signal as the frame rate. For setting procedure, refer to the operating instruction of the output device. ffSet the [REC SIGNAL] item to [SDI IN], and input the HD SDI signal to the terminal. ffFor frame rate information of the user bits, refer to "User bits settings" (page 66). ffThis setting interlocks with the setting of [ZBR] on the [SET03:MON/HDMI SETUP] screen of SmartUI. indicates factory setting values. [DISPLAY SETUP] screen Item EVF PEAK LEVEL EVF PEAK FREQ EVF TYPE EVF COLOR ZEBRA1 DETECT ZEBRA2 DETECT ZEBRA2 MARKER SAFETY ZONE FOCUS BAR DATE/TIME LEVEL METER Description of settings Adjusts the peaking level of the viewfinder screen. [−7] ... [0] ... [+7] Adjusts the peaking frequency of the viewfinder screen. [LOW] Sets the peaking frequency lower. [HIGH] Sets the peaking frequency higher. Selects the type of viewfinder to be connected. [COLOR] Connects the color viewfinder. (AJ‑CVF100G, AG‑CVF10G) [B/W] Connects the black and white viewfinder. (AJ‑HVF21KG) Selects whether to display viewfinder images in color or in black and white. [ON] Displays in color. [OFF] Displays in black and white. Sets the level of zebra pattern 1 tilting to the right. [50%] ... [70%] ... [109%] Sets the level of zebra pattern 2 tilting to the left. [50%] ... [85%] ... [109%] Selects the type of ZEBRA2. (page 81) [ON], [SPOT], [OFF] Sets on/off of the center marker displayed on the viewfinder screen. (page 81) [ON], [OFF] Sets the safety zone displayed on the viewfinder screen. (page 81) [90%], [4:3], [13:9], [14:9], [OFF] Sets the function to indicate the focus level with bar size. [ON] Displays the focus bar. [OFF] Does not display the focus bar. Sets the date and time display. [TIME] Displays hour, minute, and second. [DATE] Displays year, month, and day. [TIME&DATE] Displays hour, minute, second as well as year, month and day. [OFF] Does not display. Sets the audio level meter display. [ON], [OFF] Remark ffThis setting is not available when the [EVF TYPE] item is set to [B/W]. ffWhen the [SYSTEM MODE] item is set to [480‑59.94i] or [576‑50i], and the [ASPECT CONV] item is set to [SIDE CROP] and [LETTER BOX], the safety zone is not displayed even when [4:3], [13:9], or [14:9] is selected. ffIt is not interlocked with the focus assist button. indicates factory setting values. - 129 -
-
 1
1 -
2
-
3
-
4
-
5
-
6
-
7
-
8
-
9
-
10
-
11
-
12
-
13
-
14
-
15
-
16
-
17
-
18
-
19
-
20
-
21
-
22
-
23
-
24
-
25
-
26
-
27
-
28
-
29
-
30
-
31
-
32
-
33
-
34
-
35
-
36
-
37
-
38
-
39
-
40
-
41
-
42
-
43
-
44
-
45
-
46
-
47
-
48
-
49
-
50
-
51
-
52
-
53
-
54
-
55
-
56
-
57
-
58
-
59
-
60
-
61
-
62
-
63
-
64
-
65
-
66
-
67
-
68
-
69
-
70
-
71
-
72
-
73
-
74
-
75
-
76
-
77
-
78
-
79
-
80
-
81
-
82
-
83
-
84
-
85
-
86
-
87
-
88
-
89
-
90
-
91
-
92
-
93
-
94
-
95
-
96
-
97
-
98
-
99
-
100
-
101
-
102
-
103
-
104
-
105
-
106
-
107
-
108
-
109
-
110
-
111
-
112
-
113
-
114
-
115
-
116
-
117
-
118
-
119
-
120
-
121
-
122
-
123
-
 124
124 -
 125
125 -
 126
126 -
 127
127 -
 128
128 -
 129
129 -
 130
130 -
 131
131 -
 132
132 -
 133
133 -
 134
134 -
135
-
136
-
137
-
138
-
139
-
140
-
141
-
142
-
143
-
144
-
145
-
146
-
147
-
148
-
149
-
150
-
151
-
152
-
153
-
154
-
155
-
156
-
157
-
158
-
159
-
160
-
161
-
162
-
163
-
164
-
165
-
166
-
167
-
168
-
169
-
170
-
171
-
172
-
173
-
174
-
175
-
176
-
177
-
178
 |
 |
