Panasonic AG-HPX600PJ Operating Instructions - Page 113
Formatting a P2 card, Formatting SD memory cards, Setting the thumbnail display
 |
View all Panasonic AG-HPX600PJ manuals
Add to My Manuals
Save this manual to your list of manuals |
Page 113 highlights
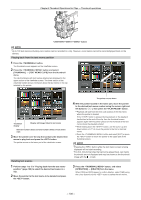
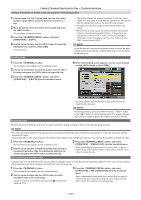
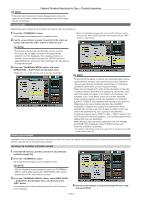
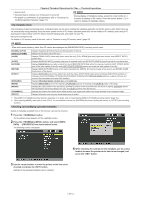
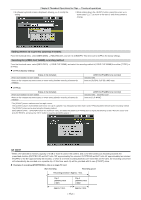
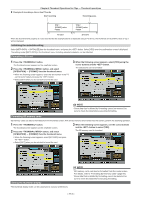
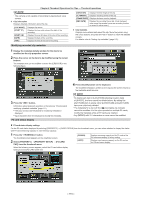
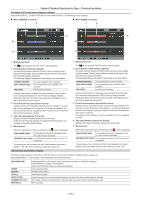
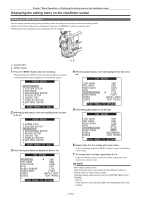
Chapter 6 Thumbnail Operations for Clips - Thumbnail operations rr Example of recording a clip on two P2 cards Start recording Recording pause Clip 1 [COUNT] value = 0003 Clip 2 [COUNT] value = 0004 1st card 2nd card When the thumbnail and property of a clip recorded like the example above is displayed using a P2 device, the thumbnail and [COUNT] value of clip 1 will be displayed. Initializing the metadata setting Select [META DATA] → [INITIALIZE] from the thumbnail menu, and press the button. Select [YES] when the confirmation screen is displayed. The settings under [META DATA] in the thumbnail menu, including uploaded metadata, can be initialized. Formatting a P2 card 1 Press the button. The thumbnail screen appears on the viewfinder screen. 2 Press the button, and select [OPERATION] → [FORMAT] from the thumbnail menu. ffWhen the following screen appears, select the slot number of the P2 card to be formatted and press the button. ffSelect [EXIT] when you do not wish to format the card. 3 When the following screen appears, select [YES] using the cursor buttons and the button. The selected P2 card is formatted. @@NOTE tt Since data that is deleted by formatting cannot be restored, be sure to check the data before executing formatting. Formatting SD memory cards SD memory cards can also be formatted from the thumbnail screen. With an SD memory card inserted into the camera, perform the following operation. 1 Press the button. The thumbnail screen appears on the viewfinder screen. 2 Press the button, and select [OPERATION] → [FORMAT] from the thumbnail menu. ffWhen the following screen appears, select [SD CARD] and press the button. ffSelect [EXIT] when you do not wish to format the card. 3 When the following screen appears, use the cursor buttons and the button to select [YES]. The SD memory card is formatted. Setting the thumbnail display The thumbnail display mode can be customized to suit your preferences. @@NOTE tt SD memory cards can also be formatted from the menu screen. For details, refer to "Formatting SD memory cards" (page 85). tt Since data that is deleted by formatting cannot be restored, be sure to check the data before executing formatting. - 113 -
-
 1
1 -
2
-
3
-
4
-
5
-
6
-
7
-
8
-
9
-
10
-
11
-
12
-
13
-
14
-
15
-
16
-
17
-
18
-
19
-
20
-
21
-
22
-
23
-
24
-
25
-
26
-
27
-
28
-
29
-
30
-
31
-
32
-
33
-
34
-
35
-
36
-
37
-
38
-
39
-
40
-
41
-
42
-
43
-
44
-
45
-
46
-
47
-
48
-
49
-
50
-
51
-
52
-
53
-
54
-
55
-
56
-
57
-
58
-
59
-
60
-
61
-
62
-
63
-
64
-
65
-
66
-
67
-
68
-
69
-
70
-
71
-
72
-
73
-
74
-
75
-
76
-
77
-
78
-
79
-
80
-
81
-
82
-
83
-
84
-
85
-
86
-
87
-
88
-
89
-
90
-
91
-
92
-
93
-
94
-
95
-
96
-
97
-
98
-
99
-
100
-
101
-
102
-
103
-
104
-
105
-
106
-
107
-
 108
108 -
 109
109 -
 110
110 -
 111
111 -
 112
112 -
 113
113 -
 114
114 -
 115
115 -
 116
116 -
 117
117 -
 118
118 -
119
-
120
-
121
-
122
-
123
-
124
-
125
-
126
-
127
-
128
-
129
-
130
-
131
-
132
-
133
-
134
-
135
-
136
-
137
-
138
-
139
-
140
-
141
-
142
-
143
-
144
-
145
-
146
-
147
-
148
-
149
-
150
-
151
-
152
-
153
-
154
-
155
-
156
-
157
-
158
-
159
-
160
-
161
-
162
-
163
-
164
-
165
-
166
-
167
-
168
-
169
-
170
-
171
-
172
-
173
-
174
-
175
-
176
-
177
-
178
 |
 |
