Panasonic AG-HPX600PJ Operating Instructions - Page 123
Menu Operations - Menu list, CINELIKE V]
 |
View all Panasonic AG-HPX600PJ manuals
Add to My Manuals
Save this manual to your list of manuals |
Page 123 highlights
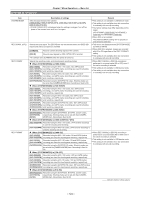
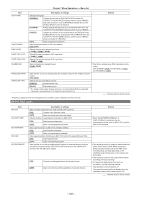
Item MASTER PED A. IRIS LEVEL DRS EFFECT GAMMA KNEE MATRIX SKIN TONE DTL V DETAIL FREQ NAME EDIT Chapter 7 Menu Operations - Menu list Description of settings Adjusts the master pedestal (black level of the image) as the basis for images. [−100] ... [+12] ... [+100] Remark ffPress and turn up or down the jog dial button, and keep pressing it at the position to change the value faster. ffWhen the remote control unit (AJ‑RC10G) or the extension control unit (AG‑EC4G) is connected, make adjustments with the M‑PED volume of the remote control unit or the extension control unit. Sets the desired auto iris level. [−10] ... [0] ... [+10] Sets the compression level for the high-brightness areas of the dynamic range stretcher function. It enables the dynamic range to be expanded by compressing the level of the video signals in the high-brightness areas where overexposure results during normal shooting. [1], [2], [3] ffThe higher the value of the setting, the higher the compression level of the high- brightness areas and the level of noise in dark areas. Selects the gamma curve. [HD NORM] [LOW] Suitable for HD shooting. Makes a mellow image using a gamma curve that has a gentle incline in low-brightness curve. The contrast sharpens. ffWhen 1080i and progressive mode are set, the dynamic range stretcher function is not activated even if [DRS EFFECT] is set. ffSet the [AUTO KNEE SW] item on the [SW MODE] screen is set to [DRS] and push the / selector switch towards the side to activate the dynamic range stretcher function. ffWhile the dynamic range stretcher function is activated and when the [CAMERA] item is set to [CINE‑LIKE], images are not changed even if the setting is changed. [SD NORM] This is the normal video setting carried over from the DVX100 series. [HIGH] Expands the tone of dark parts and makes a brighter image using a gamma curve that has a sharp incline in low-brightness curve. The contrast softens. [B.PRESS] Makes the contrast sharper than [LOW]. [CINELIKE D] Uses a gamma curve designed to create cinema-like images. [CINELIKE V] Uses a gamma curve designed to create cinema-like images with emphasized contrast. ffWhen you select [CINE‑LIKE] gamma, we recommend setting the lens aperture lower than normal image level (approximately 1/2) for optimal results. To avoid overexposure, select the compression level (knee point) of the high intensity video signals received through the MOS sensor. [HIGH] High setting (Compression starts at approx. 100%) [MID] Medium setting (Compression starts at approx. 90%) [LOW] Low setting (Compression starts at approx. 80%) ffWhile the dynamic range stretcher function is activated, images do not change when the setting is changed. ffTo set the knee point automatically according to the signals received, use the switch. Selects the matrix table suitable for the desired color expression during shooting. [NORM1] Suitable for shooting in the open air or under a halogen lamp. [NORM2] Suitable for brighter colors than the [NORM1] mode. [FLUO] Suitable for shooting under fluorescent lights indoors. [CINE‑LIKE] Suitable for shooting cinema-like images. Switches skin tone details [ON]/[OFF]. Select [ON] to reduce the skin tone details and soften the skin tone. [ON], [OFF] Sets the vertical detail. [THIN] Makes the detail thin. [MID] Makes the detail slightly thick. [THICK] Makes the detail thick. ffWhen images shot with the [THIN] or [MID] setting in progressive mode are played back on a usual TV monitor (60i: interlaced), you will sense flicker on horizontal lines and nearly-horizontal diagonal lines. When playing back in progressive environment, or performing post-processing such as edit, set this item to [THIN] or [MID] to obtain images with higher resolution than the images of [THICK] setting. Edits the name of the scene file selected on the [CAM02:SCENE FILE] screen of SmartUI. indicates the factory setting value of scene file number F1. - 123 -
-
 1
1 -
2
-
3
-
4
-
5
-
6
-
7
-
8
-
9
-
10
-
11
-
12
-
13
-
14
-
15
-
16
-
17
-
18
-
19
-
20
-
21
-
22
-
23
-
24
-
25
-
26
-
27
-
28
-
29
-
30
-
31
-
32
-
33
-
34
-
35
-
36
-
37
-
38
-
39
-
40
-
41
-
42
-
43
-
44
-
45
-
46
-
47
-
48
-
49
-
50
-
51
-
52
-
53
-
54
-
55
-
56
-
57
-
58
-
59
-
60
-
61
-
62
-
63
-
64
-
65
-
66
-
67
-
68
-
69
-
70
-
71
-
72
-
73
-
74
-
75
-
76
-
77
-
78
-
79
-
80
-
81
-
82
-
83
-
84
-
85
-
86
-
87
-
88
-
89
-
90
-
91
-
92
-
93
-
94
-
95
-
96
-
97
-
98
-
99
-
100
-
101
-
102
-
103
-
104
-
105
-
106
-
107
-
108
-
109
-
110
-
111
-
112
-
113
-
114
-
115
-
116
-
117
-
 118
118 -
 119
119 -
 120
120 -
 121
121 -
 122
122 -
 123
123 -
 124
124 -
 125
125 -
 126
126 -
 127
127 -
 128
128 -
129
-
130
-
131
-
132
-
133
-
134
-
135
-
136
-
137
-
138
-
139
-
140
-
141
-
142
-
143
-
144
-
145
-
146
-
147
-
148
-
149
-
150
-
151
-
152
-
153
-
154
-
155
-
156
-
157
-
158
-
159
-
160
-
161
-
162
-
163
-
164
-
165
-
166
-
167
-
168
-
169
-
170
-
171
-
172
-
173
-
174
-
175
-
176
-
177
-
178
 |
 |
