Panasonic AG-HPX600PJ Operating Instructions - Page 35
Basic procedures, For shooting
 |
View all Panasonic AG-HPX600PJ manuals
Add to My Manuals
Save this manual to your list of manuals |
Page 35 highlights
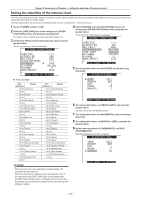
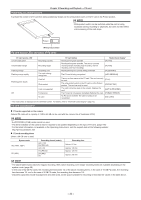
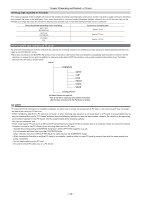
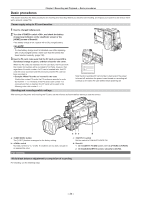
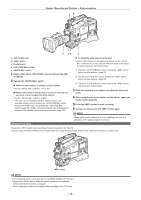
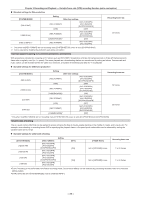
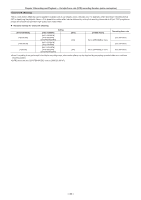
Basic procedures Chapter 3 Recording and Playback - Basic procedures This section describes the basic procedures for shooting and recording. Before you actually start shooting, pre-inspect your system to see ensure that it works properly. (page 154) Power supply setup to P2 card insertion 1 Insert a charged battery pack. 2 Turn the switch , and check the battery charge level indicator on the viewfinder screen or the [HOME] screen of SmartUI. If the battery charge is low, replace with a fully charged battery. @@NOTE tt If a low battery charge level is indicated even after replacing with a fully charged battery, make sure that the battery has been inserted correctly. (page 130) 3 Insert a P2 card, make sure that the P2 card access LED is illuminated orange or green, and then close the slot cover. When two P2 cards are inserted in the P2 card slots, the P2 card with the smaller slot number will be recorded to first. Note, however, that regardless of the slot number, if a P2 card is inserted later, that P2 card will not be accessed until the previously inserted P2 card has been recorded to. ffExample: When P2 cards are inserted in two slots If both slots contain P2 cards, the P2 cards are recorded in order slot number 1 → 2. However, if the P2 card is slot number 1 is removed and then re-inserted, the P2 cards will be used in the following order: slot number 2 → 1. 1 2 Note that the recording P2 card number is held even if the power is turned off, and when the power is next turned on, recording will continue on the same P2 card written before powering off. Shooting and recording switch settings After turning on the power and inserting the P2 card, set the switches as follows before starting to use the camera. a: button The [Y GET] function is assigned in the factory setting. b: switch Normally, set this to (0 dB). If conditions are too dark, set gain to an appropriate value. For shooting a bc d c: switch Set this switch to CAM.AUTO KNEE ON. d: SmartUI 1 On the [SET01:TC/UB] screen, set it to [F‑RUN] or [R‑RUN]. 2 On the [AUD02:INPUT] screen, set [LVL] to [AUTO]. White/black balance adjustment to completion of recording For shooting, use the following steps. - 35 -
-
 1
1 -
2
-
3
-
4
-
5
-
6
-
7
-
8
-
9
-
10
-
11
-
12
-
13
-
14
-
15
-
16
-
17
-
18
-
19
-
20
-
21
-
22
-
23
-
24
-
25
-
26
-
27
-
28
-
29
-
 30
30 -
 31
31 -
 32
32 -
 33
33 -
 34
34 -
 35
35 -
 36
36 -
 37
37 -
 38
38 -
 39
39 -
 40
40 -
41
-
42
-
43
-
44
-
45
-
46
-
47
-
48
-
49
-
50
-
51
-
52
-
53
-
54
-
55
-
56
-
57
-
58
-
59
-
60
-
61
-
62
-
63
-
64
-
65
-
66
-
67
-
68
-
69
-
70
-
71
-
72
-
73
-
74
-
75
-
76
-
77
-
78
-
79
-
80
-
81
-
82
-
83
-
84
-
85
-
86
-
87
-
88
-
89
-
90
-
91
-
92
-
93
-
94
-
95
-
96
-
97
-
98
-
99
-
100
-
101
-
102
-
103
-
104
-
105
-
106
-
107
-
108
-
109
-
110
-
111
-
112
-
113
-
114
-
115
-
116
-
117
-
118
-
119
-
120
-
121
-
122
-
123
-
124
-
125
-
126
-
127
-
128
-
129
-
130
-
131
-
132
-
133
-
134
-
135
-
136
-
137
-
138
-
139
-
140
-
141
-
142
-
143
-
144
-
145
-
146
-
147
-
148
-
149
-
150
-
151
-
152
-
153
-
154
-
155
-
156
-
157
-
158
-
159
-
160
-
161
-
162
-
163
-
164
-
165
-
166
-
167
-
168
-
169
-
170
-
171
-
172
-
173
-
174
-
175
-
176
-
177
-
178
 |
 |
