Panasonic AG-HPX600PJ Operating Instructions - Page 91
Using external DC power supply
 |
View all Panasonic AG-HPX600PJ manuals
Add to My Manuals
Save this manual to your list of manuals |
Page 91 highlights
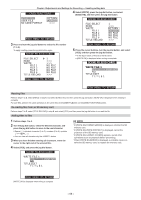
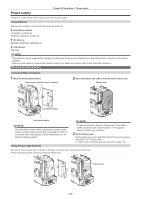
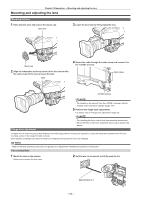
Chapter 5 Preparation - Power supply rr Setting the battery type ffSet the battery type with the [BATTERY SELECT] item on the setting menu [BATTERY SETUP] screen. ffWhen using a battery that is not in the [BATTERY SELECT] item, set [TYPE A] or [TYPE B], and set each item according to the characteristics of the battery. (The default value of [TYPE A] is set to ENDURA HL9 of the IDX battery.) For details, refer to "[BATTERY SETUP] screen" (page 130). @@NOTE tt Contact the point of purchase for information about the V-mount adaptor plate. tt When the V-mount adaptor plate is used, % (percent) display is not possible even if batteries with battery level indicator function are used. Using NP type batteries 1 Mount the V-mount adaptor plate onto the camera. For details, refer to "Using V-mount type batteries" (page 90). 2 Mount the holder plate onto NP type battery case. ffWhen packing comes with the holder plate, apply the packing to the battery case beforehand. 1) Remove the screw on the bottom of the cover, and remove the cover. 5) Align holes on the bottom of the cover (metal part) with holes on the case and mount with the screw. 2) 2) Align the holes in the battery case and the holder plate, and tighten the mounting screw. 3) Tighten the screw for power supply contact. 4) Insert the top of the removed cover in the direction of the arrow. 3) 1) 5) 4) Using external DC power supply 1 Connect the external DC power supply to the terminal of the camera. terminal External DC power supply DC cord 2 Turn on the external DC power supply switch (if there is an external DC power supply switch). 3 Turn the switch of the camera . rr External DC power supply Connect after making sure that the output voltage of the external DC power supply is compatible with the rated voltage of the camera. Select an output amperage for the external DC power supply with a margin above the total amperage of the connected devices. The total amperage of connected devices can be calculated with the following formula. Total power consumption ÷ Voltage When the power of the camera is turned on, inrush current is generated. Insufficient power supply when turning on the power may cause a malfunction. We recommend using an external DC power supply that can assure double the capacity of the total power consumption of the camera and connected devices that are turned on by interlock when the power of the camera is turned on (such as lenses, wireless microphone receivers). For the DC cord, use a dual-core shielded wire of AWG18 (nominal cross section area 0.824 mm2) or thicker. ffMake sure of the pin alignment of the DC output terminal of the external DC power supply and the camera terminal, and connect the polarity correctly. If the +12 V power supply is connected to the GND terminal in error, it may cause fire or malfunction. DC IN 1 GND 2 NC 3 NC 4 +12 V Panasonic Parts No: K1AA104H0038 Manufacturer Parts No: HA16RX-4P (SW1) (76) (Hirose Electric Co.) - 91 -
-
 1
1 -
2
-
3
-
4
-
5
-
6
-
7
-
8
-
9
-
10
-
11
-
12
-
13
-
14
-
15
-
16
-
17
-
18
-
19
-
20
-
21
-
22
-
23
-
24
-
25
-
26
-
27
-
28
-
29
-
30
-
31
-
32
-
33
-
34
-
35
-
36
-
37
-
38
-
39
-
40
-
41
-
42
-
43
-
44
-
45
-
46
-
47
-
48
-
49
-
50
-
51
-
52
-
53
-
54
-
55
-
56
-
57
-
58
-
59
-
60
-
61
-
62
-
63
-
64
-
65
-
66
-
67
-
68
-
69
-
70
-
71
-
72
-
73
-
74
-
75
-
76
-
77
-
78
-
79
-
80
-
81
-
82
-
83
-
84
-
85
-
 86
86 -
 87
87 -
 88
88 -
 89
89 -
 90
90 -
 91
91 -
 92
92 -
 93
93 -
 94
94 -
 95
95 -
 96
96 -
97
-
98
-
99
-
100
-
101
-
102
-
103
-
104
-
105
-
106
-
107
-
108
-
109
-
110
-
111
-
112
-
113
-
114
-
115
-
116
-
117
-
118
-
119
-
120
-
121
-
122
-
123
-
124
-
125
-
126
-
127
-
128
-
129
-
130
-
131
-
132
-
133
-
134
-
135
-
136
-
137
-
138
-
139
-
140
-
141
-
142
-
143
-
144
-
145
-
146
-
147
-
148
-
149
-
150
-
151
-
152
-
153
-
154
-
155
-
156
-
157
-
158
-
159
-
160
-
161
-
162
-
163
-
164
-
165
-
166
-
167
-
168
-
169
-
170
-
171
-
172
-
173
-
174
-
175
-
176
-
177
-
178
 |
 |
