Panasonic AG-HPX600PJ Operating Instructions - Page 98
Preparing for audio input, Using the front microphone, Using a wireless receiver, Using audio devices
 |
View all Panasonic AG-HPX600PJ manuals
Add to My Manuals
Save this manual to your list of manuals |
Page 98 highlights
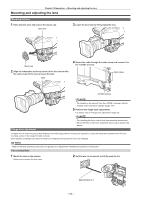
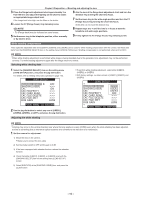
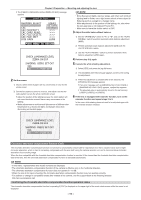
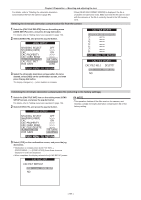
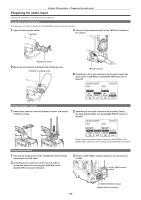
Chapter 5 Preparation - Preparing for audio input Preparing for audio input Prepare the camera for connecting audio input devices. Using the front microphone Microphones such as the microphone kit AG‑MC200G (optional) can be mounted. 1 Open the microphone holder. Viewfinder 3 Connect the microphone cable to the terminal on the camera. Microphone holder 2 Mount the microphone and tighten the clamping screw. Viewfinder clamping screw terminal 4 According to the audio channel to be recorded, switch the input signal to [FRONT] on the [AUD02:INPUT] screen of SmartUI. AUD02:INPUT [CH3/4] CH1 CH2 FRONT FRONT W.L. AUTO W.L. AUTO REAR MANU REAR MANU [ IN ] [ LVL ] [ IN ] [ LVL ] Using a wireless receiver 1 Remove the cover to insert the wireless receiver and secure it with the screws. 2 According to the audio channel to be recorded, switch the input signal to [W.L.] on the [AUD02:INPUT] screen of SmartUI. AUD02:INPUT [CH3/4] CH1 CH2 FRONT FRONT W.L. AUTO W.L. AUTO REAR MANU REAR MANU [ IN ] [ LVL ] [ IN ] [ LVL ] When using a two channel wireless receiver, select [DUAL] in the [WIRELESS TYPE] item on the setting menu [AUDIO SETUP] screen. Using audio devices 1 Connect the audio device to the terminal of the camera with the XLR cable. 2 According to the channel to which the XLR cable is connected, switch the input signal to [REAR] on the [AUD02:INPUT] screen of SmartUI. 3 Set the / selector switch on the rear panel to . / selector switch - 98 - terminal terminal
-
 1
1 -
2
-
3
-
4
-
5
-
6
-
7
-
8
-
9
-
10
-
11
-
12
-
13
-
14
-
15
-
16
-
17
-
18
-
19
-
20
-
21
-
22
-
23
-
24
-
25
-
26
-
27
-
28
-
29
-
30
-
31
-
32
-
33
-
34
-
35
-
36
-
37
-
38
-
39
-
40
-
41
-
42
-
43
-
44
-
45
-
46
-
47
-
48
-
49
-
50
-
51
-
52
-
53
-
54
-
55
-
56
-
57
-
58
-
59
-
60
-
61
-
62
-
63
-
64
-
65
-
66
-
67
-
68
-
69
-
70
-
71
-
72
-
73
-
74
-
75
-
76
-
77
-
78
-
79
-
80
-
81
-
82
-
83
-
84
-
85
-
86
-
87
-
88
-
89
-
90
-
91
-
92
-
 93
93 -
 94
94 -
 95
95 -
 96
96 -
 97
97 -
 98
98 -
 99
99 -
 100
100 -
 101
101 -
 102
102 -
 103
103 -
104
-
105
-
106
-
107
-
108
-
109
-
110
-
111
-
112
-
113
-
114
-
115
-
116
-
117
-
118
-
119
-
120
-
121
-
122
-
123
-
124
-
125
-
126
-
127
-
128
-
129
-
130
-
131
-
132
-
133
-
134
-
135
-
136
-
137
-
138
-
139
-
140
-
141
-
142
-
143
-
144
-
145
-
146
-
147
-
148
-
149
-
150
-
151
-
152
-
153
-
154
-
155
-
156
-
157
-
158
-
159
-
160
-
161
-
162
-
163
-
164
-
165
-
166
-
167
-
168
-
169
-
170
-
171
-
172
-
173
-
174
-
175
-
176
-
177
-
178
 |
 |
