Panasonic AG-HPX600PJ Operating Instructions - Page 118
Displaying the setting menu on the viewfinder screen, Setting menu basic operations, SYSTEM SETUP
 |
View all Panasonic AG-HPX600PJ manuals
Add to My Manuals
Save this manual to your list of manuals |
Page 118 highlights
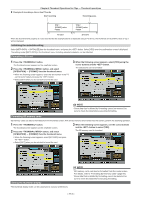
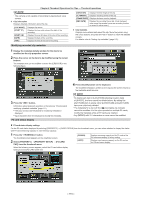
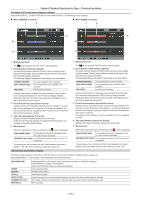
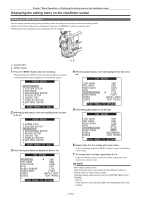
Chapter 7 Menu Operations - Displaying the setting menu on the viewfinder screen Displaying the setting menu on the viewfinder screen Setting menu basic operations You can change camera settings using the setting menu according to the shooting scene and recording details. ffWhen the thumbnail setting menu is displayed, press the button to close the menu. ffSetting menu items displayed in blue characters are not available. a: Jog dial button b: button 1 Press the button when not recording. ffKeep pressing the button for approximately one second. ffThe setting menu screen appears on the viewfinder screen. MAIN MENU 1.SCENE FILE 2.SYSTEM SETUP 3.SW MODE 4.RECORDING SETUP 5.AUDIO SETUP 6.IN/OUT SEL 7.DISPLAY SETUP 8.BATTERY SETUP PUSH MENU TO EXIT 2 With the jog dial button, move the highlight to the function to be set. MAIN MENU 1.SCENE FILE 2.SYSTEM SETUP 3.SW MODE 4.RECORDING SETUP 5.AUDIO SETUP 6.IN/OUT SEL 7.DISPLAY SETUP 8.BATTERY SETUP PUSH MENU TO EXIT 3 Press the jog dial button to display the item to set. SW MODE LOW GAIN MID GAIN HIGH GAIN ATW W.BAL.PRESET USER MAIN USER1 USER2 0dB 6dB 12dB OFF 3.2K Y GET BACK LIGHT TEXT MEMO PUSH MENU TO RETURN ab 4 With the jog dial button, move the highlight to the item to be set. SW MODE LOW GAIN MID GAIN HIGH GAIN ATW W.BAL.PRESET USER MAIN USER1 USER2 0dB 6dB 12dB OFF 3.2K Y GET BACK LIGHT TEXT MEMO PUSH MENU TO RETURN 5 Press the jog dial button to set the item. SW MODE LOW GAIN MID GAIN HIGH GAIN ATW W.BAL.PRESET USER MAIN USER1 USER2 0dB 6dB 12dB OFF 3.2K 5.6K BACKVALRIGHT TEXT MEMO PUSH MENU TO RETURN 6 Repeat steps 4 to 5 to change other menu items. To exit the settings, press the button to return to the setting menu screen. 7 To change other functions, repeat steps 2 to 5. Press the button to close the function setting menu and return to the normal screen. @@NOTE tt Menu direct close function After setting the menu, press and hold the button to directly close the setting menu screen. tt Changing setting values quickly (only for [MASTER PED] and [H PHASE]) - Fast up Press and turn up the jog dial button, and keep pressing it at the position. - 118 -
-
 1
1 -
2
-
3
-
4
-
5
-
6
-
7
-
8
-
9
-
10
-
11
-
12
-
13
-
14
-
15
-
16
-
17
-
18
-
19
-
20
-
21
-
22
-
23
-
24
-
25
-
26
-
27
-
28
-
29
-
30
-
31
-
32
-
33
-
34
-
35
-
36
-
37
-
38
-
39
-
40
-
41
-
42
-
43
-
44
-
45
-
46
-
47
-
48
-
49
-
50
-
51
-
52
-
53
-
54
-
55
-
56
-
57
-
58
-
59
-
60
-
61
-
62
-
63
-
64
-
65
-
66
-
67
-
68
-
69
-
70
-
71
-
72
-
73
-
74
-
75
-
76
-
77
-
78
-
79
-
80
-
81
-
82
-
83
-
84
-
85
-
86
-
87
-
88
-
89
-
90
-
91
-
92
-
93
-
94
-
95
-
96
-
97
-
98
-
99
-
100
-
101
-
102
-
103
-
104
-
105
-
106
-
107
-
108
-
109
-
110
-
111
-
112
-
 113
113 -
 114
114 -
 115
115 -
 116
116 -
 117
117 -
 118
118 -
 119
119 -
 120
120 -
 121
121 -
 122
122 -
 123
123 -
124
-
125
-
126
-
127
-
128
-
129
-
130
-
131
-
132
-
133
-
134
-
135
-
136
-
137
-
138
-
139
-
140
-
141
-
142
-
143
-
144
-
145
-
146
-
147
-
148
-
149
-
150
-
151
-
152
-
153
-
154
-
155
-
156
-
157
-
158
-
159
-
160
-
161
-
162
-
163
-
164
-
165
-
166
-
167
-
168
-
169
-
170
-
171
-
172
-
173
-
174
-
175
-
176
-
177
-
178
 |
 |
