Panasonic AG-HPX600PJ Operating Instructions - Page 36
Standard recording, Recording and Playback - Basic procedures
 |
View all Panasonic AG-HPX600PJ manuals
Add to My Manuals
Save this manual to your list of manuals |
Page 36 highlights
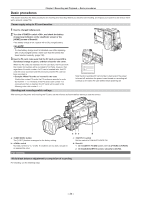
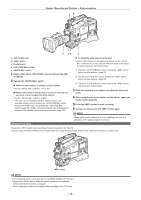
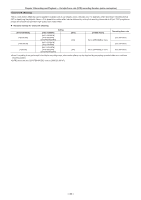
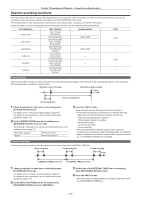
Chapter 3 Recording and Playback - Basic procedures ab b cd e a: dial b: button c: Shutter switch d: switch e: switch 1 Select a filter by the dial according to the light conditions. 2 Operate the switch. rr When the white balance is already saved in memory: ffSet the switch to or . rr When neither white or black balance is saved in memory and you have no time to adjust the white balance: ffSet the switch to . ffThe value can be changed to 3200 K, 5600 K, and the user- specified variable value by pushing the switch towards the side, and pushing the switch towards the side again while the color temperature is displayed. The variable value can be set at SmartUI. (page 140) rr To adjust the white balance on the spot: ffSelect a filter matched to the lighting conditions, set the switch to or , shoot a white test subject, and adjust the white balance by the following steps. 1) Press the switch towards the side to adjust the white balance. (page 53) 2) Set the switch towards the side to adjust the black balance. (page 55) 3) Press the switch towards the side to adjust the white balance again. 3 Point the camera at your subject and adjust the focus and zoom. 4 When using the electronic shutter, set the shutter speed and shutter mode. (page 56) 5 Press the button to start recording. 6 To stop recording, press the button again. @@NOTE tt When highly bright subjects (e.g. sun or lighting) are shot, the periphery of the subject might be colored. Standard recording Pressing the button starts recording of video and sound on the P2 card. A group of data consisting of video and sound generated by a single shooting action, together with additional information, is called a "clip". button @@NOTE tt In the following cases, it may take time to complete writing to the P2 card. Pressing the button does not accept operations immediately. - When short-burst recording is stopped - When stopping recording immediately after recording to two P2 cards - 36 -
-
 1
1 -
2
-
3
-
4
-
5
-
6
-
7
-
8
-
9
-
10
-
11
-
12
-
13
-
14
-
15
-
16
-
17
-
18
-
19
-
20
-
21
-
22
-
23
-
24
-
25
-
26
-
27
-
28
-
29
-
30
-
 31
31 -
 32
32 -
 33
33 -
 34
34 -
 35
35 -
 36
36 -
 37
37 -
 38
38 -
 39
39 -
 40
40 -
 41
41 -
42
-
43
-
44
-
45
-
46
-
47
-
48
-
49
-
50
-
51
-
52
-
53
-
54
-
55
-
56
-
57
-
58
-
59
-
60
-
61
-
62
-
63
-
64
-
65
-
66
-
67
-
68
-
69
-
70
-
71
-
72
-
73
-
74
-
75
-
76
-
77
-
78
-
79
-
80
-
81
-
82
-
83
-
84
-
85
-
86
-
87
-
88
-
89
-
90
-
91
-
92
-
93
-
94
-
95
-
96
-
97
-
98
-
99
-
100
-
101
-
102
-
103
-
104
-
105
-
106
-
107
-
108
-
109
-
110
-
111
-
112
-
113
-
114
-
115
-
116
-
117
-
118
-
119
-
120
-
121
-
122
-
123
-
124
-
125
-
126
-
127
-
128
-
129
-
130
-
131
-
132
-
133
-
134
-
135
-
136
-
137
-
138
-
139
-
140
-
141
-
142
-
143
-
144
-
145
-
146
-
147
-
148
-
149
-
150
-
151
-
152
-
153
-
154
-
155
-
156
-
157
-
158
-
159
-
160
-
161
-
162
-
163
-
164
-
165
-
166
-
167
-
168
-
169
-
170
-
171
-
172
-
173
-
174
-
175
-
176
-
177
-
178
 |
 |
