Panasonic AG-HPX600PJ Operating Instructions - Page 24
Description of Parts - Shooting and recording/playback functions
 |
View all Panasonic AG-HPX600PJ manuals
Add to My Manuals
Save this manual to your list of manuals |
Page 24 highlights
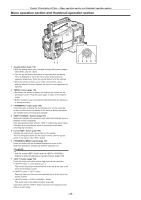
Chapter 2 Description of Parts - Shooting and recording/playback functions section Set the switch to this position when you have no time to adjust the white balance. ffThe factory setting is 3200 K. ffThe color temperature can be changed successively to 3200 K, 5600 K, and the user-specified variable value by the setting menu or by pushing the switch towards the side, and pushing the switch towards the side again while the color temperature is displayed. The variable value can be set at SmartUI. (page 140) / Pressing the switch towards automatically adjusts the white balance and saves the adjusted value to memory A or B. You can also assign the auto tracking white balance (ATW) function to in the setting menu. (page 54) 9 Focal plane index < > Indicates the focal plane of the MOS sensor. It provides a reference for making accurate focal distance measurements from the subject. 10 28 33 29 30 27 26 32 31 25 24 13 14 12 21 11 HOLD COUNTER RESET MONITOR SEL LIGHT TC NDF SLAVE P -REC CAM MEDIA CH1 A E F BATT CH2 E F 0 -10 -18 -20 AUDIO -30 SETUP dB 12 HOME /REW STOP KEY LOCK FF/ PLAY/PAUSE THUMBNAIL SET TOP SHIFT EXIT MULTI SEL MENU CANCEL BOTTOM 22 23 16 17 18 19 20 15 rr Shooting and recording/playback functions section (Recording unit) 10 button (page 36) Press this button to start recording, and press again to stop recording. This button has the same function as the VTR button on the lens side. 11 button Switch the audio channel that is output to the speaker, the terminal, and the terminal to [CH1/2] or [CH3/4] each time you press the button. The channel display of the audio channel level meter is switched together. When the screen other than the [HOME] screen of SmartUI is displayed, the function corresponding to each setting screen is executed. 12 (rewind) button Press this button during a pause to perform fast-reverse playback. Press it during playback to perform fast-reverse playback at approximately 4x speed. If it is pressed with playback paused, the clip being played back is paused at its start point (cued state). When the screen other than the [HOME] screen of SmartUI is displayed, the function corresponding to each setting screen is executed. 13 (fast forward) button Press this button during a pause to perform fast playback. Press it during playback to perform fast playback at approximately 4x speed. If it is pressed with playback paused, the clip being played back is paused at the start point of the next clip (cued state). When the screen other than the [HOME] screen of SmartUI is displayed, the function corresponding to each setting screen is executed. 14 (stop) button Press this button to stop playback. Also press it to stop interval recording and one-shot recording, or to end combining of clips in one-clip recording. When the screen other than the [HOME] screen of SmartUI is displayed, the function corresponding to each setting screen is executed. 15 (play/pause) button Press this button to view the playback image using the viewfinder screen or the monitor screen. Pressing this button during playback pauses playback. When the screen other than the [HOME] screen of SmartUI is displayed, the function corresponding to each setting screen is executed. 16 button Control lighting of SmartUI. Each press toggles lighting of SmartUI on and off. - 24 -
-
 1
1 -
2
-
3
-
4
-
5
-
6
-
7
-
8
-
9
-
10
-
11
-
12
-
13
-
14
-
15
-
16
-
17
-
18
-
 19
19 -
 20
20 -
 21
21 -
 22
22 -
 23
23 -
 24
24 -
 25
25 -
 26
26 -
 27
27 -
 28
28 -
 29
29 -
30
-
31
-
32
-
33
-
34
-
35
-
36
-
37
-
38
-
39
-
40
-
41
-
42
-
43
-
44
-
45
-
46
-
47
-
48
-
49
-
50
-
51
-
52
-
53
-
54
-
55
-
56
-
57
-
58
-
59
-
60
-
61
-
62
-
63
-
64
-
65
-
66
-
67
-
68
-
69
-
70
-
71
-
72
-
73
-
74
-
75
-
76
-
77
-
78
-
79
-
80
-
81
-
82
-
83
-
84
-
85
-
86
-
87
-
88
-
89
-
90
-
91
-
92
-
93
-
94
-
95
-
96
-
97
-
98
-
99
-
100
-
101
-
102
-
103
-
104
-
105
-
106
-
107
-
108
-
109
-
110
-
111
-
112
-
113
-
114
-
115
-
116
-
117
-
118
-
119
-
120
-
121
-
122
-
123
-
124
-
125
-
126
-
127
-
128
-
129
-
130
-
131
-
132
-
133
-
134
-
135
-
136
-
137
-
138
-
139
-
140
-
141
-
142
-
143
-
144
-
145
-
146
-
147
-
148
-
149
-
150
-
151
-
152
-
153
-
154
-
155
-
156
-
157
-
158
-
159
-
160
-
161
-
162
-
163
-
164
-
165
-
166
-
167
-
168
-
169
-
170
-
171
-
172
-
173
-
174
-
175
-
176
-
177
-
178
 |
 |
